 Contact Support
 Sign In


WordPress powers over 40% of all websites on the internet, and there are numerous reasons why. One of the biggest is how simple it is to install. Whether launching your first site or setting up a fresh project, the whole process can take as little as five minutes with the right hosting.
This guide teaches you three ways to install WordPress: one-click installation (the easiest option for most people), manual installation, and local installation for testing.
We also cover what you need before getting started, what to do after WordPress is installed, and how to fix common setup errors. By the end, you’ll have a working WordPress site that’s ready to customize.
KEY TAKEAWAYS
- WordPress can be installed through a one-click installer, manually, or locally on your computer.
- One-click installation is the fastest and easiest option for beginners and most site owners.
- Manual installation requires creating a database, uploading files, and running the setup wizard yourself.
- Local installation is designed for testing and development. It won’t make your site live online.
- After installing WordPress, configure your SSL, permalinks, backups, theme, and essential plugins before publishing anything.
- WordPress hosting simplifies the entire process by handling server configuration, security, and performance.
TABLE OF CONTENTS
Quick Answer: How Do You Install WordPress?
The fastest way to install WordPress is through a one-click installer in your hosting control panel. For this, you need a domain name, WordPress-compatible hosting, and database support.
If you prefer more control, manual installation lets you upload WordPress files and connect a database yourself. There’s also local installation, which runs WordPress on your computer for testing and development, but it doesn’t get your site live on the internet.
Before You Install WordPress: What You Need
Before installation, there are a few things you should have ready to save time and help you avoid issues halfway through the setup.
Domain Name
A domain name is the web address people type into their browser to visit your site. It’s what makes your website accessible online, so choose something short, brand-relevant, and easy to remember.
However, you don’t always need to connect your domain before installing WordPress. Depending on your hosting setup, you can install first and point the domain later.
But having one ready before you start keeps the process running more smoothly. If you haven’t chosen yours yet, register a domain name now before moving to the next step.
WordPress-Compatible Hosting
WordPress can’t run on its own. It needs a hosting server to store your files and make your site available online. Your hosting provider should support the current PHP and MySQL (or MariaDB) versions that WordPress requires to function properly.
For a detailed breakdown of those specs, check out our guide on WordPress hosting requirements.
If you’re a beginner, WordPress hosting is the easiest option. It’s pre-configured for WordPress performance, security, and updates, so there’s less setup on your end. You can learn more about how it works in our WordPress hosting guide.
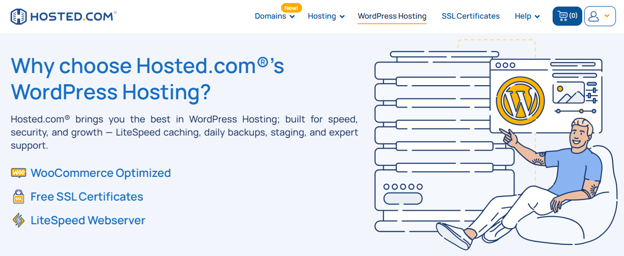
Alternatively, cPanel web hosting also supports WordPress installation through built-in app installers, giving you more flexibility with your server environment.

Database Support
WordPress stores everything in a database, from your posts and pages to user accounts, comments, and site settings. Without it, your site won’t work.
The good news is that if you’re using a one-click installer, the database is created and connected automatically during setup. However, if you’re going the manual installation route, you’ll need to create a database and database user yourself through your hosting control panel before running the WordPress installer.
For a closer look at how WordPress databases work, check out our WordPress database guide.
WordPress Admin Details
During installation, you’ll be asked to enter a few key details for your WordPress admin account. Ensure you have these ready before you begin:
- Your site title.
- An admin username.
- A strong password.
- Valid email address.
Warning: Avoid using admin as your username. It’s the most targeted username in brute-force attacks, and changing it later isn’t straightforward. So, choose something unique that isn’t easy to guess.
FTP or File Manager Access (Manual Installation Only)
This only applies if you’re planning to install WordPress manually. If you’re using a one-click installer, you can skip this step entirely.
Manual installation requires uploading WordPress files to your server, and you will need a way to do this. Most hosting providers include a File Manager in their control panel; this works directly from your browser.

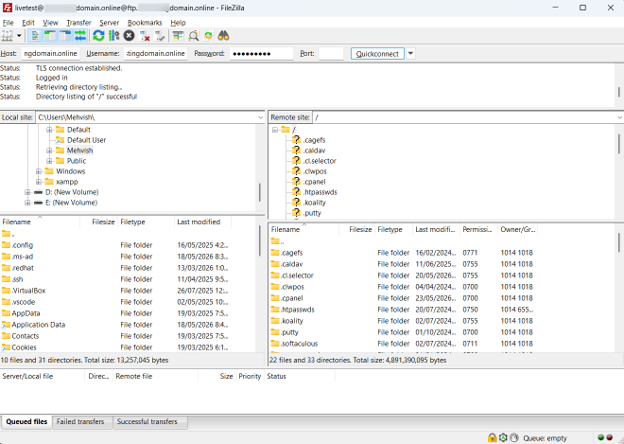
If you’d rather use a dedicated tool, an SSH File Transfer Protocol (SFTP) client like FileZilla is another solid option. Either way, ensure you have access to one of these before starting a manual setup.
Which WordPress Installation Method Should You Choose?
There are three ways to install WordPress, and the right one depends on your experience level and what you’re trying to do. Here’s a quick comparison to help you decide:
| Installation Method | Best For | Skill Level | Notes |
| One-click installation | Beginners and most site owners | Easy | Fastest method through your hosting control panel |
| Manual installation | Developers or advanced users | Moderate to Advanced | Requires database setup and file upload |
| Local installation | Testing and development | Moderate | Runs on your computer, not live online |
For most people, one-click installation is the way to go. It handles the technical setup behind the scenes, so you can have WordPress up and running in minutes without worrying about databases or file uploads.
Let’s start with that method.
Method 1: How to Install WordPress with a One-Click Installer
One-click installation is the simplest and fastest way to get WordPress running on your website. Most hosting providers offer this option through their control panel, and it takes care of the heavy lifting for you.
Here’s how to install WordPress with cPanel:
Step 1: Login to Your Hosting Control Panel
Login to your hosting account and open your control panel. If your host uses cPanel, you’ll find it through your provider’s client portal or dashboard.
Once you’re in, go to Software → Softaculous App Installer.

IMPORTANT:
The exact name varies by provider, but it’s usually easy to spot. For example, some hosting providers label it as “WordPress Installer”, “Auto Installer”, or “Softaculous”.
Step 2: Choose WordPress
Once you’re inside the installer, you’ll see a list of available applications. Find WordPress and click Install to begin the setup.
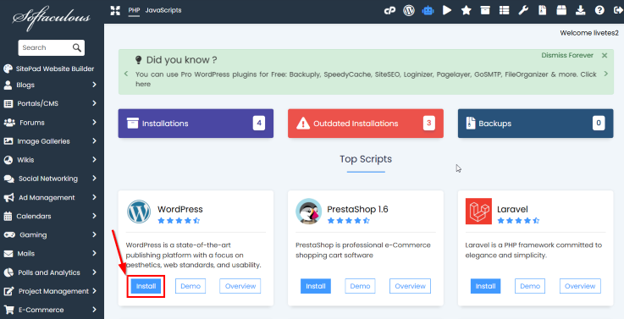
Ensure you’re installing WordPress directly through your hosting provider’s built-in installer. Avoid downloading WordPress files from third-party websites, as they could contain outdated versions, modified code, or security risks. Your control panel installer always pulls the latest official release.
Step 3: Select Your Domain
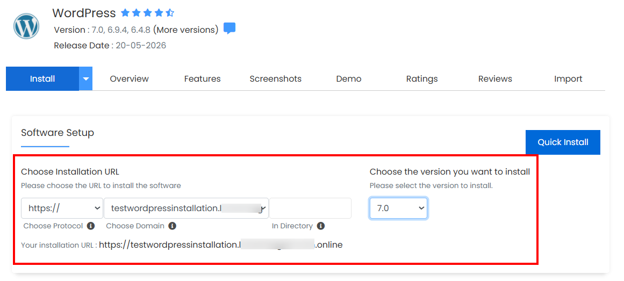
Next, the installer will ask you to choose the domain or subdomain where you wish to install WordPress. If you have multiple domains connected to your hosting account, ensure you choose the right one.
After that, choose your site URL format:
- Select https:// if you want your site to load at yourdomain.com (without www).
- Select https://www. if you want your site to load at www.yourdomain.com (with www).
For most new sites, https:// (without www) is the better choice. It’s shorter, cleaner, and the standard most modern websites follow. However, if you’re moving an existing site that already uses www and has established backlinks and search engine indexing, stick with https://www. to avoid breaking those links.
Both formats work the same way, and there’s no difference in speed or SEO. Just ensure your DNS records match whichever format you choose. Also, consider that changing this after installation means updating your WordPress settings, DNS records, and any redirects, so it’s best to decide before you install.
You’ll also need to decide whether to install WordPress in the root directory or a subfolder.
- Installing it in the root (example.com) means WordPress will power your entire site.
- Installing it in a subfolder (example.com/blog) keeps it in a separate section, which is useful if you only want WordPress to run a blog alongside an existing website.
For most new sites, root directory installation is the better choice, so you can leave the In Directory field empty. Lastly, choose the WordPress version you wish to install.
Step 4: Add Site Details
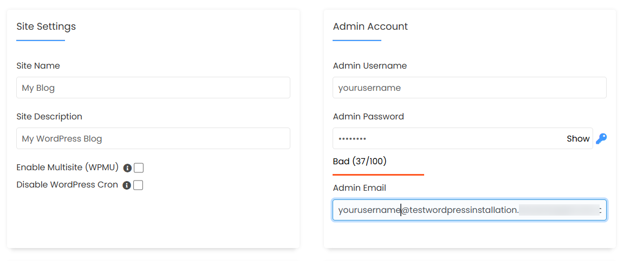
Now it’s time to fill in your site information. The installer will ask for a site title, a short tagline (or description), your admin username, a strong password, and an admin email address.
Your site title and tagline can be changed later from the WordPress dashboard, so don’t overthink them at this stage. However, your admin credentials matter right from the start. Use a unique username, set a strong password, and ensure the email address is one you check regularly, since WordPress will use it for login recovery and important notifications.
Step 5: Choose Installation Settings
Depending on your hosting provider, the installer may show a few additional settings before you proceed. These typically include options for language selection, automatic WordPress updates, and backup preferences.
Some installers also display database settings on this screen. In most cases, the default values work fine, and you won’t need to change anything unless you have a specific reason to do so. If you’re unsure about any option, leave it at the default and move on. These settings can usually be adjusted later.

Step 6: Run the Installation
Once everything looks good, click Install and let the installer do its work. This usually takes less than a minute.
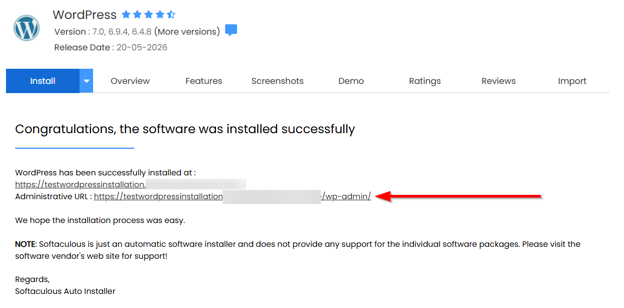
When it’s done, you’ll see a confirmation screen with your WordPress login URL and admin details. Save this information somewhere safe. You’ll need the login URL to access your dashboard, and if you lose your credentials, you’ll have to go through the recovery process before you can even get started.
Step 7: Login to the WordPress Dashboard
Head to the following URL in your browser and login with the admin credentials you set during installation:
yourdomain.com/wp-admin
If the dashboard loads, your WordPress installation was successful.

From here, you can start customizing your site, choosing a theme, installing plugins, and creating content. We cover the essential post-installation steps below.
Method 2: How to Install WordPress Manually
Manual installation gives you full control over every part of the setup. It takes more effort than the one-click method, but it’s a good option if you’re comfortable working with databases and file uploads. Here’s how to do it:
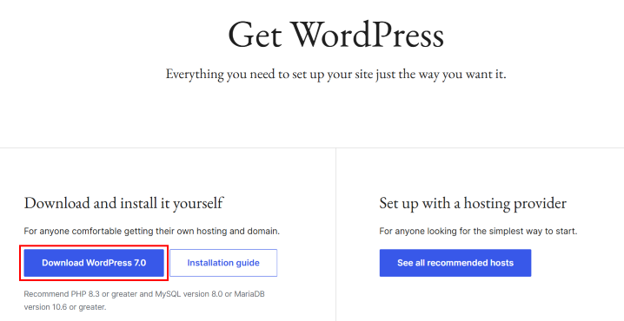
Step 1: Download WordPress from WordPress.org
Go to WordPress.org download page and download the latest version of WordPress. The file will come as a .zip archive that you’ll upload to your server in a later step.
IMPORTANT:
Always download WordPress from the official website. Third-party sources may bundle outdated versions or modified files that could create security vulnerabilities on your site.
Step 2: Create a Database & Database User
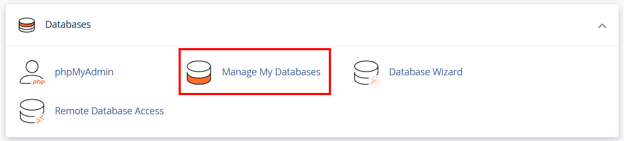
Login to your hosting control panel and navigate to Databases → Manage My Databases.
From there, do the following:
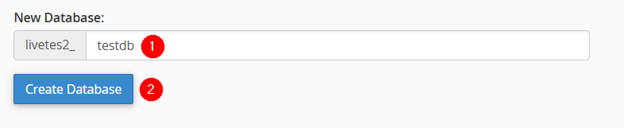
- Create a new database.
- Create a database user.

- Assign that user to the database.
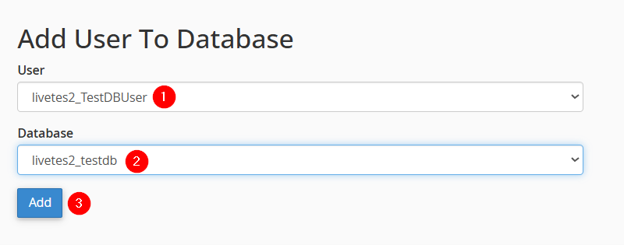
- Now, check ALL PRIVILEGES, and click Make Changes to allow full permissions to a database user.

Once that’s done, write down these four items:
- Database name.
- Username.
- Password.
- The database host (this is usually “localhost”, but your hosting provider may use something different).
You will need all four during the WordPress setup process, so keep them handy.
Step 3: Upload WordPress Files
Extract the WordPress .zip file you downloaded earlier, then drag and drop its contents into your server. You can do this through your hosting control panel’s File Manager or with an SFTP client like FileZilla.
Ensure you upload the files to the correct directory. For most hosting setups, that’s the public_html folder if you want WordPress to load from your main domain.

Once the upload is complete, double-check that the core WordPress files and folders (wp-admin, wp-content, wp-includes) are located inside that directory and aren’t within an additional subfolder.
IMPORTANT:
If you’re using File Manager for the first time, you can look at our How to Use cPanel File Manager guide. However, if you want to use FileZilla, check out How to Configure a Site in FileZilla and How to Upload Files Using FileZilla.
Step 4: Configure the Installation
Open your browser and visit your domain. WordPress will automatically detect that it hasn’t been configured yet and will launch the setup wizard.
The wizard will first ask you to choose your desired language for your website, then click Continue. Next, it will request the database details, specifically the database name, username, password, and host you saved in Step 2.
Enter those and click Submit.

If the connection is successful, WordPress will prompt you to continue with the site setup, where you will enter your site title, admin username, password, and email address.
IMPORTANT:
This will create a wp-config.php file with these provided database credentials, so ensure you delete the wp-config-sample.php file.

Once you’ve filled everything in, click Install WordPress, and WordPress will take care of the rest.
Step 5: Secure the Installation
With WordPress installed, take a few minutes to lock things down before you start building. Ensure your admin password is strong, and if you haven’t already, update WordPress to the latest version immediately. Updates often include critical security patches that you don’t want to skip.
You should also install an SSL certificate if one isn’t already active on your domain. SSL enables HTTPS, which encrypts data between your site and its visitors. It’s essential for protecting user information and building trust with your audience.
Method 3: How to Install WordPress Locally
Local installation runs WordPress on your own computer rather than on a live server. It’s useful for testing themes and plugins, learning how WordPress works, or building a site before going online. Just remember that a local site isn’t accessible to anyone else; it only exists on your machine until you migrate it to a hosting provider.
To set up a local environment, you’ll need a tool that simulates a web server on your computer. Popular options include Local, XAMPP, MAMP, and WAMP. Local is the most beginner-friendly of the bunch, while XAMPP and MAMP offer more flexibility for advanced users.
Basic Local Installation Steps
The general process is the same, regardless of which tool you choose.
- First, download and install your preferred local development tool.
- Once it’s running, create a new WordPress site in the tool and configure your environment settings, such as the PHP version and server type.
- After setup, the tool will provide a local URL to access your WordPress dashboard.
- From there, you can build, test, and experiment with your site just like you would on a live server.
When you’re ready to go live, you’ll need to migrate the site to your hosting account using a migration plugin or manual export.
What to Do After Installing WordPress
Getting WordPress installed is just the first step. Before you start publishing content, there are a few important settings to configure to ensure your site is secure, functional, and ready for visitors.
Update WordPress, Themes, & Plugins
The first thing to do after logging in is to check for updates. Go to Dashboard → Updates and ensure WordPress core, your default themes, and any pre-installed plugins are all updated.

Updates fix known security issues and improve compatibility, so it’s best to start fresh.
Set Your Permalink Structure
WordPress defaults to a URL structure that isn’t very clean or SEO-friendly. To fix this, navigate to Settings → Permalinks and switch to Post name. Then, click Save Changes.

This gives you readable URLs like yourdomain.com/your-post-title instead of yourdomain.com/?p=123, which is better for both search engines and visitors.
Install an SSL Certificate
If you didn’t set up SSL during installation, now’s the time. An SSL certificate enables HTTPS on your site, which encrypts data between your server and your visitors’ browsers. It protects sensitive information, improves SEO, and shows users that your site is trustworthy.
Choose a WordPress Theme
Your theme controls how your site looks and feels, so select one that’s responsive, lightweight, and well-maintained. Avoid bloated themes with features you’ll never use, as they can slow down your site. If you’re unsure where to start, check out our list of WordPress themes to find a solid option.
Install Essential Plugins
Plugins add functionality that WordPress doesn’t include out of the box. At a minimum, you’ll want plugins for SEO, security, backups, caching, and a contact form. Don’t go overboard, though. Every plugin you install adds weight to your site, so stick to the ones you need.
Create Core Pages
Before driving any traffic, set up the essential pages your visitors will expect to find:
- Homepage.
- About page.
- Contact page.
- Services or products page.
- Privacy policy.
These pages give your site structure and credibility from day one.
Set up Backups
When running a WordPress site, things can go wrong, whether it’s a bad plugin update, a server issue, or an accidental deletion. When any of this happens, a website backup helps you restore your site quickly.
To back up your website files and database, we’ve written a detailed tutorial at the following link: How to Back up Your WordPress Site: A Comprehensive Guide.
Expert Tip:
Always have a backup in place before making major changes. It’s also worth setting up WordPress uptime monitoring, so you’re notified immediately if your site goes down.
Connect Analytics & Search Console
Finally, connect your site to Google Analytics and Google Search Console.
- Analytics shows you who’s visiting your site and what they’re doing.
- Search Console helps you track how your pages perform in search results.
Setting these up early gives you useful data from the start.
Common WordPress Installation Errors & How to Fix Them
Even with a smooth WordPress setup guide, things can occasionally go wrong. In this quick WordPress installation troubleshooting section, we show you the most common errors and how to fix them.
Error Establishing a Database Connection
This is one of the most frequent installation errors, and it almost always comes down to incorrect database credentials. Open your wp-config.php file and verify that the database name, username, password, and host match exactly what you set up in your hosting control panel.
If the credentials are correct, the database server itself may be down, or the user may not have the correct permissions. In that case, contact your hosting provider to confirm the server status and check your database user privileges.
IMPORANT:
To dive deeper, refer to the tutorial, Fix An Error Establishing a Database Connection in WordPress.
White Screen of Death
A blank white screen usually means something is crashing behind the scenes. The most common causes are plugin or theme conflicts, PHP errors, and memory limits being exceeded.
To troubleshoot, try disabling all plugins by renaming the wp-content/plugins folder through your File Manager or SFTP. If the screen returns, reactivate plugins one at a time to find the culprit.
You can also switch to a default WordPress theme and check your server’s error logs for more specific clues.
Missing Files Error
If WordPress tells you files are missing during installation, the upload was likely incomplete, or the files ended up in the wrong directory.
To resolve this, return to your server and verify that all core WordPress folders (wp-admin, wp-content, and wp-includes) are present in the correct location. If anything looks off, delete the incomplete files and re-upload a fresh copy from WordPress.org.
Internal Server Error
An internal server error (HTTP 500) can be tricky because it doesn’t give you much detail. Common causes include a corrupted .htaccess file, PHP memory limits, or a plugin conflict.
To fix this, start by renaming your .htaccess file to something like .htaccess_old. If that fixes the issue, go to Settings → Permalinks in your WordPress dashboard and click save to generate a fresh .htaccess file. If the problem persists, check your PHP error logs or reach out to your hosting provider’s support team.
For a detailed troubleshooting guide, refer to the following guide: How to Fix the WordPress 500 Internal Server Error.
404 Errors After Installation
If your pages or posts return 404 errors right after WordPress installation steps, your permalink settings may need a quick refresh. To do this, go to Settings → Permalinks in your WordPress dashboard, then click Save Changes without making any changes.
This forces WordPress to regenerate its rewrite rules. If that doesn’t fix it, check whether your .htaccess file exists in the root directory and contains the correct WordPress rewrite rules.
Domain Not Loading After Installation
If your domain isn’t loading your new WordPress site, the issue is usually outside of WordPress itself. The most common reason is DNS propagation, which can take up to 48 hours after pointing your domain to a new hosting server.
So, double-check that your nameservers are set correctly and that your domain is properly connected to your hosting account. However, if you haven’t set up your domain yet, you can register it now and connect it through your hosting dashboard. Also, ensure SSL is configured if your site is set to load over HTTPS.
WordPress Installation Checklist
Use this checklist to ensure you haven’t missed anything during the WordPress installation guide:
- Domain registered and ready to use.
- Hosting account active.
- WordPress-compatible hosting confirmed (PHP and MySQL/MariaDB support).
- Database created, either automatically or manually.
- Admin username and password set.
- WordPress installed successfully.
- Domain connected to hosting.
- SSL certificate active (HTTPS working).
- WordPress dashboard accessible.
- Permalink structure configured.
- Theme installed and activated.
- Essential plugins installed (SEO, security, backups, caching, contact form).
- Automated backups enabled.
- Core pages created (homepage, about, contact, privacy policy).
- Site tested on both desktop and mobile.
If everything on this list checks out, your WordPress site is ready to go.
How Hosted.com® Helps You Install WordPress
Installing WordPress is easier when your domain, hosting, SSL, and support are all managed from a single place. That’s exactly what Hosted.com® is designed for.
Our WordPress hosting is built specifically for WordPress sites, with server environments optimized for performance, security, and reliability. You get a one-click WordPress installation, so the entire setup takes minutes instead of hours. There is no manual database configuration, no file uploads, and no guesswork.
You can also register your domain name and manage it alongside your hosting from a single dashboard. Plus, SSL certificates are also available on all WordPress hosting plans to secure your site from day one. However, if you run into any issues during setup, our support team is here to assist.
We also offer cPanel web hosting for users who prefer a traditional control panel environment with more hands-on server management. Whichever option you choose, you’ll have the tools and support you need to get your WordPress site up and running smoothly.
![Strip Banner Text - Skip the setup headaches. Install WordPress with one click on Hosted.com®. [Learn More]](/articles/wp-content/uploads/2026/07/install-wordpress-04.webp "Hosted® WordPress - Skip the setup headaches. Install WordPress with one click on Hosted.com®. [Learn More]")
How to Write and Publish Your First WordPress Blog Post
VIDEO: How to Write and Publish Your First WordPress Blog Post
FAQS
What is the easiest way to install WordPress?
The easiest way is through a one-click installer in your hosting control panel. It handles the database setup, file configuration, and installation automatically. Most beginners can have WordPress running in under five minutes using this method.
How do I install WordPress on my website?
Login to your hosting control panel, open the WordPress installer, select your domain, enter your site details, and click install. Once the installation is complete, you can access your WordPress dashboard at yourdomain.com/wp-admin.
Do I need hosting to install WordPress?
Yes. WordPress needs a web server to run and be accessible online. Without hosting, there’s no place to store your site’s files or database. The only exception is local installation, which runs WordPress on your own computer for testing purposes.
Can I install WordPress without a domain?
You can install WordPress on hosting setups using a temporary URL or server IP address. However, you’ll need a domain name before your site can go live with a proper web address. It’s best to have one ready before you start.
Can beginners install WordPress?
Absolutely. One-click installation is designed to be beginner-friendly and requires no technical knowledge. You fill in a few details, and the installer does the rest. Manual installation takes more effort, but it’s still manageable if you follow the steps carefully.
What’s the difference between one-click and manual WordPress installation?
One-click installation automates the entire process through your hosting control panel, including database creation and file setup. Manual installation requires you to download WordPress yourself, create a new database, upload the files to your server, and run the setup wizard on your own.
How do I install WordPress locally?
Download a local development tool like Local, then create a new WordPress website within the tool. It sets up a server environment on your computer for you to build and test your site offline before migrating it to live hosting.
Why is my WordPress installation showing a database connection error?
This usually means the database credentials in your wp-config.php file don’t match what’s set up in your hosting control panel. Double-check the database name, username, password, and host. If everything looks correct, your database server may be down, or the user may not have the right permissions.
What should I do after installing WordPress?
Start by updating WordPress, themes, and plugins to the latest versions. Then, configure your permalink structure, install an SSL certificate, choose a theme, add essential plugins, create your core pages, and set up backups. Connecting Google Analytics and Search Console early on is also a good idea.
Can I move a local WordPress site to live hosting?
Yes. You can migrate a local WordPress site to a live server using a migration plugin or by manually exporting your database and uploading your files. You also need to update your site URL and database settings to match your live hosting environment.
Other Blogs of Interest
– What Is WordPress Hosting – Beginner Guide
– How To Launch A WordPress Site
– Gutenberg WordPress Editor – Features, Blocks And How It Works
– The History Of WordPress: How It Evolved Into Today’s Leading Website Platform
– WordPress Database Guide: MySQL, Management & Optimization Basics
- About the Author
- Latest Posts

Rhett isn’t just a writer at Hosted.com – he’s our resident WordPress content guru. With over 6 years of experience as a content writer, with a background in copywriting, journalism, research, and SEO, and a passion for websites.
Rhett authors informative blogs, articles, and Knowledgebase guides that simplify the complexities of WordPress, website builders, domains, and cPanel hosting. Rhett’s clear explanations and practical tips provide valuable resources for anyone wanting to own and build a website. Just don’t ask him about coding before he’s had coffee.