Keeping your WordPress website updated is extremely important. It helps protect your website from hackers and keeps everything running smoothly. Update fix bugs, improve performance, and add new features that make your site better and faster.
For many website owners, staying on top of updates can feel like a huge task, especially if you’re busy managing other things. That’s where automatic updates come in. They take care of updates for you, ensuring your WordPress site stays secure and up-to-date without needing your constant attention.
Automatic updates ensure you don’t worry about missing important fixes or improvements. They work in the background so you can focus on growing your website or creating amazing content while your site stays safe and functional. This feature is helpful for those who don’t have a technical background or wish to save time.
This tutorial explores everything you need to know about WordPress automatic updates, why they’re essential, and how to make the most of them.
KEY TAKEAWAYS
- Automatic updates in WordPress help keep your site secure, updated, and running smoothly.
- Enable updates for the WordPress core, plugins, and themes to save time and reduce risks.
- Regularly monitor your site after updates to catch and fix any potential issues early.
- Always use plugins and themes provided by trusted developers to ensure compatibility with new WordPress versions.
- Back up your site before updates to prevent data loss if something goes wrong.
- Configure email notifications to stay informed about updates applied to your site.
- Use tools like WordPress plugins or hosting dashboards to manage updates efficiently.
- Monitor update logs to track changes and troubleshoot problems if needed.
- Follow best practices to enjoy the benefits of WordPress automatic updates without worrying about unexpected issues.
TABLE OF CONTENTS
Understand WordPress Automatic Updates
Auto update in WordPress is a built-in feature that keeps your website updated without needing to do anything manually. They handle essential tasks like resolving bugs. Instead of logging in and updating your site whenever there’s a new release, WordPress does it for you automatically.
This feature is useful for busy WordPress website owners or anyone who may forget to update their site. By enabling WordPress auto updates, you ensure your website remains secure, fast, and in line with the latest improvements, all without requiring constant attention.
How do Automatic Updates Work?
WordPress has a reliable system for managing automatic updates. It regularly checks its servers for new updates to the WordPress core software, themes, or plugins. When there is an update, WordPress downloads and installs it directly on your site. This happens behind the scenes, so your website stays updated without disrupting your work or visitors.
By default, WordPress automatically applies minor core updates, such as security patches and bug fixes. These updates are crucial for protecting your site from vulnerabilities. However, major updates, which introduce significant changes or new features, are not enabled by default. If you want automatic major updates to your site, you can change the WordPress settings manually or use a plugin to manage them.
In addition to core software, WordPress can update themes, plugins, and translation files if you enable these options. This ensures your entire website ecosystem stays in sync, preventing compatibility issues and keeping everything running smoothly. With automatic updates, your WordPress site is always current and ready for visitors.
Significance of Updating WordPress
It’s advisable to keep your WordPress site updated constantly. Regular updates are important for maintaining your website’s security and functionality. Whenever an update is released, you should apply it right away. Here are some key advantages of updating WordPress:
Enhanced Security
One of the biggest benefits of enabling automatic updates is better security for your website. Hackers often look for weaknesses in older versions of WordPress, plugins, and themes. These vulnerabilities can make your site an easy target.
However, WordPress automatic updates fix these vulnerabilities as soon as new patches are released, reducing the chances of your site being hacked. With timely updates, your site stays protected without you needing to remember to check for updates manually.
Improved Performance
WordPress automatic updates can also improve how fast and smoothly your website works. Updates often include code improvements that optimize your site’s speed and functionality. A faster website provides a better experience for your visitors and helps with SEO rankings, as search engines prioritize sites that load quickly.
Access to New Features
Every WordPress update comes with exciting new features designed to make managing your site easier and more efficient. For example, recent updates have added tools to improve website security, enhance customization options, and simplify processes like adding images or switching from HTTP to HTTPS.
With automatic updates, you won’t miss out on these helpful features. They’ll be added to your site as soon as they are released, keeping your website modern and user-friendly.
Bug Fixes
Like any software, WordPress can sometimes have bugs – small errors that cause issues on your site. These bugs may make certain features stop working or cause unexpected glitches. Updates often contain fixes for these bugs, ensuring your website works smoothly. Automatic updates mean these fixes are immediately applied, helping you avoid downtime or frustration for your visitors.
Types of WordPress Updates
There are 4 types of WordPress updates:
- WordPress Core Updates
- Plugin Updates
- Theme Updates
- Translation File Updates.
Let’s go through them.
Core Updates
WordPress core updates are the updates that apply to the main WordPress software. These updates are divided into 2 types:
- Major Updates
- Minor Updates.
Major updates introduce big changes like new features, improved designs, or significant enhancements to how WordPress works. Minor updates focus on fixing security issues and small bugs. Minor updates happen automatically by default to keep your site secure, while major updates often require manual approval unless WordPress automatic updates are enabled.
Plugin Updates
Plugins add extra features to your WordPress site, like contact forms, image galleries, or SEO tools. Keeping your plugins updated is essential for 2 main reasons: compatibility and security.
Outdated plugins can create conflicts with the latest WordPress version or other plugins which can break your site. They may also have vulnerabilities that hackers can exploit. Regular updates ensure your plugins work smoothly and protect your site from threats.
Theme Updates
Themes control the design and layout of your WordPress site. When theme updates are released, they often include improvements to appearance, bug fixes, and compatibility with the latest WordPress version.
If you don’t update your theme, you may miss out on these enhancements, and your site could look outdated or have errors. However, it’s important to back up your site before updating a theme, as changes may affect how the site looks or functions if you’ve customized the theme.
Translation File Updates
Translation file updates are for WordPress sites that use multiple languages. These updates ensure the text on your site, like buttons or error messages, is translated correctly.
Remember, it is crucial to keep translation files updated if your site serves a global audience. Updated translation files fix mistakes and add new translations, improving the user experience for visitors who speak different languages.
Now that you know what WordPress automatic updates are, how they work, and what different types of WordPress updates are, let’s explore what to do before enabling WordPress auto updates.
Prepare for Automatic Updates
Before applying any updates to your WordPress site, create a backup. It helps if something goes wrong during the update process. Although automatic updates are designed to run smoothly, issues like compatibility problems or interrupted updates can sometimes cause errors. If you have a website backup, you can easily restore it to its previous state.
There are many reliable ways to back up your website. One of the popular WordPress backup plugins is UpdraftPlus. These tools let you create backups of your site’s files and database with just a few clicks.
You can also schedule WordPress automatic backups, so you don’t have to remember to do it manually. Another option is using your hosting provider’s backup feature, which is included in many hosting plans. If you’re a Hosted® user, you can enjoy daily automatic backups on all WordPress hosting plans to ensure your website remains protected, no matter what happens.
After backing up your website files to your computer or a cloud storage platform, you can enable automatic updates for WordPress. Additionally, it’s best to avoid updating WordPress core files, plugins, and themes simultaneously. Update each component individually to ensure everything functions as expected.
How to Manage Automatic Updates
There are 5 ways to manage WordPress automatic updates:
- Use WordPress Dashboard
- Update wp-config.php File
- Use WordPress Plugins
- Use API Filters
- Use the Hosted® Dashboard.
Use WordPress Dashboard
WordPress introduced automatic updates in version 3.7 to make website maintenance easier. Before this, keeping your site updated meant manually downloading and installing updates, which was time-consuming. Also, in the early days, even automatic updates required coding knowledge to tweak the settings.
Since the release of WordPress 5.5, managing automatic updates has become much simpler. You can now enable and manage updates for your WordPress core, themes, and plugins directly from the dashboard, which makes the process quick and user-friendly for everyone, even beginners. Here’s how:
To enable WordPress automatic updates for all major releases, go to your WordPress Admin Dashboard and click Dashboard → Updates. Look for Current version: x.x.x section. If your site is set to receive minor updates only, you’ll see this message:
“This site is automatically kept up to date with maintenance and security releases of WordPress only”.
Click the link called Enable automatic updates for all new versions of WordPress.

Once enabled, the message will change to:
“This site is automatically kept up to date with each new version of WordPress”.

If you prefer to stick with updates for minor fixes and security patches rather than major changes, you can easily revert by going through the following steps:
Go to Dashboard → Updates. Click Switch to automatic updates for maintenance and security releases only. This ensures your site remains stable while still receiving important security updates.

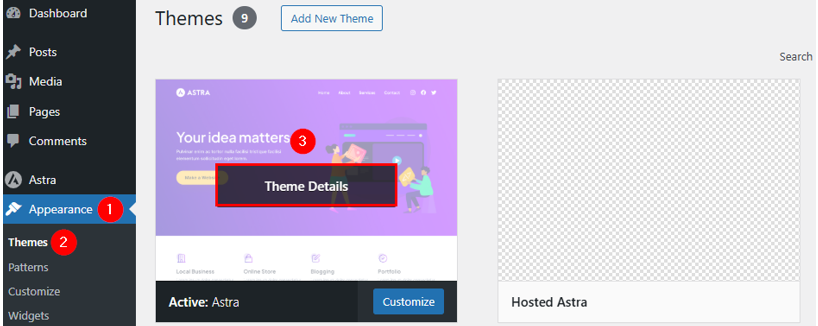
Next, updating your themes is essential to maintain compatibility with WordPress and other plugins. To enable automatic updates for a theme:
Navigate to Appearance → Themes. Hover over your theme and click Theme Details.
Under the theme’s title and author information, click Enable auto-updates.
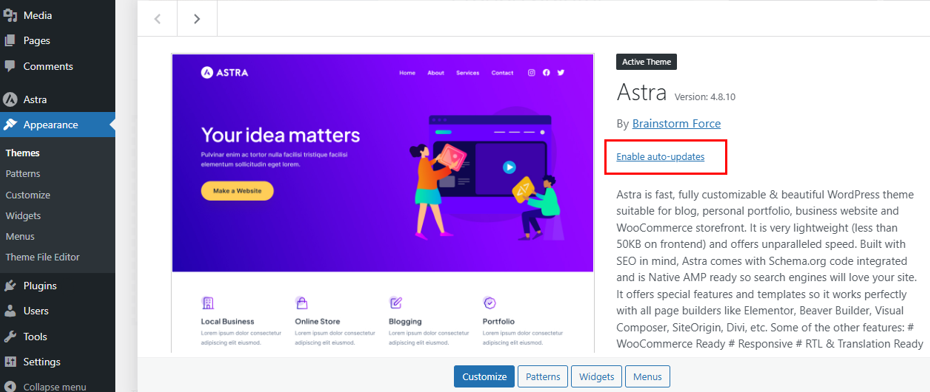
This way, your WordPress theme will always stay updated without requiring manual intervention.
However, to enable automatic updates for WordPress plugins:
Go to Plugins → Installed Plugins. Locate the plugin you want to update automatically. Then, click Enable auto-updates next to the plugin.

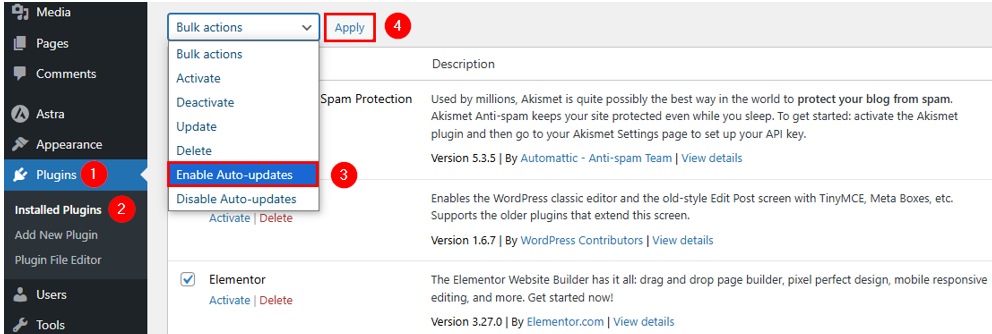
On the same Installed Plugins page, mark the checkboxes next to the plugins you wish to update. Then, use the Bulk actions drop-down menu and select Enable auto-updates. Lastly, click Apply to enable automatic updates for all selected plugins simultaneously.
Update wp-config.php File
If you want more control over WordPress automatic updates, you can adjust the wp-config.php file. This file stores important settings for your WordPress site. Here’s how to configure it:
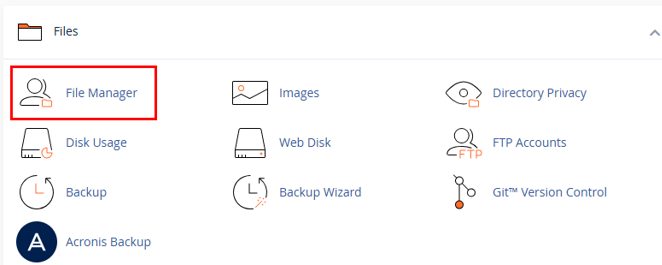
Use an FTP client like FileZilla or your hosting provider’s File Manager to locate the wp-config.php file in the root folder of your WordPress installation. For this tutorial, we use the Hosted® File Manager feature. Here’s how:
Login to the Hosted® cPanel. Go to Files → File Manager.
Once in File Manager, navigate to the public_html folder, right-click on the wp-config.php file, and choose Edit.
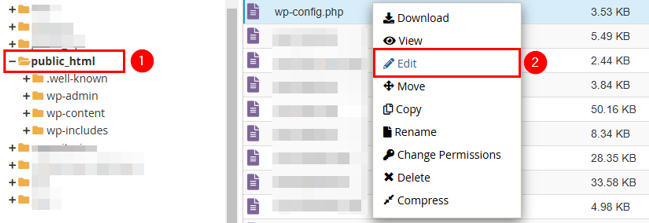
Then, to enable all core updates, add this line of code:
define('WP_AUTO_UPDATE_CORE', true);

To disable all core updates, use:
define('WP_AUTO_UPDATE_CORE', false);

However, if you want to allow only minor updates (default behavior), use:
define('WP_AUTO_UPDATE_CORE', 'minor');
Once you make these changes, save the file (or upload it back to your server if you used an FTP client to edit the wp-config.php file).
Keep your site secure and up-to-date with Hosted®’s WordPress Hosting, featuring a Smart Update tool that automatically updates plugins.
This tool also checks for breaks on your pages, ensuring your site remains fully functional at all times.
Use WordPress Plugins
For an easy way to control WordPress automatic updates without editing files, choose plugins. These tools give you advanced control over updates for WordPress core, plugins, and themes. For this tutorial, we use the Easy Updates Manager plugin. It allows you to enable or disable automatic updates for core, plugins, themes, and more.
Here’s how to use the Easy Updates Manager plugin to let WordPress enable automatic updates for core, plugins, and themes:
First, install and activate this plugin. Next, navigate to Dashboard → Updates options. This will open the Easy Updates Manager plugin’s settings page, where you can control all update options.
On the settings page, ensure you’re on the General tab. Scroll to WordPress core updates. Select Auto update all releases. This includes both major and minor updates.
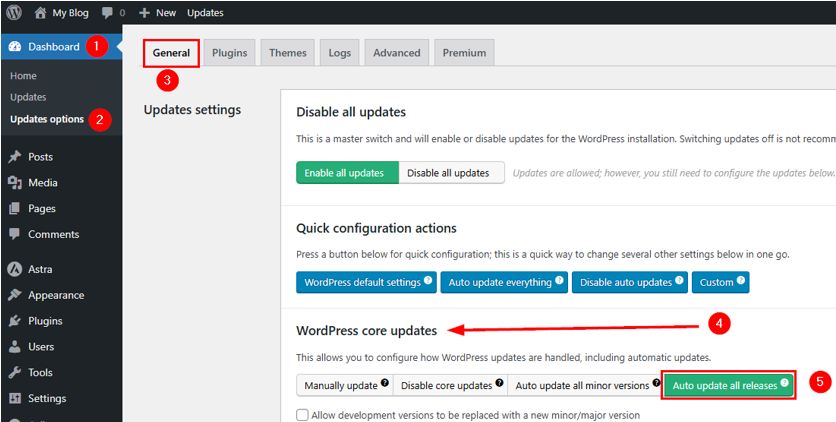
After that, scroll down to Plugins updates and choose Enable auto updates. Remember, this will enable automatic updates for all plugins. For specific plugins to get updated automatically, select Choose per plugin.

Similarly, locate the Themes updates section. Choose Enable auto updates to turn on updates for all installed themes or enable Choose per theme for specific ones.

IMPORTANT:
If you select Choose per plugin or Choose per theme, ensure you switch Plugin to Theme and switch on automatic updates for your required plugins or themes.
Returning to the General tab, if you scroll a little further, you can also enable auto-updates for translation files.

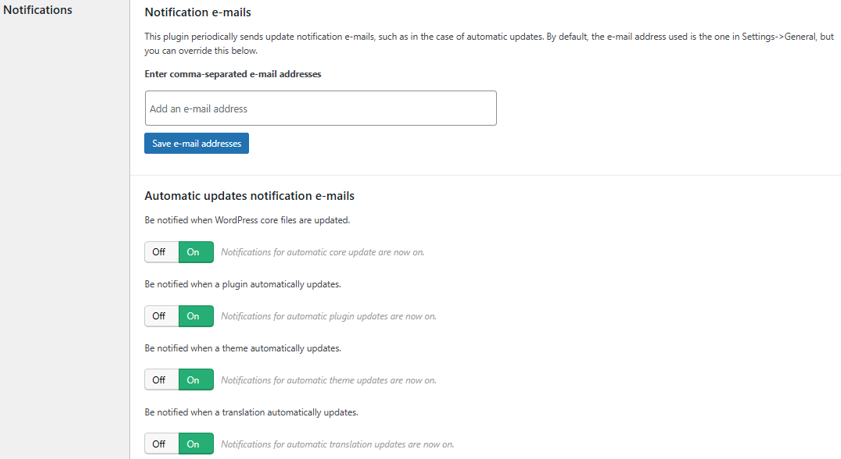
Furthermore, you can also enable or disable email notifications for updates.
Use API Filters
API filters in WordPress are a powerful way to control automatic updates. These filters act like switches that allow you to turn certain updates on or off and fine-tune how they work.
They are useful for managing updates to the WordPress core, plugins, and themes without relying on default settings. By using API filters, you gain flexibility, such as enabling only minor updates or controlling automatic updates for specific plugins. This approach helps keep your site secure and running smoothly while giving you full control over updates.
One of the best ways to apply API filters is through must-use plugins, also called mu-plugins. These plugins are automatically enabled and run on your site without manual activation, making them perfect for consistency.
You can find the mu-plugins folder in the wp-content directory. To create a must-use plugin, add a new PHP file to this folder, and include your desired API filters, and they automatically control how updates work on your site.
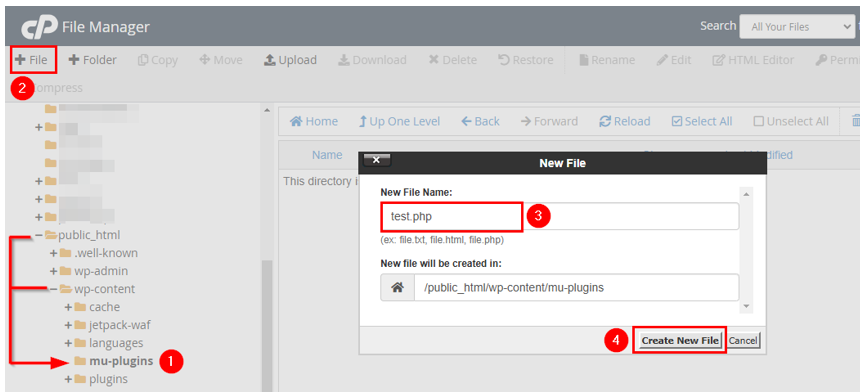
For example, if you wish to disable all WordPress automatic updates on your site, you can add the following filter to your mu-plugin file:
add_filter( 'automatic_updater_disabled', '__return_true' );If you’d prefer to enable automatic updates for all WordPress core types, use this code:
add_filter( 'auto_update_core', '__return_true' );These filters offer the flexibility to turn updates on or off based on your preferences.
Sometimes, you can manage specific core updates instead of enabling all updates. For instance, you can use filters to allow only minor updates, major updates, or development updates. To enable major updates, add this code:
add_filter( 'allow_major_auto_core_updates', '__return_true' );

Similarly, for minor updates, use:
add_filter( 'allow_minor_auto_core_updates', '__return_true' );

For development updates, which are often used for testing, you can include:
add_filter( 'allow_dev_auto_core_updates', '__return_true' );
However, if you wish to disable any updates, replace true with false.

API filters can also manage updates for plugins and themes. To enable automatic updates for all plugins, use this code:
add_filter( 'auto_update_plugin', '__return_true' );

For themes, add the following filter:
add_filter( 'auto_update_theme', '__return_true' );

Add the following line to manage WordPress automatic updates for translation files:
add_filter( 'auto_update_translation', '__return_true' );
When you apply these filters, you ensure your plugins and themes stay updated automatically, ensuring your site is secure and functional.
Manage Automatic Updates via Hosted® Dashboard
If you’re hosting your website on Hosted®, managing automatic updates for your WordPress site is incredibly easy through its dashboard. Hosted offers user-friendly tools to enable, customize, or disable updates without diving into complicated settings.
Here is a step-by-step way to manage WordPress automatic updates using the Hosted® dashboard:
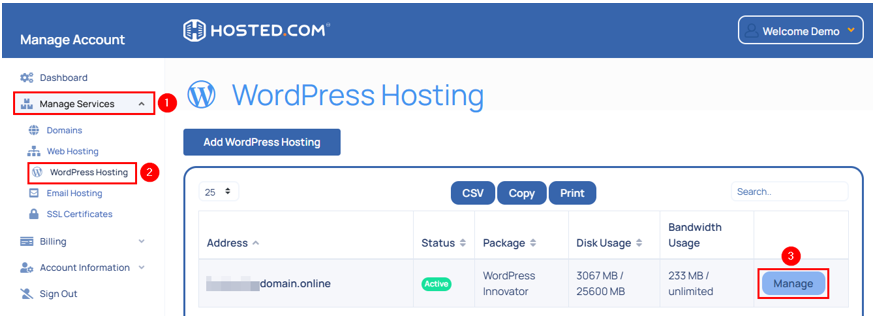
First, log in to your Hosted account. Once logged in, navigate to the Manage Services → WordPress Hosting and click Manage (located next to your desired domain name).
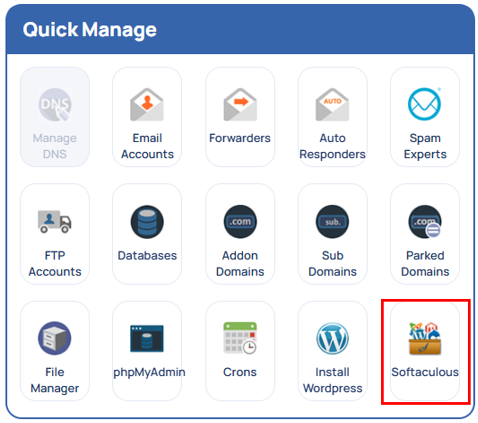
Next, locate the Quick Manage area and click Softaculous.
Then, click WordPress Manager. This will open a dashboard dedicated to managing your WordPress site.

Click on the downward arrow (V) for your selected WordPress installation and choose the following settings:
- Choose Upgrade to latest version available (Major as well as Minor) for Auto Upgrade WordPress Core. Optionally, you can enable automatic minor updates if you wish.
- Select Enabled for Auto Upgrade WordPress Plugins and Auto Upgrade WordPress Themes. Remember, this enables automatic updates for all the installed themes and plugins.
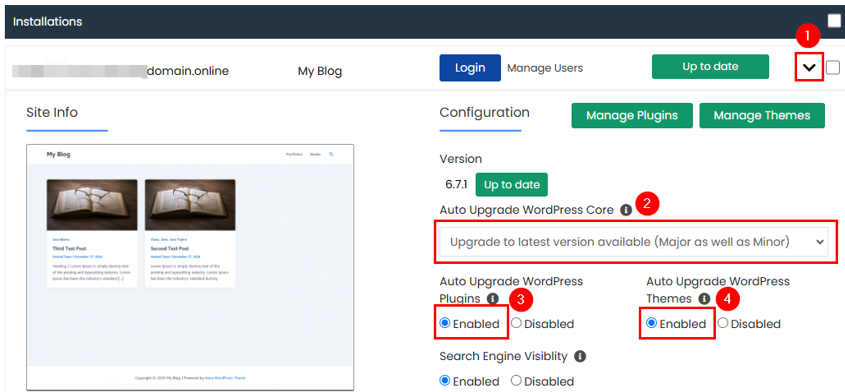
Once you’ve chosen your preferred update settings, Hosted® will take care of updates based on your configuration. After enabling WordPress automatic updates, monitor your site regularly. Check for any changes or errors after updates are applied to ensure everything runs smoothly.
Best Practices for Auto Update in WordPress
To ensure your WordPress site remains available securely, follow these best practices for automatic updates:
1. Regular Monitoring: Even with automatic updates, monitor your site regularly. After updates are applied, check for broken layouts, missing functionality, or error messages. Those websites with multiple plugins or custom themes may experience compatibility issues. Tools like Google Analytics can help track site performance, allowing you to catch and fix problems early.
2. Maintaining Compatibility: Always ensure your themes and plugins are compatible with the newest WordPress version. Updates can sometimes conflict with outdated components, causing errors. So, it’s important to stick to plugins and themes from trusted developers who provide regular updates and check compatibility information in the WordPress repository before enabling automatic updates.
3. Review Update Logs: Logs record updates applied to your site and can help troubleshoot issues. Plugins like Easy Updates Manager or your hosting dashboard often include detailed update logs. Reviewing these WordPress logs ensures you stay informed about changes and identify problems quickly.
4. Set Up Update Notifications: Enable email notifications to stay updated on core, plugin, and theme updates. These notifications tell you about every update applied, allowing you to respond promptly to any issues.
By following these practices, you can enjoy the convenience of WordPress automatic updates while maintaining a secure, efficient WordPress site.
Troubleshoot Common Issues
Enabling auto update in WordPress is convenient, but it can sometimes lead to challenges. Common issues include failed updates or site errors following an update. Let’s see how you can troubleshoot them:
Update Failures
When WordPress automatic updates fail, your site may be partially updated or vulnerable to security risks. The first step is to check your internet connection or hosting server to ensure no interruptions occurred during the update process.
If everything seems fine, verify your file permissions, as incorrect permissions can block updates. WordPress files should have 644 permissions, while folders should have 755.
Another possible issue is incomplete temporary files left behind during the update. These can cause the update to fail. To resolve this, use an FTP client to access your site and remove any leftover files in the following directory before trying the update again:
wp-content/upgradeIf the issue persists, you may need to update WordPress manually. Download the latest WordPress version from WordPress.org and use an FTP client to upload the files to your site.
Ensure you replace all files except the wp-content folder and the wp-config.php file so you preserve your content and settings. For further debugging, enable error logs by adding this line to your wp-config.php file:
define( 'WP_DEBUG', true );This will help you pinpoint the root cause of the failure.
To simplify things, we’ve already written about this. You can refer to the following links:
– How to Update WordPress Using an FTP Client
– How to Enable WordPress Debug Mode to Fix Errors
Site Breakage Post-Update
If your site breaks after an update, don’t panic. The easiest fix is to restore your site from a recent backup. Most backup plugins or hosting providers offer tools to revert your website to a previous version. If you don’t have a backup, check with your hosting provider; they may have one for restoration.
Sometimes, the issue may be caused by a plugin or theme conflict. Use an FTP client or your hosting service’s File Manager to deactivate all plugins by renaming the plugins folder (e.g., to plugins-old).
This will disable all plugins and help you identify if any is causing the issue. Similarly, switch to a default WordPress theme like Twenty Twenty-Three by renaming your active theme folder.
If the problem is with the WordPress core update, you can restore the previous version. Download the older version of WordPress and upload the files to your site using FTP. Again, ensure you exclude the wp-content folder and wp-config.php file to avoid overwriting your existing content and settings.
Finally, update all your plugins and themes to ensure they’re compatible with the latest WordPress version. If you’re still stuck, contact your hosting provider or visit WordPress support forums for assistance.
Following these troubleshooting steps can resolve most problems caused by update failures or site breakage. Regular backups and monitoring can help you recover quickly and keep your site running smoothly.
![Keep your plugins updated automatically with Hosted®’s WordPress Hosting Strip Banner Text - Keep your plugins updated automatically with Hosted®’s WordPress Hosting. [Get started]](https://www.hosted.com/articles/wp-content/uploads/2025/02/wordpress-automatic-updates-2-1024x229.webp)
FAQS
Are automatic updates enabled by default in WordPress?
WordPress enables automatic updates by default for minor core releases, such as security patches and bug fixes. However, major updates, plugin updates and theme updates are not automatically enabled unless configured manually.
Are there risks to enabling automatic updates?
The primary risk of enabling automatic updates is compatibility issues between WordPress and your plugins or themes. These conflicts could break parts of your site. That’s why you must have a website backup on hand. However, if you’re applying updates manually, you can test updates in a staging environment to minimize these risks.
Can automatic updates affect my website’s performance?
Generally, WordPress automatic updates improve your site’s performance by fixing bugs and optimizing features. However, if a plugin or theme is incompatible with the updated WordPress version, it could cause issues. In this case, regular monitoring and compatibility checks can prevent performance problems.
How do I know if an update was successful?
You can check the WordPress dashboard for confirmation after an update. Many plugins and hosting dashboards also provide update logs detailing what was updated and when. You can also monitor your site to ensure it functions as expected after an update.
Are automatic updates available for multisite WordPress installations?
Yes, WordPress automatic updates can be enabled for multisite installations. However, managing them requires careful planning to ensure updates don’t break subsites.
Other Related Tutorials
– How to Backup Your WordPress Site: A Comprehensive Guide
– How to Reinstall WordPress: Troubleshooting Guide
– WordPress Recovery Mode: Everything You Need to Know
– 403 Forbidden Error Explained: Easy Fixes for Your Website
– WordPress Multisite Setup & Installation Guide


