This tutorial covers in detail the steps to install a GDPR cookie popup in WordPress for consent as stipulated by the GDPR and can be used for any website, not just a WordPress site. When you visit a website, you may see a small popup asking if you accept cookies. These cookies help WordPress websites remember your preferences, login details, and browsing history. However, websites must ask for permission before storing cookies because of a privacy law called GDPR.
This law protects personal data online. One important GDPR rule is getting user consent before storing cookies. This means you must inform visitors about your site’s cookies and allow them to accept or reject them. Ignoring this rule could lead to fines or penalties.
A cookie consent popup is a small message that appears when someone visits your WordPress site. It explains what cookies are used and lets users accept or decline them. This keeps your site compliant with GDPR and CCPA, builds trust with visitors, and helps you avoid legal trouble. This tutorial shows you how to easily add a cookie popup in WordPress, ensuring your site follows privacy regulations.
KEY TAKEAWAYS
- Websites that collect user data with cookies must follow GDPR and CCPA rules.
- A cookie consent popup lets users choose whether to accept or reject cookies.
- WordPress makes it easy to add a cookie popup using plugins like CookieYes or Complianz.
- The CookieYes plugin allows easy setup with customizable banner styles and consent options.
- Websites must block cookies until users give consent to comply with GDPR.
- Users should enable or disable specific cookie categories, like analytics or marketing.
- Avoid cookie walls that force users to accept cookies before accessing content.
- Cookie popups should be mobile-friendly and should not block website navigation.
- Multilingual support helps users understand the cookie policy popup in their preferred language.
- Websites must provide a link to a detailed privacy and cookie policy for transparency.
- Users should be able to change or withdraw consent easily at any time.
- Testing the cookie popup ensures it appears and functions as expected.
- Use browser developer tools to verify if cookies are blocked before consent is given.
TABLE OF CONTENTS
Understand GDPR & Cookie Consent
The internet is full of websites that collect information about visitors. This data helps websites improve user experience, remember preferences, and track behavior. However, not everyone wants their data to be collected without permission. That’s where GDPR comes in.
GDPR, or the General Data Protection Regulation, is a law that protects the privacy of people in the European Union (EU). It ensures websites ask for permission before collecting or storing user data, including cookies. If your website has visitors from the EU, you must follow GDPR rules, no matter where your business is located.
Cookies are small files stored on a user’s device when they visit a website. They help websites remember login details, shopping carts, and browsing activity. While cookies make WordPress websites more useful, they can also track user behavior, which raises privacy concerns. Some cookies collect personal data, like IP addresses and preferences, so privacy laws require websites to ask for consent before using them.
GDPR is not the only privacy law. California Consumer Privacy Act (CCPA) in the US also gives users control over their data. Many countries now require websites to display a cookie consent popup, allowing visitors to accept or reject cookies before storing them.
How to Add a GDPR Cookie Popup in WordPress
In this section, we discuss a 3-step process to add a cookie popup in WordPress:
- Choose a GDPR Cookie Consent Plugin
- Install and set up a Cookie Popup Plugin
- Test Cookie Popup.
Let’s start with the first one.
Choose a GDPR Cookie Consent Plugin
Adding a cookie consent popup to your WordPress site is easy with the right plugin. These plugins help you follow GDPR and CCPA rules by showing a clear message about cookies and letting users accept or reject them. Many cookie consent plugins are available, but choosing the best depends on your needs. Here are some examples:
CookieYes: A popular plugin because it offers an easy setup, customizable banners, and automatic scanning of cookies. It also supports multiple languages, making it ideal for global websites.

GDPR Cookie Consent by WebToffee: It provides a simple way to add a cookie banner with options to accept, reject, or manage preferences. It also includes a log of user consent, which is useful for legal compliance.
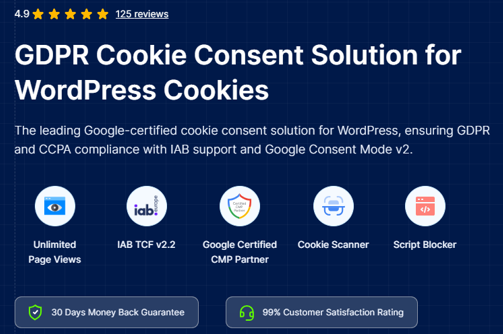
Complianz: An advanced plugin that detects user location and shows a customized cookie banner based on local privacy laws. It also generates a privacy policy automatically.

Cookie Notice & Compliance for GDPR/CCPA: Lightweight, free plugin that lets you display a simple cookie notice and lets users accept or decline cookies.

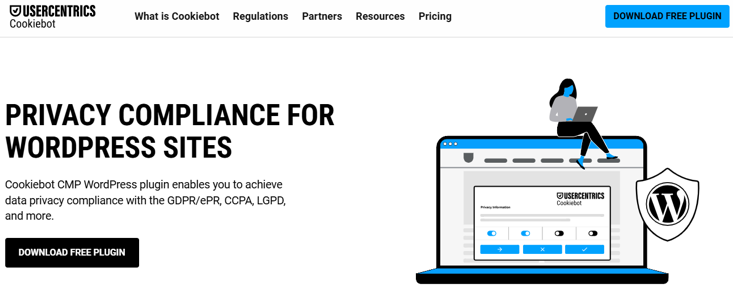
Cookiebot: This powerful tool helps WordPress sites comply with GDPR, CCPA, and other privacy laws. It automatically scans your website for cookies, categorizes them, and provides a customizable cookie consent banner. With Cookiebot, users can easily accept, reject, or adjust their cookie preferences, ensuring transparency and legal compliance.
When choosing a plugin, consider ease of use, customization options, compliance with multiple laws, and whether it logs user consent. The right plugin ensures your website stays compliant while providing a smooth user experience.
For this tutorial example, we use CookieYes to demonstrate how to create and add a cookie popup in WordPress.
Install & Setup a Cookies Popup Plugin
Adding a plugin with the CookieYes plugin is simple. It adds a cookie consent popup to your WordPress website to let you accept or reject cookies. This helps you follow GDPR and CCPA rules by showing a clear message. Below are the steps to install and set it up:
Step 1: Create CookieYes Account
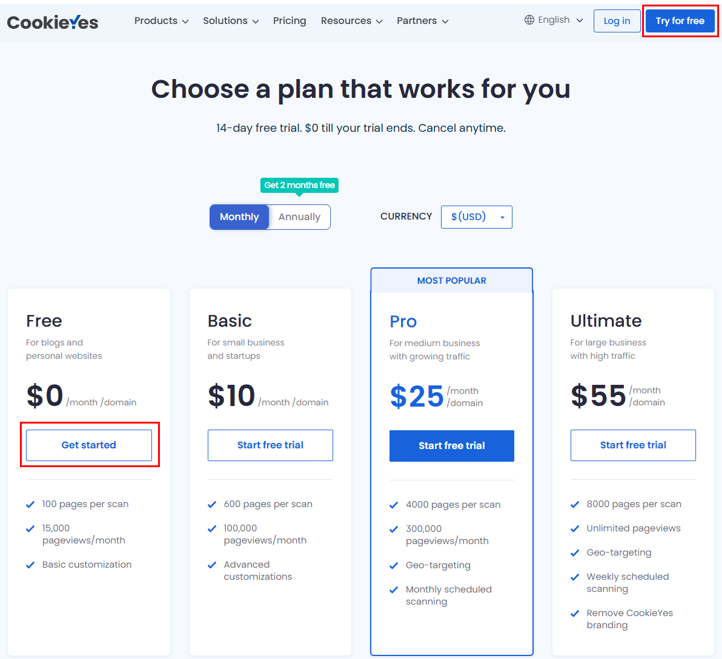
Go to the CookieYes website and click Get Started to sign up for a free account. You may also go with a premium plan based on your project requirements. For this tutorial, we click Try for free to use a free trial.
Fill in your email address. Write your exact domain name without https:// and www. Set your CookieYes account password. Accept the terms and conditions and privacy policy. Then, click Get Started.
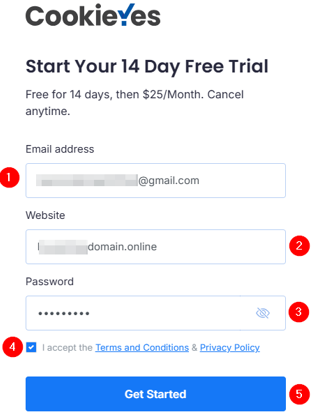
Step 2: Configure Basic Settings
Once you’re signed in, you’ll see the following screen. Here, you can choose Banner language and Layout. In our example, we select English as a language and Banner as a cookie popup layout.
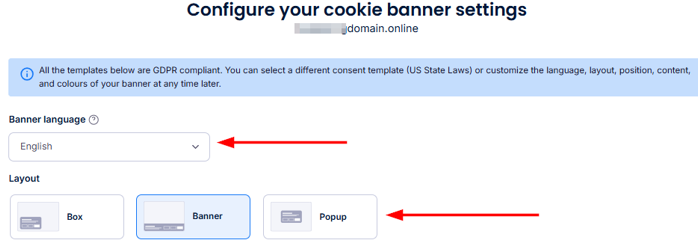
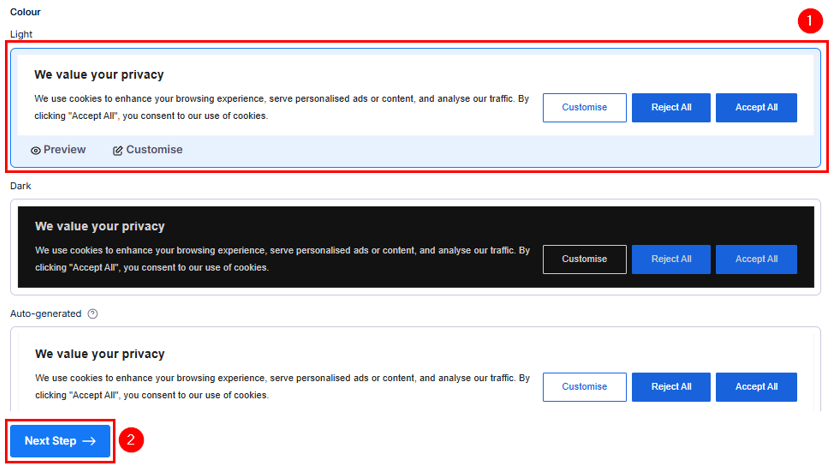
Choose the Colour of your cookie popup (Light, Dark,or Auto-generated) and click Next Step.
alt=”Choose Cookie Popup Color”
Step 3: Install Cookie Banner on Your Website
Now, select your preferred approach to install CookieYes on the WordPress website. You can do it using the manual approach or Google Tag Manager. For this tutorial, we click Install manually on website.
If you’re already using the CookieYes plugin, you can connect your plugin to the CookieYes web app. To do this, click connect plugin to our web app.
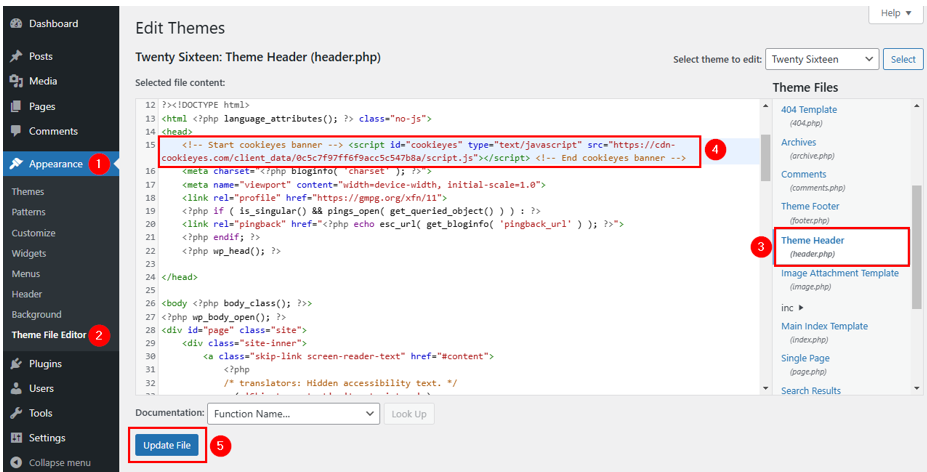
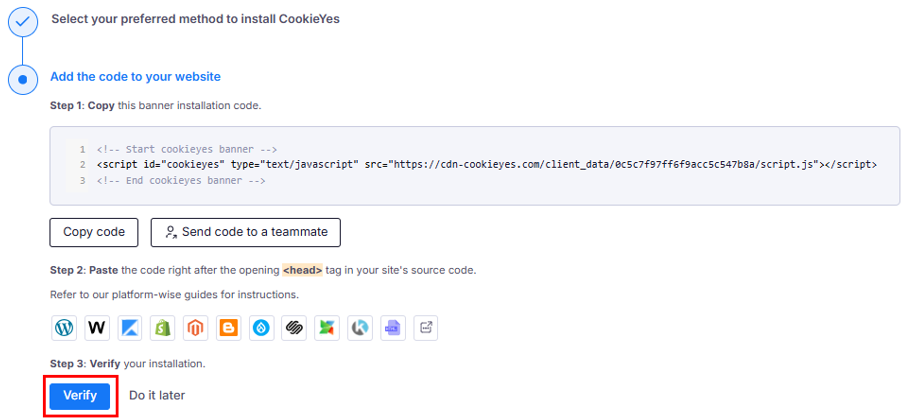
Next, click Copy code to copy the provided cookie popup installation code.

Then, navigate to WordPress Dashboard → Appearance → Theme File Editor. Click header.php. Once the file is opened in the editor, paste the code right after the opening <head> tag and click Update File to save changes.

IMPORTANT:
If you are using Hosted®’s WordPress Hosting service, you can edit the header.php file directly using the Hosted® File Manager. Alternatively, use the FTP client FileZilla to edit files and upload them to the web server.
Now, click Verify to verify the cookie popup code installation.
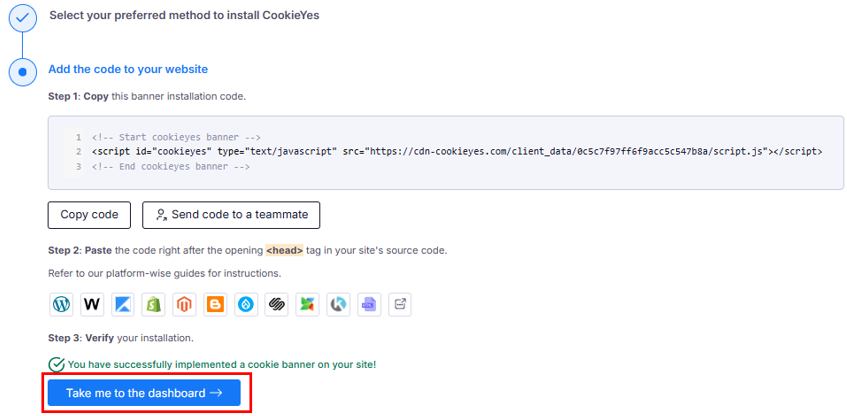
Once it’s successfully verified, click Take me to the dashboard.
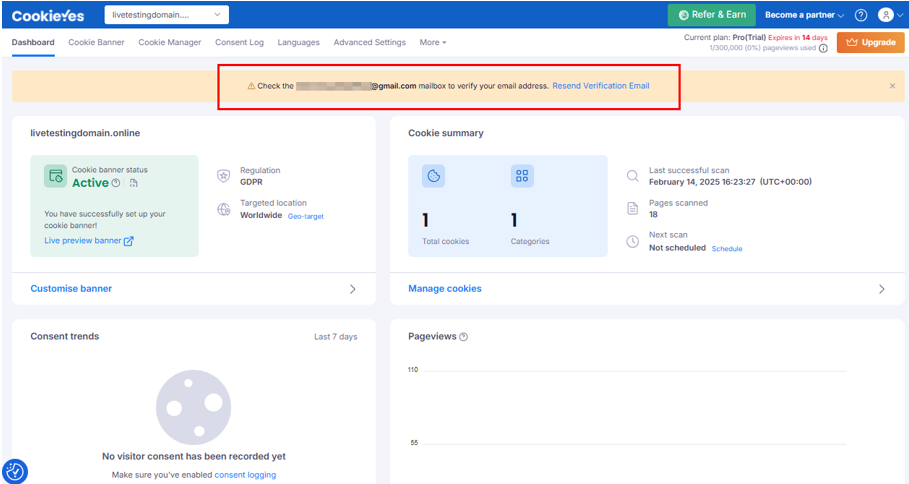
On the dashboard, you’ll be asked to verify the email that you provided while signing up for your CookieYes account.
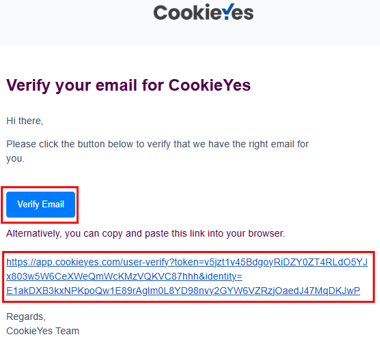
Go to your email inbox. Find your email and click Verify Email or copy and paste the provided link in the browser.
Now, you’ll see the following screen. Click Go to Dashboard.
Step 4: Customize Cookie Popup
To personalize the key components of the cookie notice, navigate to Cookie Banner in the CookieYes dashboard. Here are the customization options available:
General Settings: Choose the legal framework to comply with, enable IAB TCF v2.2, set up geo-targeting, adjust consent expiration, and configure the page to reload after a consent action.
Layout Settings: Select from 3 different banner layouts: Box, Banner, or Popup, and modify the preference center layout as needed.
Content Settings: If your WordPress site uses Google services like AdSense, Firebase, or Analytics, edit the default title and message of the cookie popup, customize the buttons, manage the cookie list, and set up a link to Google’s Privacy Policy.
Color Settings: Change the cookie banner colors to match your WordPress website’s theme.
Custom CSS Settings: Insert a custom CSS script to apply unique styling and design modifications.

These settings allow you to design the cookie banner for compliance and user experience. Let’s go through the detailed instructions for each section below:
- Step 4.1: General Settings
The General settings tab in CookieYes allows website owners to customize their cookie consent popup to comply with several privacy laws. These settings help ensure user data is handled responsibly, following regulations such as GDPR and US state laws. Here’s how you can update General settings to create a GDPR popup:
First, select the right Consent Template. As a website owner, you can choose between:
- GDPR: Suitable for European users.
- US STATE LAWS: Follows compliance for states like California (CCPA).
- GDPR & US STATE LAWS: Ensures compliance with both regulations.
This selection determines how the website processes user consent and cookie preferences.
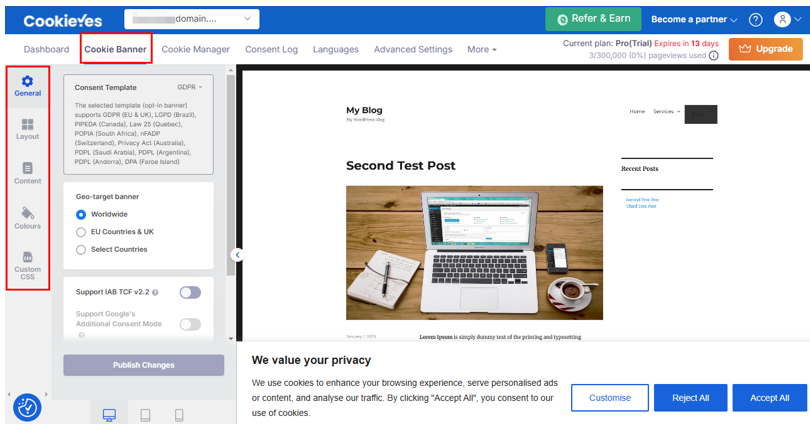
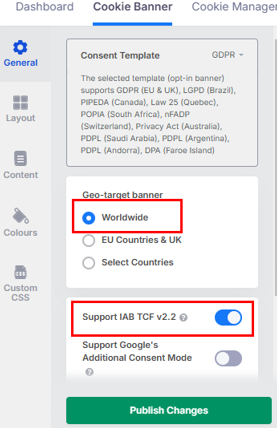
Another key option is the IAB TCF v2.2 Support, which allows WordPress sites to enable a banner that lets visitors manage their advertising tracking preferences using a granular method. However, this option is only available for websites following GDPR Consent Templates.
For website owners who want to target specific users, the Geo-target banner feature enables you to display cookie popups only for visitors from selected countries. This means users outside the specified regions will not see the banner, improving visitor experience while ensuring compliance with GDPR or CCPA regulations.

However, for those who need more control over how cookie banners behave, CookieYes provides advanced settings. To access that, click Show advanced settings. Here, you can update the following based on your project needs:
Consent Expiration Period: By default, CookieYes sets the consent expiration to 365 days, meaning visitors will only be shown the cookie popup again after a year. However, WordPress website owners can modify this duration to meet their compliance requirements. We specified 14 days in our example. After 14 days, users must consent again.
Page Reload on Consent Action: This setting lets you decide whether the webpage should refresh after a visitor accepts or rejects cookies. If enabled, the page will reload to apply user preferences instantly.
Once done with the General settings, click Publish Changes.
IMPORTANT:
Website owners must ensure their cookie handling practices align with GDPR compliance. It’s important to note that loading cookies before consent is not GDPR-compliant. Also, hiding cookie categories from users violates GDPR guidelines.
- Step 4.2: Layout Settings
Customizing the layout of your cookie popup is essential for ensuring compliance while maintaining a smooth user experience. The CookieYes plugin allows you to choose from different banner types and positions based on your WordPress site’s needs. Below, we explore the available layouts and how they can be positioned for better visibility.
To modify your cookie banner, go to Layout in the left panel in the CookieYes dashboard. There are 3 banner layouts: Box, Banner, and Popup. However, Pro and Ultimate plan users get exclusive access to the Popup layout option.
The Box layout offers flexibility in positioning. You can place the banner in four positions: Bottom left, Bottom right, Top left, and Top right. This layout ensures the cookie notice is compact and does not interfere with the main website content.

The Banner layout provides a wider, full-width design and is available in 2 positions: Bottom and Top. This format is ideal if you want the cookie banner to be clear but not intrusive.
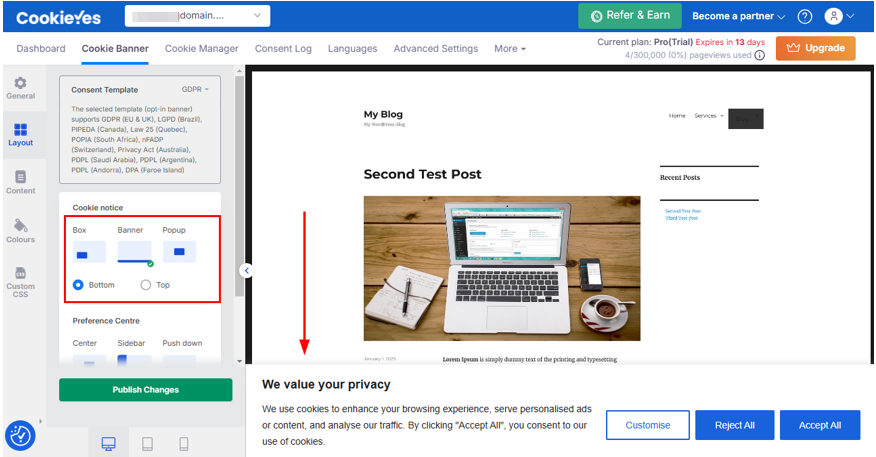
The Popup layout appears in the center of the screen, making it highly noticeable. This format ensures users engage with the consent message before interacting with the website.

A cookie consent popup helps your WordPress site comply with GDPR laws while ensuring a transparent user experience.
Get optimized hosting with Hosted®’s WordPress Hosting and keep your WordPress site running at its best.
Next, scroll to Preference Center, which allows users to manage their cookie preferences. You can customize how it appears on your WordPress website based on the layout type you choose. This feature depends on the cookie popup layout you select. For example,
If you select the Box layout, 2 positions are available for the Preference Center: Center and Sidebar. This allows users to adjust their cookie preferences without disrupting their browsing experience.

The Banner layout for the preference center includes 3 configuration options: Center, Sidebar, and Push down. A key feature of the Banner + Push down layout is the Categories on first layer option, which lets users view cookie categories directly on the first screen.
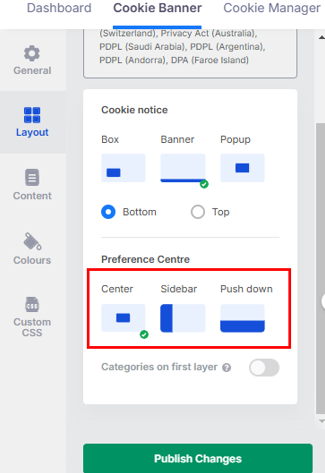
Also, in Popup, you can choose between Center and Sidebar. This layout ensures users can easily modify their preferences while keeping the cookie consent process simple and accessible.

Once done with updating Layout settings, click Publish Changes.
- Step 4.3: Content Settings
The cookie popup is the first thing users see when they visit a website. With CookieYes, you can modify all key elements to ensure transparency and compliance. To do that:
Expand the Cookie Notice menu and change Cookie Notice to edit the title and message displayed on the banner; this will clearly explain how cookies are used on your WordPress website.
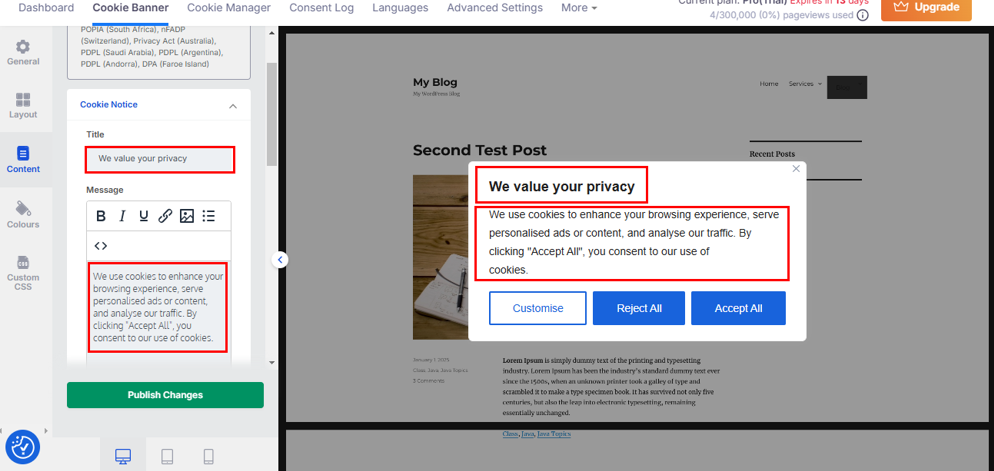
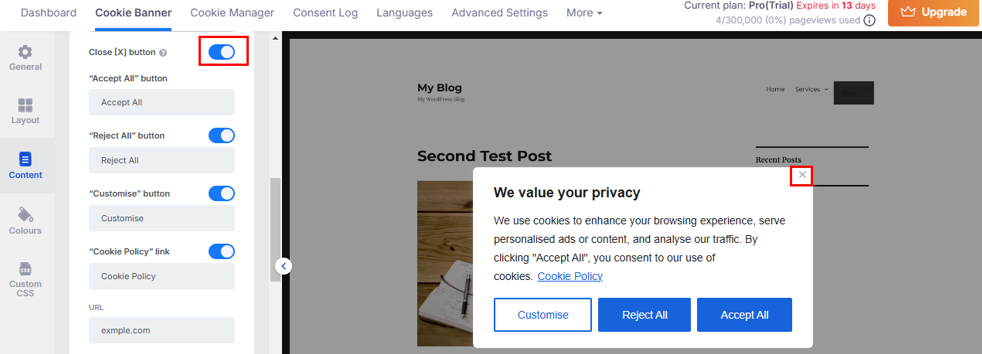
Here, you can also enable or disable Close [X] Button. If enabled, users can close the banner without making a choice, allowing them to browse without explicit consent.
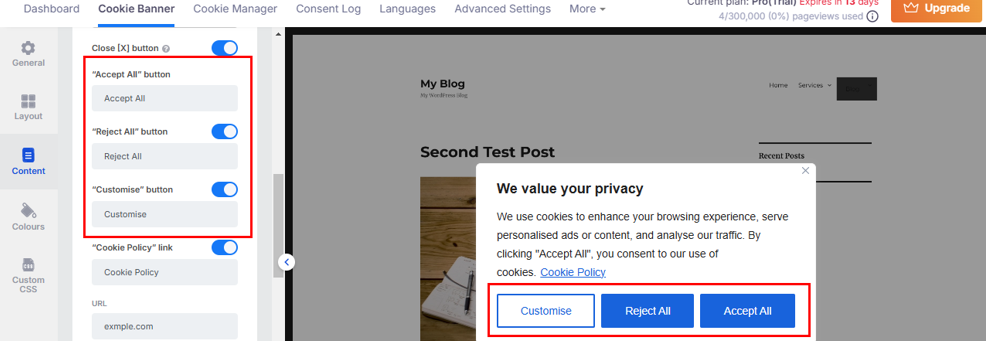
You can also customize the label for Accept All, Reject All, and Customize buttons.
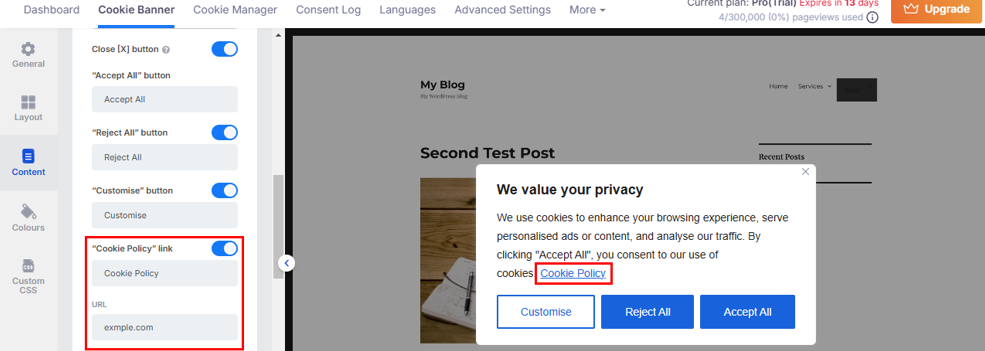
Additionally, you can provide the Cookie Policy label and link as follows:
IMPORTANT:
If you’ve enabled Categories on First Layer under Layout, cookie categories are displayed on the first layer of the cookie popup, allowing users to manage their preferences immediately. You can also add a custom logo to personalize the banner and remove Powered by CookieYes text using the Ultimate CookieYes plan.
The Preference Center is the second layer of the consent banner where users can adjust their cookie preferences in more detail. Here, you can modify Title and Privacy overview.

You can also edit the labels for Save my Preferences, Show More, and Show Less.

If your website uses Google services like AdSense, you must display Google’s Privacy Policy as required by the Digital Markets Act (DMA). You can:
- Enable or disable the Show Google Privacy Policy option.
- Edit the message content to explain the link.
- Modify the link text and URL to ensure users can access Google’s policy easily.

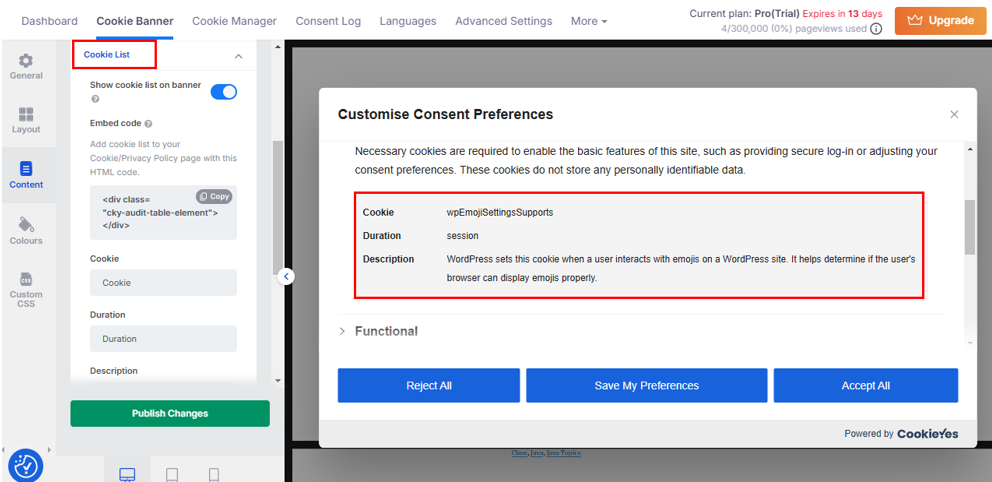
Also, expand the Cookie List menu to provide detailed information about the cookies used on your WordPress site. Here, you can enable or disable the cookie list display in the second layer of the cookie popup. You can customize the cookie name, duration, description, and Always Active label. You may also change the message shown when no cookies are listed.
If you want your users to have the option to change or withdraw their cookie consent, use the Revisit Consent Button, which provides quick access to preference settings. We usually don’t recommend it until it’s necessary, as it may not look good with your customized WordPress theme design.

Lastly, you can edit the Blocked Content message to inform users why the content is unavailable. For example, when a user rejects certain cookies required for embedded content (such as videos), they may be unable to view videos from YouTube, Vimeo, or other sources. To ensure clarity, you can display a custom message over blocked videos, informing users why the content is unavailable.

After making your changes in Content settings, click Publish Changes and move to the next step.
- Step 4.4: Change Cookie Popup Color
Go to the Colours section in the left panel to adjust the banner’s appearance, including the background, buttons, and text colors. You can select from several color themes for the banner:
- Light
- Dark
- Auto-generated
- Custom.
Remember, if you choose Auto-generated, the banner’s colors will automatically match your WordPress site’s existing color scheme.

If you wish to add custom CSS, click Custom CSS and write your code in the provided CSS box.

- Step 4.5: Manage Cookies
In Cookie Manager, you can add new cookies under specific categories and scan your website.

For detailed instructions, you can refer to the following CookieYes guides:
– How to Manually Add New Cookies
You can also hide certain cookies from the banner, load cookies before consent, and modify category names and descriptions as required. To do that, click on your required cookie category in Cookie List, then click Edit Category next to the category you wish to modify.
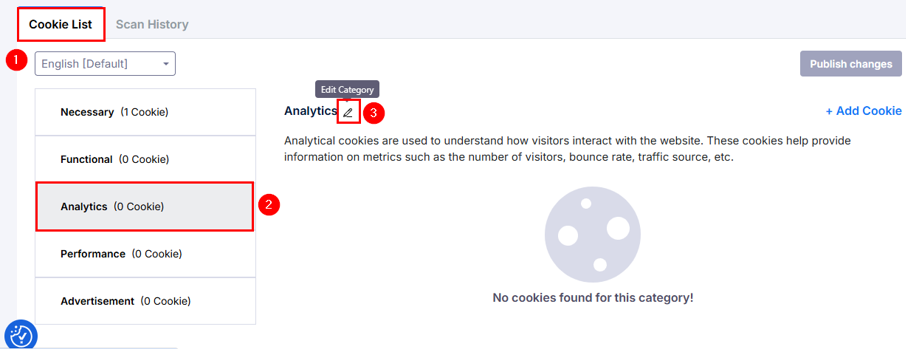
Change the category name if you want. Next, find Hide category from banner and Load cookies prior to consent, and toggle the switch to the right to enable it. Then, click Save Draft to store your changes.
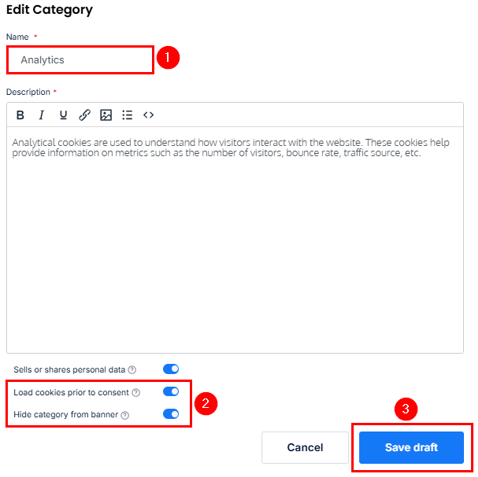
Finally, select Publish Change to apply the update.

IMPORTANT:
Preloading cookies before obtaining user consent or concealing cookie categories does not align with GDPR compliance requirements.
- Step 4.6: Maintain Consent Log
You can also maintain a user consent log through a cookie notice or banner and download it by clicking Export as CSV. Additionally, you can download Proof of Consent for each user entry.

To enable or disable the consent log, go to Advanced Settings → Consent settings and toggle on/off the Consent log. Once enabled, the system records user consent, displaying details such as Consent ID, Consent Status, and Date/Time under Consent Log.

- Step 4.7: Create Privacy Policy
To generate a custom privacy policy for your WordPress site, navigate to More → Privacy Policy Generator.

Answer a few simple questions and proceed to create a custom privacy policy.

- Step 4.8: Create Cookie Policy
To create a Cookie Policy, go to More → Cookie Policy Generator.

In Type of Cookies, make the necessary adjustments. Then, switch to Manage Cookie Preferences and apply your preferred modifications. Lastly, click Generate to finalize the policy.

- Step 4.9: Google Consent Mode
CookieYes also supports Google Consent Mode (GCM). You can activate it by navigating to Advanced Settings → Google consent mode (GCM) and enabling Support GCM. It’s important because when people don’t allow the Analytic cookies, they will use a basic analytic feature cookie so that people are still being tracked but with less data.

IMPORTANT:
If you’re using the CookieYes plugin, you may refer to the following link to see all the configurations without connecting to the CookieYes web application: WordPress Plugins Only.
Test Cookie Popup
After setting up the cookie popup, test it to ensure everything works correctly. A proper test ensures that the banner appears as expected, users can accept or reject cookies, and cookies are only stored after consent.
First, open your WordPress website in a private (incognito) window or a different browser. This helps you see the popup as a new visitor would. The cookie banner should appear immediately, displaying the message, buttons, and any customization you added. If it doesn’t show, check the settings to ensure it is enabled.
Next, test the accept or reject functionality. Click Accept All and refresh the page. The popup should disappear, and cookies should be stored. Next, clear your browser cookies, reload the page, and click Reject All. This time, cookies should not be set. If they are still being stored, revisit the settings.
Then, to confirm that cookies follow user preferences, open Developer Tools in your browser (press F12 or right-click → Inspect). Go to Application, then to Storage → Cookies and click your website’s URL. Look for your website’s cookies and check if they match the user’s choice. If cookies are set before consent is given, adjust your settings to fix the issue.

By following these steps, you can ensure your cookie consent popup works properly and complies with GDPR and CCPA.
Best Practices to Design GDPR-Compliant Cookie Popups
- Always provide equally visible Accept and Reject buttons. Users should have a proper choice without feeling forced to accept cookies.
- Let users choose which cookies they allow, such as necessary, analytics, or marketing. Include clear descriptions of what each category does.
- A cookie wall forces users to accept cookies to access your WordPress site. This is discouraged under GDPR. Instead, offer an option to browse with only necessary cookies.
- Dark patterns are misleading designs that push users into accepting cookies. Keep your design honest and avoid tricks like hiding the Reject button.
- Ensure your popup looks good and works smoothly on all devices without blocking content or making navigation difficult.
- Show the cookie popup in the user’s language for better understanding and compliance.
- Always include a link to detailed privacy and cookie policies to build trust.
- Ensure that only essential cookies are active by default, while others require explicit consent.
- Customize popups based on user location to meet local privacy laws.
- Allow users to change or withdraw their consent anytime through a simple setting.
![Get fast and secure WordPress Hosting for your website with Hosted® Strip Banner Text - Get fast and secure WordPress Hosting for your website with Hosted®. [More Info]](https://www.hosted.com/articles/wp-content/uploads/2025/03/cookie-popup-2-1024x229.webp)
FAQS
Can I customize the design of my cookie consent popup?
Yes. Most cookie consent plugins allow you to change the popup’s text, colors, position, and buttons. You can also add links to your privacy policy and give users more control over their cookie settings.
How can I ensure my cookie popup follows GDPR popup rules?
To be GDPR-compliant, your cookie popup should clearly explain why cookies are used, provide an equal choice to accept or reject cookies, allow users to manage cookie preferences (e.g., necessary, analytics, marketing), and block non-essential cookies until a user consents.
What happens if I don’t add a cookie consent popup?
If your website collects data from visitors without consent, you can violate GDPR or other privacy laws. This could lead to penalties or a poor user experience. A cookie consent popup builds trust with visitors and ensures your site follows legal requirements.
Do I need a cookie consent popup if my website doesn’t sell anything?
Yes. Even if you don’t sell products, your site can still use cookies for analytics, embedded videos, or third-party ads. GDPR applies to all websites that collect user data, not just e-commerce sites. If your site has visitors from the EU, you must ask for cookie consent.
What is the easiest way to add a cookie popup in WordPress?
The easiest way is to use a WordPress cookie consent plugin like CookieYes or Cookie Notice u0026amp; Compliance for GDPR/CCPA. These plugins let you create a customized popup where users can accept or decline cookies. You must install, activate, and configure the settings in your WordPress dashboard.
Other Related Tutorials
– How to Update WordPress Plugins: A Step-by-Step Guide
– How to Add WordPress Custom CSS: 5 Easy Methods
– How To Use The wp_insert_post Function In WordPress
– WordPress get_post_meta Function: How to Display Custom Fields
– How to Update WordPress Plugins: A Step-by-Step Guide


