Fonts play a huge role in how your website looks and feels. They are not just about making text readable; they also help set the tone of your site. Imagine a fun and colorful font for a kid’s toy store or a sleek and professional font for a law firm. The right font can make your website look friendly, serious, modern, or playful. This is why choosing the right fonts is important for your website design.
When it comes to WordPress, you have plenty of options to change the fonts on your site. Whether you want to use the built-in options, try out some handy plugins, or even get your hands dirty with some code, WordPress lets you do it. Each method gives you different levels of control over how your site looks.
In this tutorial, we’ll show you several ways to change fonts in WordPress. We’ll start with the easiest options, like using the WordPress customizer, and then move on to more advanced methods, like manually adding custom fonts. By the end of this tutorial, you’ll know exactly how to make your website’s text look just the way you want it.
KEY TAKEAWAYS
- Fonts are key to your website’s design, affecting readability and style. Therefore, you should carefully choose a font while learning how to change font in WordPress.
- WordPress offers various ways to change fonts, including the theme customizer, plugins, and manual methods.
- The Theme Customizer is the easiest option for beginners to adjust fonts.
- Full Site Editing (FSE) provides complete control over your site’s typography.
- Plugins like Easy Google Fonts offer a wider range of font choices without needing coding.
- Custom fonts can be added manually for unique branding.
- Always optimize fonts for performance and limit the number of fonts for a clean, fast website.
Table of Contents
Introduction to Web Fonts
Web fonts are special font types used on websites to make the text look more interesting and unique. Unlike the standard fonts installed on your computer, web fonts are downloaded from the internet and displayed in the browser when you visit a website.
They allow web designers to use a wide variety of fonts beyond the basic ones like Arial, Times New Roman, or Verdana, making the website more visually appealing and helping to convey a particular style or brand identity.
Types of Web Fonts
As you learn how to change font in WordPress, you might be interested in web font types. There are several types of web fonts, each with special characteristics and uses:
Serif Fonts: These fonts have small lines or decorative strokes attached to the end of their letters. They look formal and traditional. Examples include Times New Roman and Georgia. Serif fonts are often used in newspapers, magazines, and academic websites.

Sans-Serif Fonts: These fonts do not have small lines at the end of letters, so they look clean and modern. Examples include Arial, Helvetica, and Open Sans. Sans-serif fonts are popular for digital content because they are easy for your target audience to read on screens.

Script Fonts: These fonts look like cursive handwriting or calligraphy. They are often used for decorative purposes or to add a personal touch. Examples include Pacifico and Brush Script. Script fonts are suitable for invitations, logos, and artistic designs.

Monospace Fonts: In these fonts, each letter takes up the same amount of space. They are often used in programming and coding because they make it easy to line up characters. Examples include Courier and Consolas.

Display Fonts: These are creative, eye-catching fonts designed to grab attention. They are often used in headings, posters, and banners. Examples include Impact and Lobster. Also, display fonts can be playful, bold, or highly stylized.

Use of Web Fonts in WordPress
There are multiple ways to add web fonts to a WordPress site to customize the appearance of your content. Here’s how you can use web fonts in WordPress:
Google Fonts
Google Fonts is a popular and free resource that offers a huge selection of web fonts. To use Google Fonts in WordPress, go to the Google Fonts website, select the font you like, and then embed it into your site. This usually involves copying a small code piece into your WordPress theme’s functions.php file.
Install a Font Plugin
If you’re uncomfortable editing code, use a WordPress plugin to add web fonts. Plugins like Easy Google Fonts or Custom Fonts allow you to browse and select fonts directly from your WordPress dashboard. Once installed, these plugins make it easy to apply new fonts to different sections of your site without having any coding knowledge.
Edit Your Theme’s CSS
For those with some coding experience, you can add web fonts by editing your theme’s CSS file. This involves linking to the web font in the CSS and then using the font-family property to apply the font to specific elements on your site, such as headings or paragraphs.
Use a Theme with Built-in Font Options
Many WordPress themes come with built-in options to select and use various web fonts. If your theme includes this feature, you can usually find it in the customization options under Typography or Fonts. This is the easiest way to change fonts without adding extra plugins or editing code.
Now that you know what a web font is and how to use it on your WordPress website, we will discuss how to change font on a WordPress site.
How to Change Font in WordPress
Various methods teach you how to change font in WordPress. However, your chosen method will depend on your theme or customization preferences. Premium themes like Divi offer a built-in font manager that automatically includes Google Fonts.
Additionally, Divi lets you enable all Google font subsets through the theme settings, allowing for broader font choices. For other themes, you can typically modify fonts using the Theme Customizer. However, the available font options may be more limited, depending on your chosen theme.
If you’re working with block themes that support Full Site Editing (FSE), like Twenty Twenty-Two, you can edit the theme.json file to add custom fonts. Alternatively, you can install a Font Manager plugin or use the Gutenberg block editor to adjust typography. Lastly, you can add fonts to your WordPress theme manually if needed.
We will walk through each method to learn how WordPress change font options can be adjusted, allowing you to personalize your site’s typography effectively and effortlessly.
Use Theme Customizer
The Theme Customizer (a.k.a Visual Customizer and WordPress Customizer) is a built-in WordPress tool that allows you to customize the appearance of your website easily. It provides a live preview so you can view the changes to your site’s design in real-time before saving them.
Using the theme customizer, you can change various aspects of your site, such as colors, fonts, layout, and more, without any coding skills. Here’s how to change font in WordPress with Theme Customizer:
Step 1
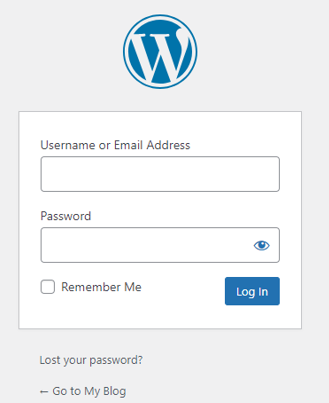
First, log in to your WordPress admin area (dashboard) by going to yourwebsite.com/wp-admin and entering your username and password. Don’t forget to replace the ‘yourwebsite’ and ‘.com’ with your domain name and extension.
Step 2
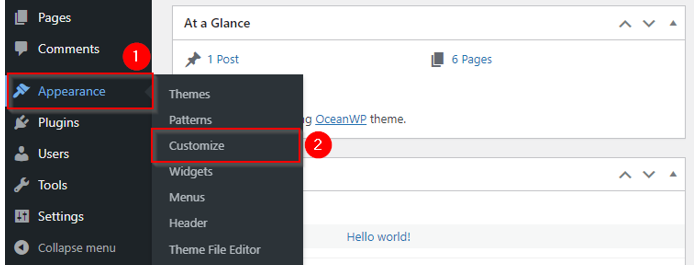
Once logged in, from the left-hand menu, navigate to Appearance and click on Customize to customize your theme. For this section example, we’re using the OceanWP WordPress theme.
Remember, sometimes, you may not find the Customize option under the Appearance menu. For example, if you’re using the Twenty Twenty-Four theme, you’ll find the Customize button on your active theme as follows:
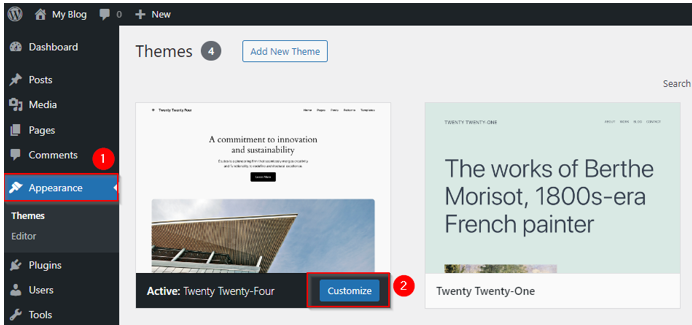
This will open the Theme Customizer, where you can change your site and see a live preview of the updates.
Step 3
In the customizer menu, click on Typography. This option allows you to modify the font settings for various parts of your website, such as headings, paragraphs, and menus. Note that this option may vary depending on the theme you’re using. Some themes come with more customization options than others.

Inside the Typography section, you will find settings for different text elements, such as All Headings, Body, and Main Menu text. Click on each of the sections that you want to change. For example, click Heading 2 (H2) to change the H2 text font.
In the section you chose, you’ll see options to change fonts in WordPress. Click on the Font Family drop-down menu to see a list of fonts. Scroll through the list and click on the font you like.
As soon as you select a font, you’ll see the change happen on the preview of your site on the right. This allows you to experiment with different fonts and see the changes before making them permanent.
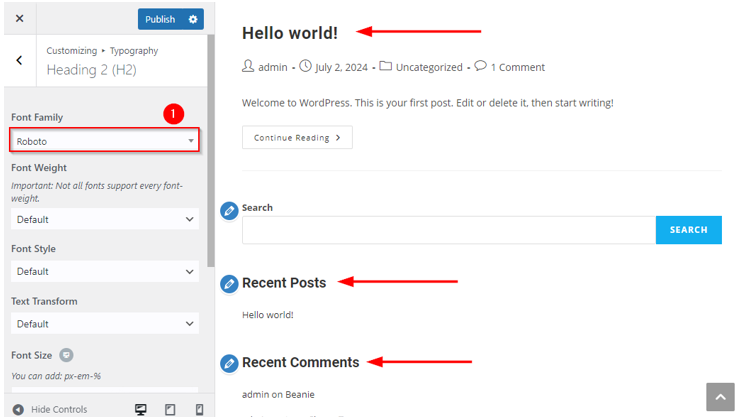
Furthermore, you can also change other settings like:
- Font Weight: Makes the text thinner or bolder.
- Font Style: Choose normal or italic.
- Text Transform: Make the text uppercase, lowercase, or capitalized.
- Font Size: Change how big or small the text is.
- Line Height: Adjust the space between lines of text.
- Letter Spacing: Change the space between letters.
- Font Color: Change the font color in the WordPress site.
Once you’re satisfied with the font changes, click the Publish button at the top of the customizer to save your updates. The new fonts will now be applied to your website.

However, if you want to change fonts in other areas, repeat Step 3 for each section (Body, Main Menu, etc.). This way, you can have different fonts for headings and body text if you like.
Use WordPress Full Site Editing (FSE)
Full Site Editing (FSE) is a powerful new feature in WordPress that allows you to make design changes across your entire website, not just individual pages.
With FSE, you can customize everything from headers and footers to fonts, all in one place. To explore how to change font on WordPress using FSE, you need to follow the steps given below:
Step 1
First, ensure your theme is block-based because FSE only works with block-based themes, such as Twenty Twenty-Two. To check if you’re using a compatible theme, go to Appearance → Themes in your WordPress dashboard. If you’re not using a block-based theme, search for one in the WordPress theme directory and install it.
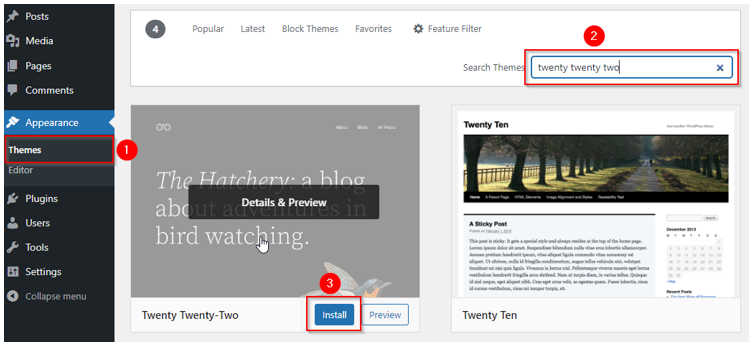
Once it’s installed, click Activate to activate it.

Step 2
From your WordPress dashboard, navigate to Appearance → Editor. This will take you to the Full Site Editing interface, where you can edit every website component using blocks.

Step 3
In the Site Editor, you can select different parts of your website to edit, like the Navigation, Pattern, or Styles of your pages. As we want to change fonts in WordPress, we need to click on Styles.
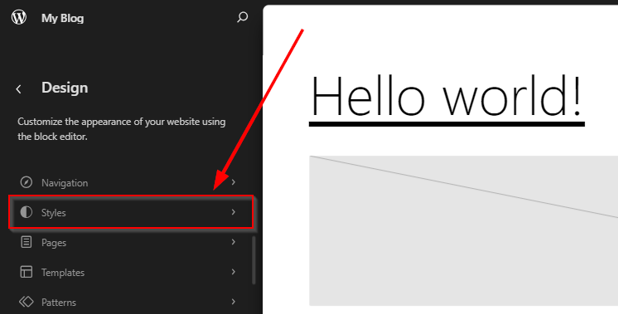
Then, click on the pencil icon to edit style settings.
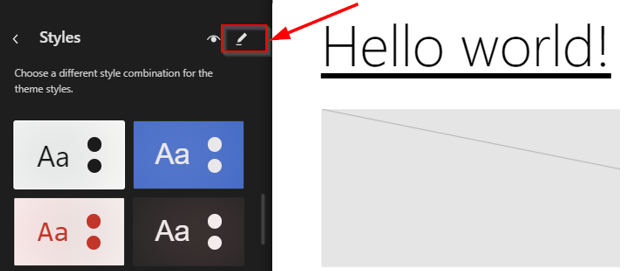
After that, click on Typography.
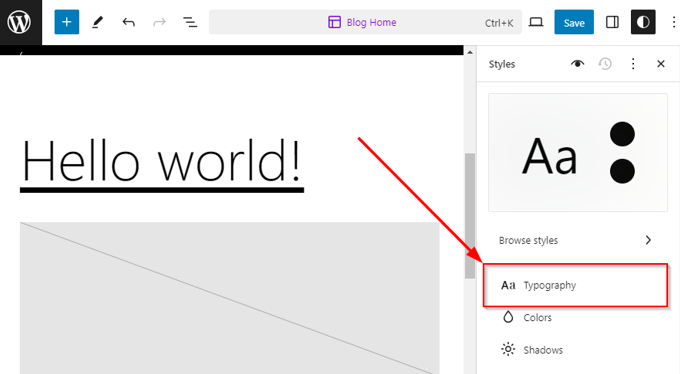
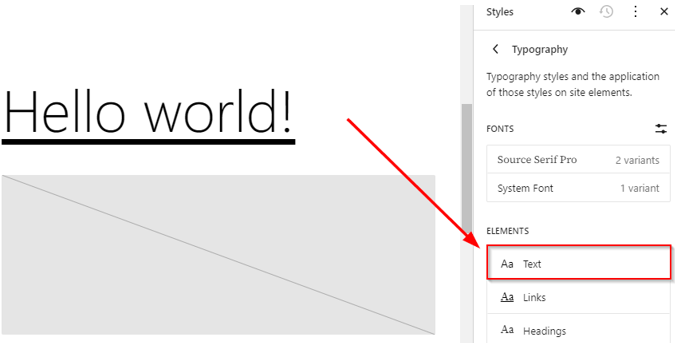
From here, you may select the desired element you want to use to change the font. For example, we want to change the font text, so we’ll click on the Text element.
Now, you can easily modify the text font, size, appearance, letter spacing, and line height. As soon as you update the font or change other style settings, you can preview these changes on the left (on your web page).
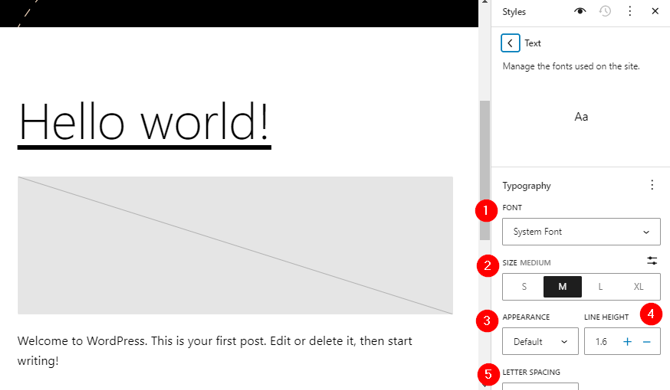
Important: Using the FSE approach, the modifications will be applied to the entire website for that specific element.
Step 4
Once you adjust the font on your website and are satisfied with the changes, click the Save button in the top-right corner. This will apply your changes to the live website.

Use Block Editor (Gutenberg)
This method is not recommended if you want to explore how to change font in WordPress globally; in that case, you should use the Full Site Editor approach covered in the previous section. However, if you want to modify the font of a particular paragraph, title, or heading, you can use this method.
Here are the detailed steps of how to change font in WordPress:
Step 1
Login to the WordPress admin area. Once logged in, choose the post or page where you want to change the fonts. To create a new post or page, click Posts or Pages in the left menu and then click Add New Post or Add New Page.
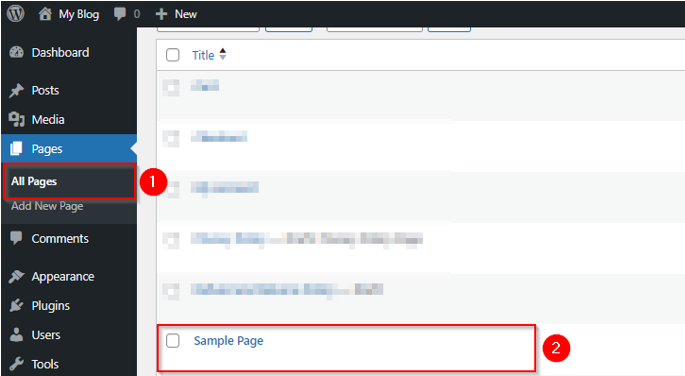
To edit an existing post or page, click All Posts or All Pages, then select the one you want to edit. We’ll edit the Sample Page here.
Step 2
In the Block Editor, click on the block that contains the text you want to change. This could be a paragraph block, heading block, or any other text block. Once the block is selected, options appear on the right-hand side.
In the right-hand panel, scroll down to the Typography section. This is where you can change the font settings for the selected text block. You can also choose from preset sizes like S (small), M (medium), L (large), and XL (extra-large), or you can set a custom size by clicking the tune icon.
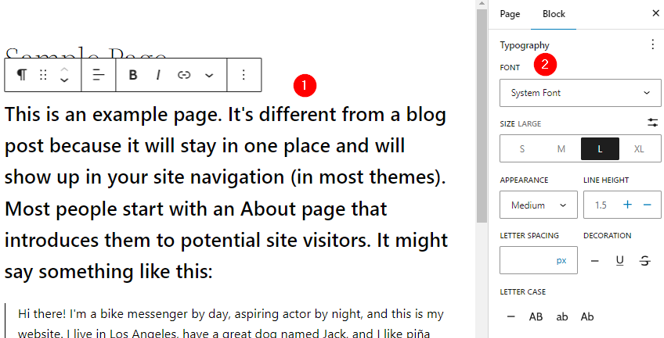
Once you’re done, click Save to apply changes.
Important: If you don’t see the options to change fonts in WordPress, click the three-dot menu (⋮) located next to Typography and choose the options there.
Use a Plugin to Change Fonts
Sometimes, themes don’t offer enough font options, and you may want to use a wider range of fonts or specific ones. This is where Fonts Plugin comes in handy. A plugin allows you to change fonts easily without having any coding skills.
It’s fast and gives you access to more font styles, making your website stand out. Now, the steps to install and use a plugin to see how to change font in WordPress.
Step 1
Once in the WordPress dashboard, go to Plugins → Add New Plugin. In the Search Plugins bar, type “fonts plugin”. Once you find a plugin you like, click on Install Now next to the plugin name.
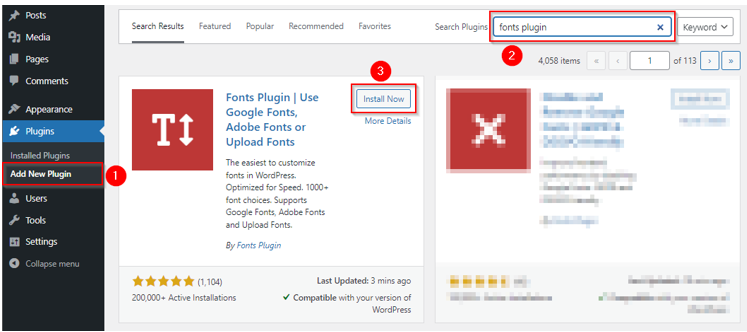
After the plugin is successfully installed, click the Activate button. The plugin is now ready to use.
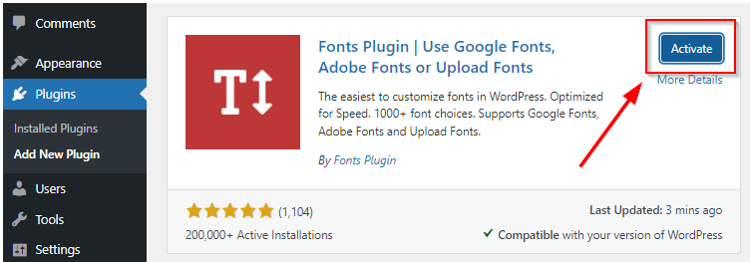
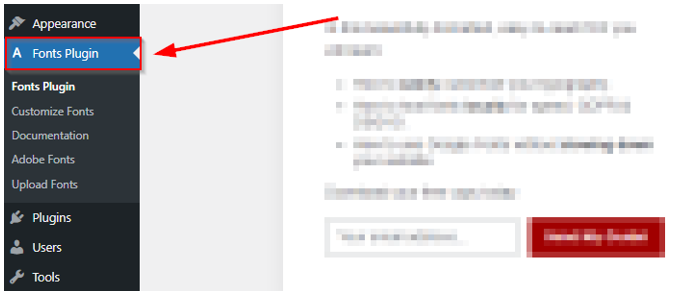
After activating the plugin, a new option for managing fonts will appear in your WordPress dashboard.
Step 2
Go to Fonts Plugin → Customize Fonts. Then, click on the Fonts Plugin option.
Step 3
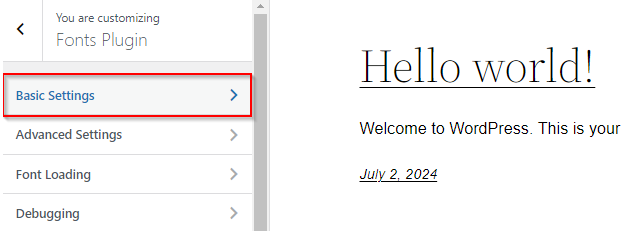
Now, you’ll see options to change the fonts for various parts of your site; in this example, we continue with Basic Settings.
Here, you can change the font family for various types of text content; this includes body text, headings, buttons, and inputs.
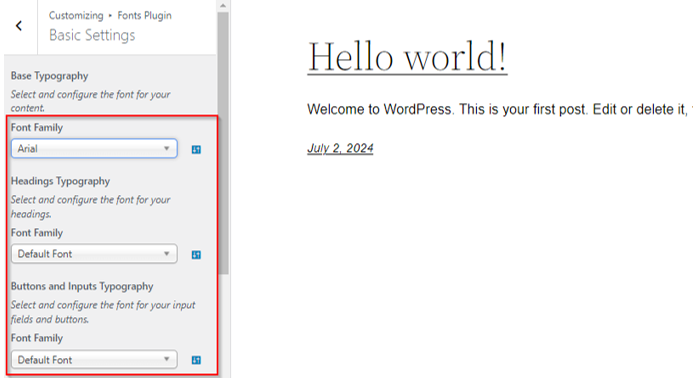
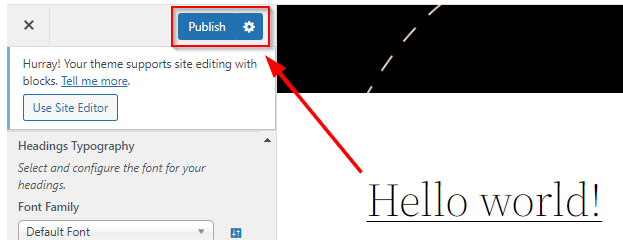
As you adjust the font settings, you’ll see a live preview of the changes on your website. This lets you experiment and find the font style that looks best. Once you’re happy with the changes, click the Publish button at the top to save your new fonts. Your website will now display the updated fonts for visitors to see.
Important:
While exploring how to change font in WordPress, you may also want to change color. If this is the case, upgrade the Fonts Plugin. You can also look for an alternate plugin depending on your needs and requirements.
Experience unparalleled speed, security, and support tailored to your website’s needs.
Discover the unmatched performance of Hosted®’s WordPress Hosting solutions.
Add Custom Fonts Manually
Sometimes, you may wish to add a unique font you can’t find in WordPress plugins or built-in options. This is where manually adding custom fonts can be helpful, especially if you need complete control over your site’s typography. However, this approach requires some basic coding skills and the ability to edit theme files.
If you want to continue with this method, we recommend you use a child theme, as making errors in the core theme files can cause problems for your site. Furthermore, adding custom fonts may not give you options as plugins do, but it’s a smart way to keep your site lightweight and fast, especially if you only need a few fonts.
Now, we will look at an example of Google Fonts to see how to change font in WordPress:
Step 1
Go to Google Fonts Official Website and click on the font you want. We selected Roboto.
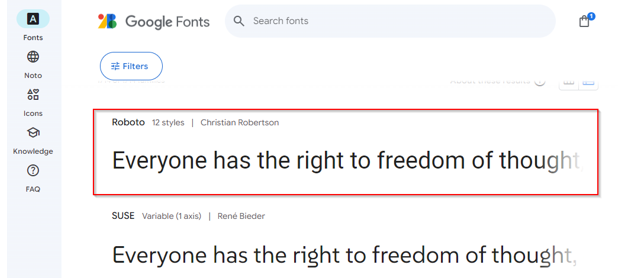
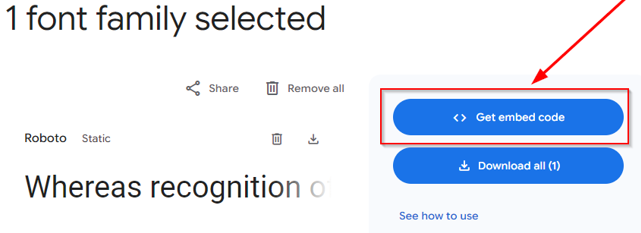
Click on the Get Font button. This will provide two options: you can either download the font or get an embed code.

We used the WordPress preferred method of wp_enqueue_style, for which we required the embed link. To get this, click on Get embed code.
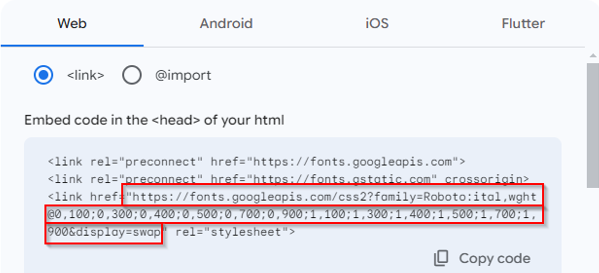
Now, you need to copy the embed link, which is highlighted in the following screenshot. This is the link you’ll add to your WordPress theme.
Step 2
Once you have the embed link, access your site’s theme files. For this, you can use your FTP client, like FileZilla, to connect to your website. To do this, you’ll need your FTP login credentials from your hosting provider.
If you’re a Hosted® user, you can find these FTP credentials at cPanel → Files → FTP Accounts. Once you have these login details, populate them in FileZilla and click Quickconnect.

Step 3
Once connected, go to /public-html/wp-content/themes/yourthemechild to edit the functions.php file. Don’t forget to replace yourthemechild with the name of your specific child theme. Ensure you’re working in a child theme that protects your site from breaking after updates.
<br>Alt
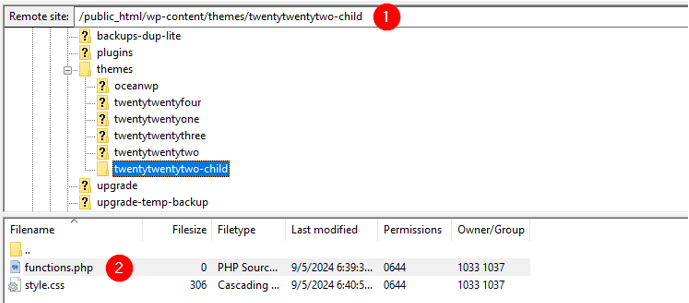
Important: If you haven’t set up a child theme yet, it’s important to do so before proceeding as a child theme lets you safely modify your website without affecting the core files in the main theme.
Step 4
Next, right-click on the functions.php file in your child theme and select View/Edit to open it in the editor.
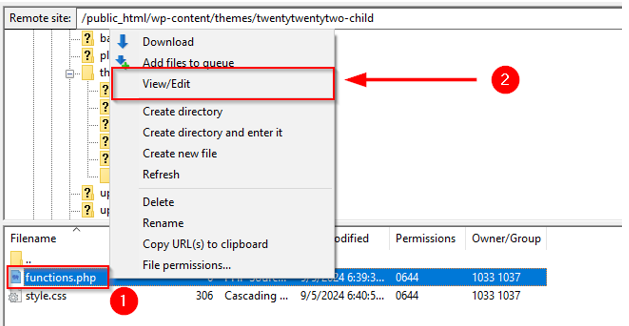
Now, to make WordPress recognize the font, you need to enqueue it. To do this, add the following code to the bottom of the functions.php file:
function add_my_font() {
    wp_enqueue_style( 'add_my_font', 'https://fonts.googleapis.com/css2?family=Roboto:ital,wght@0,100;0,300;0,400;0,500;0,700;0,900;1,100;1,300;1,400;1,500;1,700;1,900&display=swap', false );
}
add_action( 'wp_enqueue_scripts', 'add_my_font' );
After adding the code, save the functions.php file and re-upload it to your site using FileZilla.
Step 5
After that, you need to tell WordPress where you want this font to be used. To do this, locate and open the style.css file in the same child theme folder.
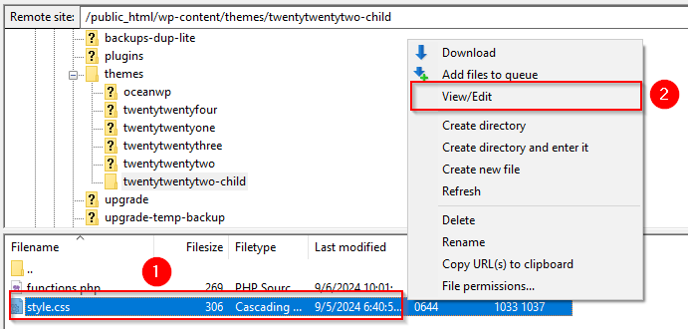
To apply the Roboto font to your website’s body text and headings, add the following CSS:
.body, .h1, .h2, .h3, .h4, .h5, .h6 {
    font-family: 'Roboto', sans-serif;
}
Once you’ve added this code, save the file and upload it to your site with FileZilla’s help. Your site will now have the new font you applied.
Important: Every theme is different, so it’s possible that the code may not work exactly as expected for all elements. If the font doesn’t appear as intended, you may use your browser’s inspection tool to identify the CSS rules for fonts and adjust them accordingly. However, if you’re still having trouble, reach out to your theme’s developer for assistance.
Until now, you’ve learned how to change font in WordPress using a theme customizer and plugin. We also went through the manual approach for changing the font in WordPress. We will look at how to change font in WordPress using custom fonts in Full Site Editing themes.
Use Custom Fonts in FSE Themes
Using custom fonts in WordPress themes that support Full Site Editing (FSE) lets you personalize your site’s typography across different templates. In Full Site Editing (FSE) themes (like Twenty-twenty Two), there’s no need to rely on the traditional @font-face CSS rule to include fonts.
Instead, fonts are placed in the assets/fonts/ directory and referenced through the theme.json file to integrate them into the theme. Here’s a simple, step-by-step guide on how to use custom fonts in FSE themes:
Step 1
Start by selecting the custom font you want to use. You can find free fonts on sites such as Google Fonts, Font Squirrel, or Adobe Fonts. For this tutorial, we’ll use the Roboto Google Fonts that we used in the previous section. However, the approach would be different – see below.
So, once you find your desired font, download it in web-safe formats like .ttf. These formats are recommended for use on websites.

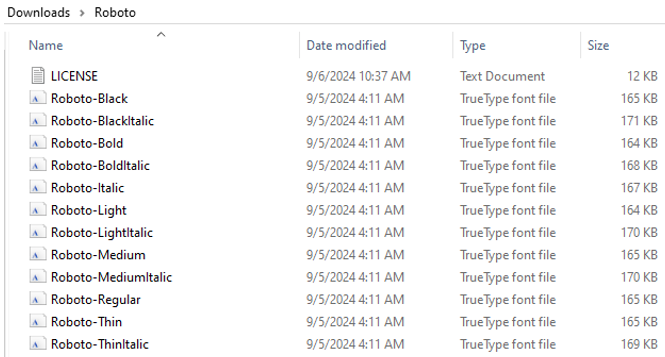
Once the download is complete, you’ll get a zip file on your local machine. Extract it to see all the Roboto font files.
Step 2
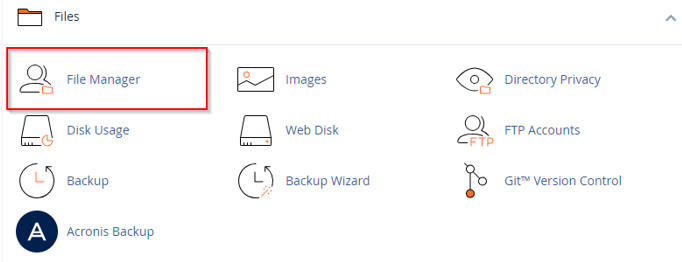
Log in to the web hosting control panel (cPanel) and access the File Manager feature. The location of this feature may vary depending on what host you’re using. However, Hosted® users can access File Manager by navigating to cPanel → Files → File Manager.
Step 3
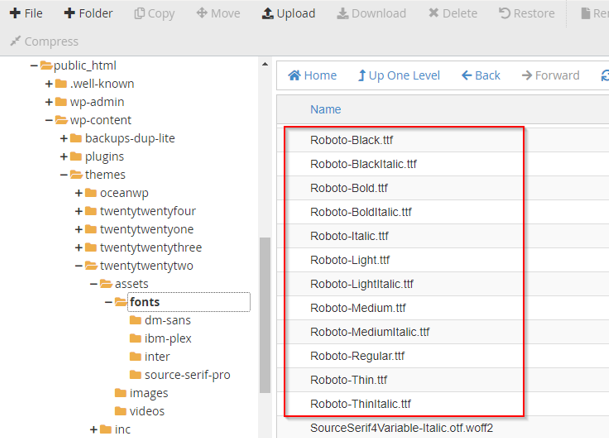
After accessing File Manager, navigate to /public_html/wp-content/themes/twentywentytwo/assets/fonts and upload your downloaded font files to this new folder.
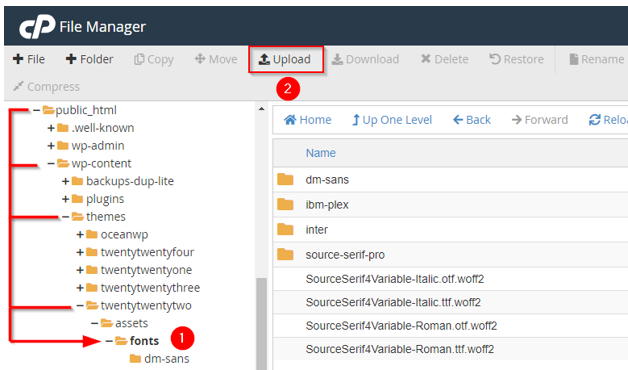
It will now look like this:
Step 4
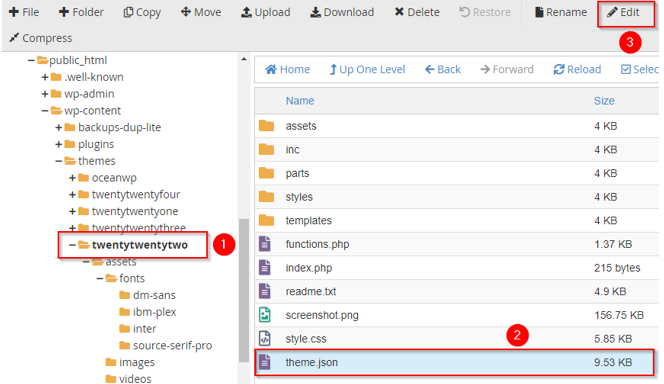
In FSE themes, fonts are managed through the theme.json file. This file controls the theme’s typography settings, including custom fonts. In your FTP client or hosting file manager, go to /public_html/wp-content/themes/twentywentytwo/. Locate the theme.json file and click Edit.
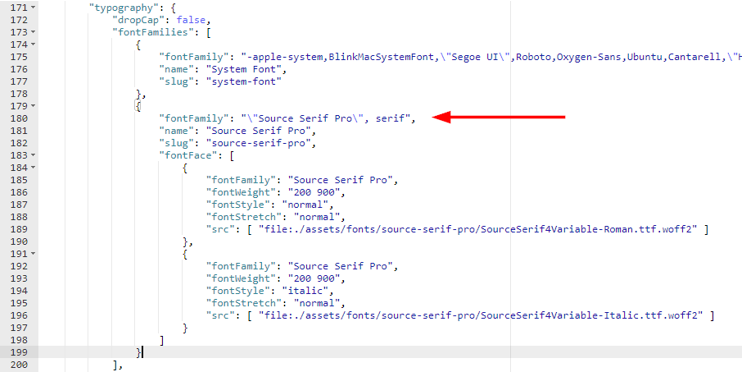
In the theme.json file, navigate to the settings section and scroll just beyond the typography settings where the Source Serif Pro code is located.
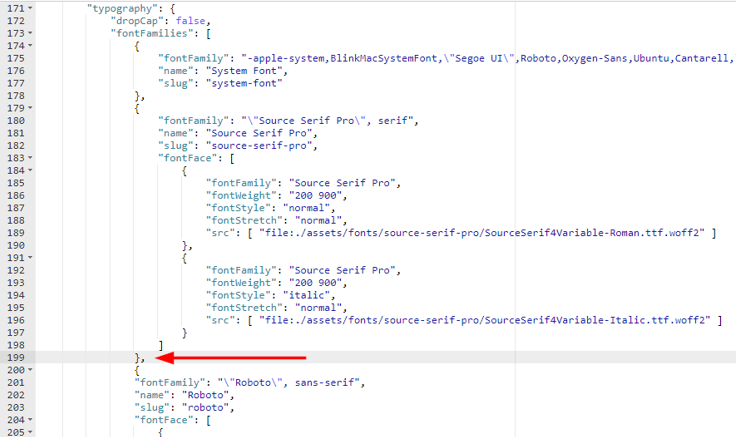
Then, write a comma after } (this is located at line 199 in our case) and write the following code after it:
{
    "fontFamily": ""Roboto", sans-serif",
    "name": "Roboto",
    "slug": "roboto",
    "fontFace": [
        {
            "fontFamily": "Roboto",

            "fontWeight": "900",

            "fontStyle": "normal",

            "fontStretch": "normal",

            "src": [ "file:./assets/fonts/roboto/roboto-black.ttf" ]
        },
        {
            "fontFamily": "Roboto",

            "fontWeight": "700",

            "fontStyle": "normal",

            "fontStretch": "normal",

            "src": [ "file:./assets/fonts/roboto/roboto-bold.ttf" ]
        },
        {
            "fontFamily": "Roboto",

            "fontWeight": "200",

            "fontStyle": "normal",

            "fontStretch": "normal",

            "src": [ "file:./assets/fonts/roboto/roboto-light.ttf" ]
        },
        {
            "fontFamily": "Roboto",

            "fontWeight": "400",

            "fontStyle": "normal",

            "fontStretch": "normal",

            "src": [ "file:./assets/fonts/roboto/roboto-medium.ttf" ]
        },
        {
            "fontFamily": "Roboto",

            "fontWeight": "300",

            "fontStyle": "normal",

            "fontStretch": "normal",

            "src": [ "file:./assets/fonts/roboto/roboto-regular.ttf" ]
        },
        {
            "fontFamily": "Roboto",

            "fontWeight": "100",

            "fontStyle": "normal",

            "fontStretch": "normal",

            "src": [ "file:./assets/fonts/roboto/roboto-thin.ttf" ]
        },
        {
            "fontFamily": "Roboto",

            "fontWeight": "900",

            "fontStyle": "italic",

            "fontStretch": "normal",

            "src": [ "file:./assets/fonts/roboto/roboto-blackitalic.ttf" ]
        },
        {
            "fontFamily": "Roboto",

            "fontWeight": "700",

            "fontStyle": "italic",

            "fontStretch": "normal",

            "src": [ "file:./assets/fonts/roboto/roboto-bolditalic.ttf" ]
        },
        {
            "fontFamily": "Roboto",

            "fontWeight": "400",

            "fontStyle": "italic",

            "fontStretch": "normal",

            "src": [ "file:./assets/fonts/roboto/roboto-italic.ttf"]
        },
        {
            "fontFamily": "Roboto",

            "fontWeight": "300",

            "fontStyle": "italic",

            "fontStretch": "normal",

            "src": [ "file:./assets/fonts/roboto/roboto-lightitalic.ttf" ]
        },
        {
            "fontFamily": "Roboto",

            "fontWeight": "400",

            "fontStyle": "italic",

            "fontStretch": "normal",

            "src": [ "file:./assets/fonts/roboto/roboto-mediumitalic.ttf" ]
        },
        {
            "fontFamily": "Roboto",

            "fontWeight": "100",

            "fontStyle": "italic",

            "fontStretch": "normal",

            "src": [ "file:./assets/fonts/roboto/roboto-thinitalic.ttf" ]
        }
    ]
}
Then, click Save Changes to save the theme.json file.

Step 5
Next, go to Appearance → Editor in your WordPress dashboard. This opens the Full Site Editor, where you can apply the custom fonts to different elements of your website.

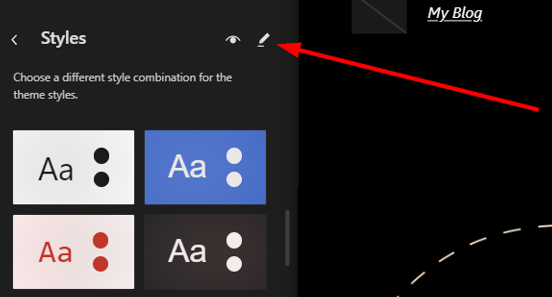
In the Styles panel, click on the pencil icon.
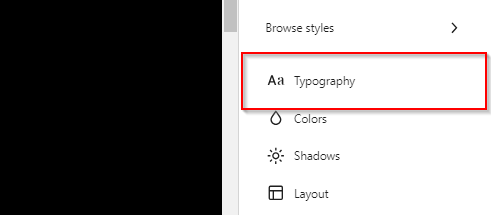
Then, navigate to the Typography section.
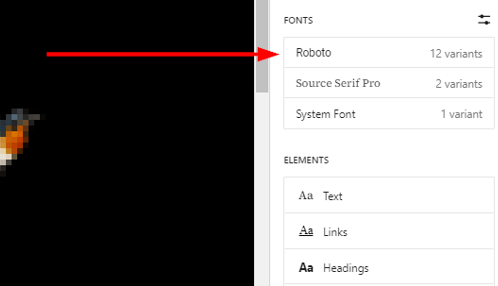
Now, you’ll see options to apply the custom font (e.g., Roboto) to various elements, such as headings, body text, and more.
After selecting your custom font, click Save to apply the changes.
Important:
If the custom font doesn’t display correctly, double-check the theme.json file and ensure that the font files are correctly uploaded in the right format. Alternatively, you can use your browser’s Inspect tool to confirm that the correct font is applied to text elements.
Tips & Best Practices
Below are a few tips and best practices that are worth using while exploring how to change font in WordPress website:
Optimize Font Usage for Performance:
When you use too many font files or large ones, this can slow down your website. To keep your site fast, choose fonts that are optimized for the web and only load the styles you need, like regular or bold.
Choose Readable & Accessible Fonts:
It’s important to pick fonts that are easy to read on all devices. Make sure the text size is big enough and that there’s a good contrast between the text and background.
Limit the Number of Fonts for a Clean Design:
Using too many fonts can make your site look messy. So, it’s better to stick to one or two fonts to keep things simple and professional. This will also improve your website’s speed and overall design consistency.
By following these best practices, you can ensure your website is fast, readable, and visually appealing!
![Revolutionize Your Website With Hosted®’s Premium WordPress Hosting Strip Banner Text - Revolutionize your website with Hosted®’s Premium WordPress Hosting. [Get started]](https://www.hosted.com/articles/wp-content/uploads/2024/09/change-fonts-in-wordpress-1-1024x229.png)
FAQs
How to change font in WordPress?
You can change the font in WordPress through the Theme Customizer, Full Site Editing, plugins, or by adding custom fonts manually.
Can I add custom fonts to WordPress without a plugin?
Yes, you can manually upload custom fonts using CSS or edit the theme.json file in FSE themes.
What’s the easiest way to change fonts in WordPress?
The easiest way is through the Theme Customizer, where you can select and preview fonts.
Do I need coding skills to change fonts in WordPress?
No, many options for how to change font in WordPress, like the Customizer or plugins, require no coding. However, manual methods may need some coding knowledge.
How to change font in WordPress using plugins?
Install a font plugin like Easy Google Fonts, then select fonts and apply them through the plugin’s settings.
What font formats are supported in WordPress?
WordPress supports web-safe formats like .woff, .woff2, and .ttf for custom fonts.
Can I use Google Fonts in WordPress?
Yes, many themes and plugins (e.g., Easy Google Fonts) allow easy integration of Google Fonts.
Will changing fonts affect my website’s speed?
Yes, loading large or too many fonts can slow down your site. Optimize font loading by restricting the number of fonts used.
How to change font in WordPress using Full Site Editing themes?
You can change the font by editing the theme.json file or using the FSE interface to modify global typography settings.
What’s the best font for my WordPress site?
While exploring how to change font in WordPress, select fonts that are easy to read, match your site’s style, and work well on all devices for accessibility.
Other Related Tutorials & Blogs:
– How to Export A WordPress Site: A Step-By-Step Guide
– How to Reinstall WordPress: Troubleshooting Guide
– Load Balancing for WordPress Hosting Performance
– Managed WordPress eCommerce Hosting to Boost Your Site
– Secure Ecommerce Payment Processing in WordPress Hosting


