
If you have a WordPress website, embedding a Google Form can make it easier for visitors to share information directly on your site. For example, if you’re running a blog, you can collect feedback or ideas from readers.
Google Forms is a free tool from Google that helps you collect information easily. Use it to create surveys, feedback forms, quizzes, or registration forms. With its simple interface, anyone can make a form without having technical skills.
If you have a business website, you can use forms for customer inquiries, event registrations, or collecting reviews. Instead of sending users to another page, they can fill out the form on your WordPress website, making it convenient for everyone.
The good news is that when you wish to embed a Google Form in WordPress, it is straightforward, even for beginners. You don’t need any coding experience. In this tutorial, we’ll learn how to embed a Google Form in WordPress with and without a plugin. Whether creating a simple survey, or a detailed questionnaire, this tutorial will help you get started easily.
KEY TAKEAWAYS
- When you embed a Google Form in WordPress, you’ll find it a simple way to collect feedback, orders, or survey responses directly from your site.
- To embed a Google Form in WordPress without any plugin, copy the form’s iframe code and paste it into your WordPress page or post.
- Install the EmbedPress plugin to embed a form by using the Google Form’s URL and adding it to your WordPress page or post. The plugin also offers customization features.
- Clear instructions and a clean design make your form more user-friendly and increase the chances of users completing it.
- Regularly check your form responses to stay updated and ensure the form works as expected.
- Using third-party tools like LeadsBridge can enhance Google Form integrations for advanced needs, such as WooCommerce compatibility.
TABLE OF CONTENTS
Google Forms vs WordPress Form Plugins
WordPress provides robust form builder plugins such as WPForms, Gravity Forms, and Contact Form 7. These tools offer advanced customization options and seamless integration with WordPress, enabling features like conditional logic, multi-page forms, and lead data management. However, they often come with a learning curve and may involve additional costs, depending on which features you need.
On the other hand, Google Forms is known for its simplicity and user-friendly design. Unlike WordPress plugins, it doesn’t need installation or updates, making it a great choice for users who prefer a hassle-free solution. It’s also free, so it’s an excellent option for individuals or small businesses working with limited budgets or those only needing basic functionality without extensive customization.
Benefits of Using Google Forms
Google Forms is a handy tool that makes creating and managing forms simple. It’s packed with features that help you collect information quickly and efficiently. Let’s look at the key benefits of using Google Forms:
Easy to Use & Intuitive:
Google Forms is designed to be straightforward, even for beginners. You don’t need to know coding or have special skills to create a form. The drag-and-drop interface lets you add questions, choose answer types, and organize everything effortlessly. It’s as simple as clicking, typing, and sharing.
Real-Time Responses &d Analysis:
One of the best features of Google Forms is that it instantly collects and organizes responses. When someone submits their responses, you see them in real time. When you link your Google Form with a Google Sheet, the data is automatically stored, making it easy to analyze trends, compare results, and act quickly.
Customization to Match Your Brand:
Google Forms allows you to tweak colors, fonts, and images to match your website or brand style. While it may not offer as much customization as professional form builders, you can still make forms that look professional. This adds a personal touch to your forms and helps maintain a consistent brand identity.
Mobile-Friendly & Responsive:
Today, many people access websites through their phones, and Google Forms works perfectly on all devices. Whether visitors use a tablet, phone, or computer, your forms will look great and function smoothly. This responsiveness ensures you won’t miss out on collecting valuable data from mobile users.
So, Google Forms is an excellent option for anyone who wants a quick, simple, and effective way to collect and analyze data. Its ease of use, real-time features, customization options, and mobile-friendly design make it a reliable tool for various needs.
How to Embed A Google Form in WordPress Website
This involves a 3-step process:
- Create Your Google Form.
- Get the Embed Code from Google Forms.
- Embed Google Form in WordPress Site.
Let’s go through each process below.
Step 1: Create Your Google Form
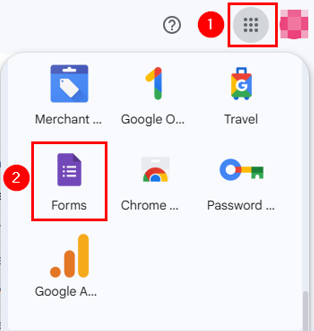
The first step to embed Google Form in WordPress is to create the form. Start by logging into your Google account. Once you’re logged in, go to Google Forms. You can also access it by clicking on the Google Apps menu (nine-dot drop-down) and then on Forms. This is where you can design and customize your form.
To create a new form, click the Blank form option (a plus sign) or choose a template from the Template gallery that fits your requirements. You can add different types of questions, such as multiple-choice, checkboxes, short answers, or dropdowns. For example, if you’re making a feedback form, you may use a mix of short answer and multiple-choice questions.

For this tutorial example, let’s create a form to collect feedback about a WordPress hosting service.
At the top, replace Untitled form with a meaningful title like Share Your Experience About WordPress Hosting.

Below the title, add a description to explain the purpose of the form, such as:
We value your feedback! Please take a few minutes to share your thoughts on our WordPress hosting services. Your responses will help us improve.
You may also format your form’s description using the given formatting tools.

Use the menu on the right to start adding questions specific to your hosting service.
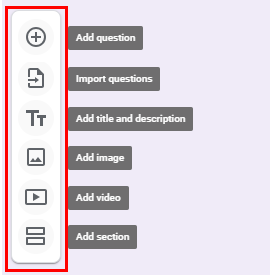
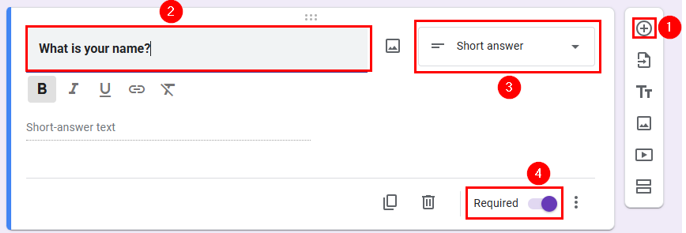
Let’s add a few sample questions so you understand the process. Click on Add question (+) to add a question. Write your questions (e.g., what is your name?). Choose your question type, which, in this case, is a Short answer. Enable Required if you wish respondents not to skip this question before submitting the form.
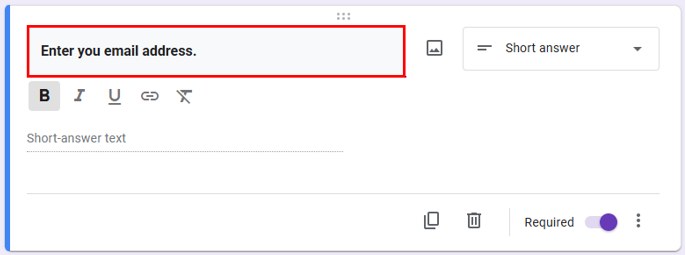
Add another short question asking for email addresses. This helps if you need to follow up. Then, instead of creating a new question from scratch, you can click Copy in the previous question to duplicate that and then update the question content. It makes the process easy and fast.
To add a multiple-choice question, click Add question again, type your question, and choose the question type as Multiple choice. Next, write your options.
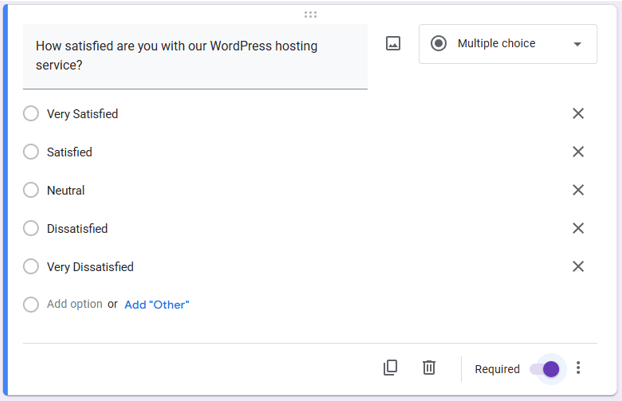
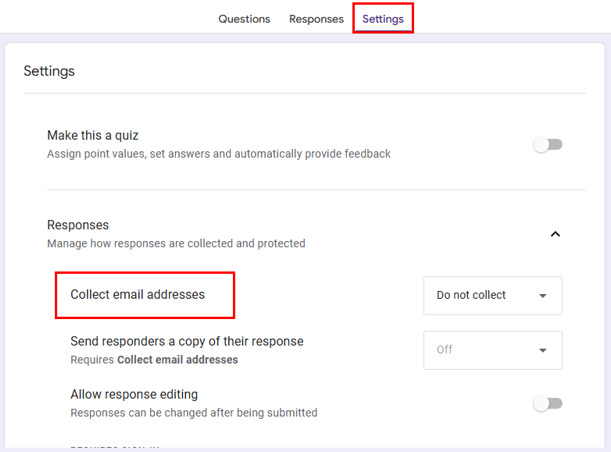
This way, you can add questions of your choice. To customize settings, click Settings. Here, you can enable Collect email addresses to follow up with respondents. Decide if you want to limit responses to one per person.
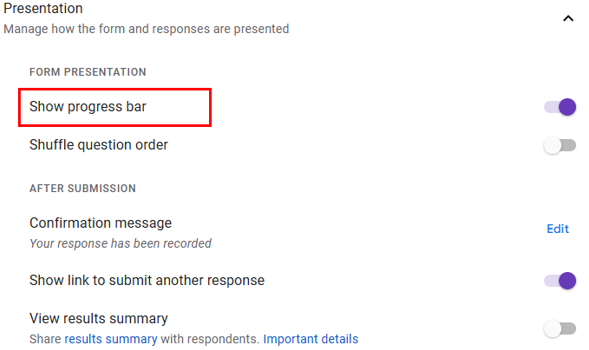
Scroll down to Presentation. Now, you can enable Show progress bar if the form has many questions.
Once your form is ready, preview it by clicking the Eye Icon at the top. This shows you exactly how it will appear to your visitors. Check for any mistakes, like missing questions or unclear instructions, and make changes if necessary. When everything looks good, click Publish to publish this form.

Now, your Google Form is ready for the next step.
Step 2: Get Embed Code from Google Forms
After creating your Google Form, the next step is to get the embed code to add it to your WordPress site. This is a simple process and doesn’t require any technical skills.
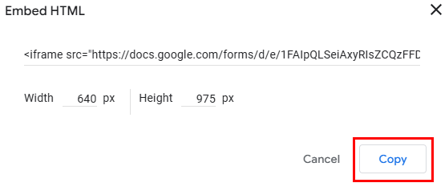
Click on the three-dot menu at the top and choose <> Embed HTML.
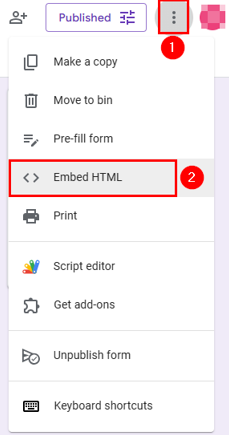
Now, an iframe code is displayed. You use this code to embed the form into WordPress. Before copying the code, you can adjust the Width and Height to customize the way the form looks on your WordPress site. Once satisfied, click Copy to save the iframe code to your clipboard. Right, you’re ready to move to the next step: adding the code to your WordPress page or post.
Safely develop and test changes without risking your live website with our WordPress Staging Area included in all Hosted®’s WordPress Hosting plans.
Experiment with new features, plugins, and designs while ensuring everything is perfect before going live, all backed by our expert support team.
Step 3: Embed Google Form in WordPress Site
Now that you have the embed code for your Google Form, it’s time to add it to your WordPress site. Whether using the Block Editor or the Classic Editor, the process is simple and easy for beginners. Let’s break it down step by step.
Use WordPress Block Editor
If your WordPress site uses the Block Editor, follow these steps:
Open the WordPress post or page where you want to display your form. You can edit an existing post or create a new one. Inside the editor click the + to add a new WordPress block. From the block options, search for Custom HTML and select it.

Once the Custom HTML block is added, paste the iframe code you copied earlier into the block. This code will display the Google Form on your page. After pasting the code, click Preview to check how the form will look on your site. Ensure everything appears correctly.

Finally, save your changes by clicking Save Draft or Save if it’s an existing post. Alternatively, you can click Publish to make it live on your WordPress website.
Using Classic Editor
If you’re using the Classic Editor, the steps are slightly different:
Open the post or page where you wish to embed the form. You can create a new post/page or edit an existing one. In the editor, switch to Text. This tab allows you to add code directly to your content. Paste the iframe code into the Text editor where you want the form to appear. Ensure you place it in the right spot within your content.

Once you’ve pasted the code, switch back to the Visual tab to preview how the form will look. If everything looks fine, click Publish or Update to save your changes.

That’s it! Your Google Form is now live on your WordPress site. Whether you’re collecting feedback, survey responses, or registrations, your visitors can easily fill out the form on your page. Ensure you test it yourself to check it’s working perfectly.
Use a Plugin for Embedding (Optional)
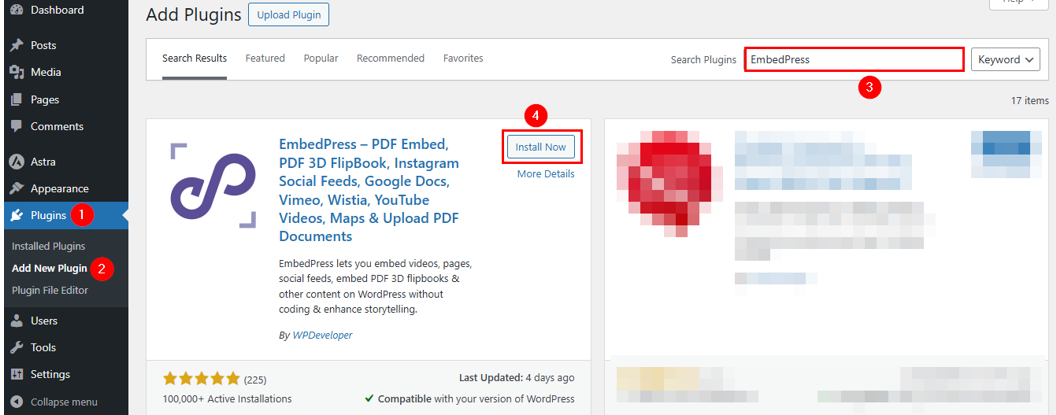
If you prefer an easier way to embed a Google Form without handling HTML code, use a plugin. Plugins like EmbedPress make embedding Google Forms into WordPress seamless and beginner-friendly. These tools handle the technical details for you so you can concentrate on creating your content.
Here’s how you can add Google Form to website using the EmbedPress plugin:
Go to WordPress Dashboard → Plugins → Add New Plugin and search for EmbedPress. Click Install Now. Once the installation is complete, click Activate.
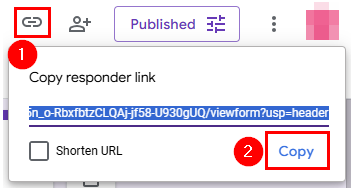
Next, open your Google Form, click on the link icon, and then click Copy to copy the responder link.
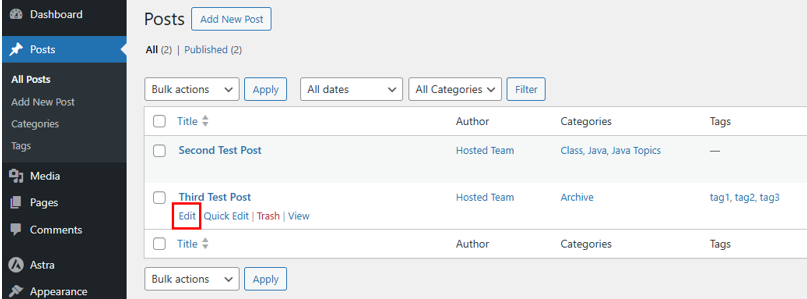
After that, sign in to your WordPress Admin Dashboard and open the page or post in the edit mode.
Navigate to the section where you want to add the form. Click + to add a new block, then search for Google Forms and select it.

Paste the Google Form URL into the content field and click Embed.

The URL will automatically transform into an embedded Google Form, visible directly on your page.
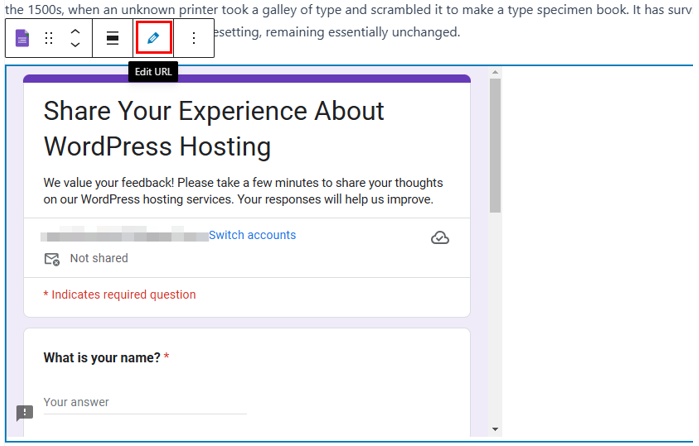
If you need to update or edit the embed form, EmbedPress makes this easy. Click on the embedded form, and a pencil icon will appear. This icon, named Edit URL when you hover over it, allows you to modify the URL or alter the embed. Click the pencil icon to adjust as needed.
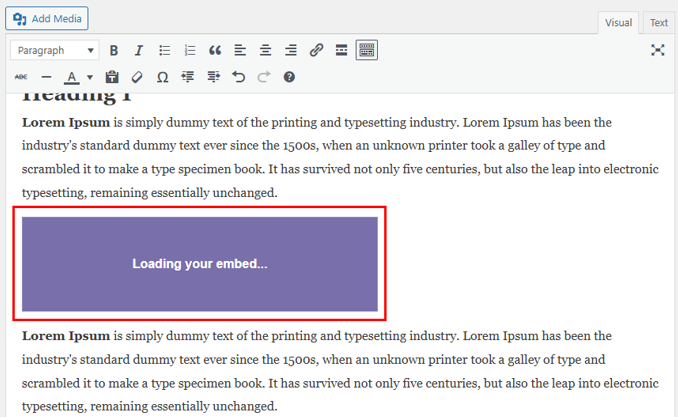
However, if you’re using a Classic Editor, paste the URL of your Google Form into the content area. You’ll notice a purple background with a message that reads: Loading your embed. After a few moments, the URL is automatically converted into an embedded version of your Google Form.
Use Google Forms with WooCommerce
Google Forms is a versatile tool that is also highly useful for WooCommerce and other ecommerce platforms. It allows you to create custom order forms effortlessly. You can also use the built-in order form template to save time and streamline the process.
You can use Google Forms to collect customer details, request feedback about products, or ask buyers to rate their shopping experience. This makes it an excellent choice for gathering valuable insights and improving customer satisfaction.
However, there’s a catch: embedding Google Forms on your product pages won’t connect them directly to WooCommerce’s order processing system. This means that, while Google Forms helps collect data, it lacks integration with WooCommerce’s built-in functionalities. Thankfully, the third-party tool LeadsBridge can bridge this gap.
LeadsBridge is a powerful solution for integrating WooCommerce with Google Forms. It automates the connection between the two platforms, allowing you to track leads and monitor customer interactions seamlessly.
With LeadsBridge, you can monitor your ecommerce performance and manage data more efficiently. It provides step-by-step instructions to set up the integration, enabling you to create custom order forms and other features to improve your online store.
Tips to Optimize Embedded Google Form
When you embed Google Form in WordPress, ensure it works well and gives the best experience to your users. You need to optimize it to do this. Here are some simple tips to help you get started:
- Ensure Your Form is Mobile-Friendly: Test your form on mobile devices to confirm it displays correctly and is easy to fill out on smaller screens. Avoid making it too cluttered with excessive questions or elements.
- Use Clear, Simple Instructions: Write simple and precise instructions for each question to avoid confusion. Clear directions help users complete the form quickly and correctly.
- Regularly Check Form Submissions: Monitor your Google Form responses or linked Google Sheet to ensure data is accurate and complete. Regular checks help you stay updated and spot any issues early.
Follow these tips to create a Google Form that’s easy to use, works well on all devices, and helps you collect accurate and useful information. Remember, a well-optimized form improves the user experience and ensures you get the most out of your embedded Google Form.
![Explore new features without any risk with Hosted®’s WordPress Staging Area Strip Banner Text - Explore new features without any risk with Hosted®’s WordPress Staging Area. [More Info]](https://www.hosted.com/articles/wp-content/uploads/2025/02/embed-a-google-form-2-1024x229.webp)
FAQS
How can I share the same Google Form on multiple pages or websites?
Google Forms can be embedded on multiple pages or websites by simply reusing the same embed code or URL. Any responses submitted through these forms will be collected in a single place, simplifying managing data across different platforms.
Can I restrict access to my embedded Google Form?
Yes, you can control access to your form by adjusting the settings in Google Forms. For example, you can restrict responses to specific users, such as those with a particular email address, or enable a setting to allow only one response per user. This helps maintain data quality and prevent spam.
What are the limitations of embedding Google Forms in WordPress?
The main limitation is that Google Forms doesn’t integrate directly with WordPress functionalities, such as ecommerce systems like WooCommerce. Additionally, while it offers basic customization, it doesn’t provide advanced styling options or conditional logic that some WordPress form plugins include.
How do I update a Google Form after embedding it in WordPress?
Any changes you make to your Google Form are updated automatically on your WordPress site. There’s no need to re-embed the code. This simplifies editing questions, adjusting form settings, or updating content without further steps.
Can I embed Google Form in WordPress website’s sidebar or widget area?
Yes, you can embed a Google Form in a sidebar or widget section using a Custom HTML widget. Paste the embed code into the widget, and the form will appear in the designated area of your WordPress website.
Other Related Tutorials
– WordPress Widgets: How To Add & Use Them For Maximum Impact
– How to Use the wp_get_attachment_image Function in WordPress
– How To Disable Comments On WordPress: A Step-By-Step Guide
– How To Configure WordPress Error Logs: Identify & Fix Issues
– WooCommerce Shortcodes: A Guide to Their Uses & Benefits


