In this tutorial, we’ll take you step-by-step through how to host websites for clients. By doing so, you’re not just building a website, you’re creating a reliable service that benefits you and your clients. This isn’t just helpful for clients; it’s a great opportunity for you. Hosting services bring in steady, recurring income, help build long-term client relationships and provide more control over website performance. Plus, since you manage the hosting, fixing issues becomes much easier.
Every website needs web hosting to be available online. Hosting stores website files on a server, making them accessible to visitors. A good hosting setup ensures fast loading, security, and reliability, all essential for businesses, bloggers, and online stores.
Many clients don’t know how to choose or manage hosting. That’s where you come in. By offering hosting services, you can handle everything for them: setting up, maintaining, and securing their websites so they don’t have to worry about the technical side.
KEY TAKEAWAYS
- Always choose the right hosting provider to host websites for clients. Look for high uptime, strong security, and 24/7 support.
- Before setting up hosting, assess the client’s website type and expected traffic to choose the best hosting plan.
- Use a staging environment or temporary domain to build and test the website before going live.
- Update DNS settings to point the client’s domain to your hosting server and allow time for DNS propagation.
- Set up automatic website backups to prevent data loss and enable security measures like SSL, firewalls, and strong passwords.
- Perform regular maintenance by updating software, monitoring performance, and fixing issues quickly.
- Keep clients informed with clear communication, regular updates, and simple explanations of any problems.
- Stay updated on hosting trends, security updates, and best practices through forums, webinars, and online communities.
- Offering hosting services helps clients and builds long-term business relationships and recurring revenue.
TABLE OF CONTENTS
Understand Web Hosting
Web hosting is a service that stores website files on a special computer called a server. When someone types a website’s name into a browser, the server delivers the site’s content to be viewed online. Without web hosting, a site would not be accessible to anyone.
To understand how hosting works, let’s look at its main components:
- Server: A computer that stores website files and makes them available online.
- Domain Name: The website’s address (like example.com) that directs users to the correct server.
- Bandwidth: The amount of data that can be transferred when users visit the site.
- Storage: Space on the server to store website files, images, and databases.
Types of Web Hosting
Different websites need different hosting types. Below are the most common ones:
- Shared Hosting: Many websites share one server. It’s cheap but can be slow.
- VPS Hosting: A server is divided into sections, giving each website its own space. It’s faster and more secure than shared hosting.
- Dedicated Hosting: A whole server is used for one website. It’s powerful but expensive.
- Cloud Hosting: Uses multiple servers to balance traffic and prevent downtime. It’s flexible and reliable.
- Managed WordPress Hosting: It’s particularly optimized for the WordPress content management system (CMS).
So, you need to choose the right hosting depending on website size, traffic, and security needs. Understanding these basics helps you provide the best hosting to host clients’ websites.
Benefits & Challenges of Hosting Client Websites
Hosting websites for clients can be a great way to grow your business, but it also comes with responsibilities. Let’s look at the benefits and the challenges of managing client hosting.
Easier Setup for Clients:
Many clients cannot understand web hosting or how to set it up. When you offer hosting services, you handle everything for them, making the process smooth and stress-free. This way, clients can focus on their business while you take care of the technical side.
Recurring Revenue:
Instead of a one-time payment for building a website, hosting allows you to earn money every month or year through hosting fees. This steady income helps keep your business running even when you’re between projects.
More Control Over Website Performance:
When you manage hosting, you ensure websites run fast, securely, and without downtime. If a client uses poor hosting, their site can load slowly or crash; this can hurt their business. By offering reliable hosting, you keep websites performing well.
Responsibility for Uptime & Performance:
Since you are the host, clients expect their websites to be online constantly and work properly. If there’s an issue, you must fix it fast. This means monitoring servers, updating software, and handling unexpected problems.
Financial Risks:
Clients can stop paying for their hosting, leaving you with the bill. Prevent this by always setting clear payment terms and requiring upfront payments, or automated billing.
Ongoing Maintenance & Support:
Hosting is not a one-time task. You must update servers, protect sites from hackers, and troubleshoot problems when they arise. This requires time and technical knowledge.
By understanding these benefits and challenges, you can decide if you can host websites for clients. If managed well, it can be a profitable and rewarding service.
Preparing to Offer Hosting Services
Before you host websites for clients, you need the right setup. This includes choosing a reliable hosting provider, setting fair pricing, creating contracts, and adding hosting to client proposals. Let’s go through these steps.
Select a Reliable Web Hosting Provider
Your hosting provider affects the client’s website’s performance, security, and reliability. When choosing a provider, consider:
- Uptime & Speed: Look for 99.9% uptime and fast servers to keep websites online and loading quickly.
- Customer Support: Choose a provider with 24/7 support to help resolve issues fast.
- Transparent Pricing: Avoid hidden fees. Understand the costs for bandwidth, storage, and security features before committing.
Popular hosting options include Managed WordPress Hosting, VPS Hosting, and Cloud Hosting. Pick an option based on your client’s needs. With us, you are guaranteed 99.9% uptime and 24/7 professional support. Each package provides the quote with a detailed features list. So, you don’t have to worry about hidden costs.
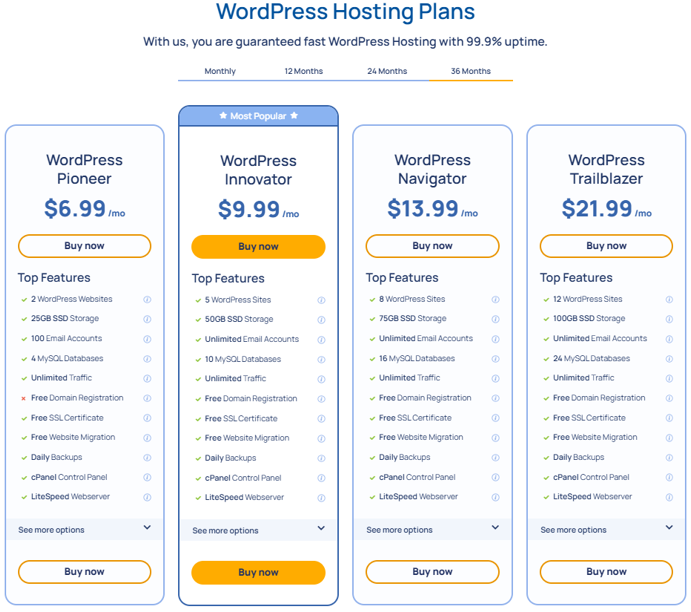
Establish a Pricing Model
Pricing should cover hosting costs, your time, and your profit. Here’s how to set fair rates:
- Calculate Expenses: Include hosting fees, domain costs, and maintenance time.
- Offer Different Plans: Create basic, standard, and premium packages to fit various budgets.
- Charge Monthly or Annually: Subscription-based payments ensure a steady income.
A simple pricing model helps clients understand their options and makes billing easier for you.
Create Comprehensive Hosting Contracts
A clear contract protects you and your clients. It should include:
- Scope of Services: Explain what is included (e.g., hosting, backups, security updates).
- Payment Terms: List pricing, billing dates, and accepted payment methods.
- Responsibilities: Define what you manage and what the client needs to do (e.g., content updates).
Specifying all this is important because contracts prevent misunderstandings and ensure a smooth working relationship.
When pitching your services, show clients why your hosting is better than doing it themselves. You can highlight the benefits by explaining that your hosting is fast, secure, and hassle-free. Additionally, you can include detailed hosting features, such as a hosting control panel (cPanel), website backups, SSL security, and performance optimization in your proposals.
By preparing well, you create a professional and profitable hosting service that benefits you and your clients.
TIP: If you choose Hosted®, you don’t have to worry about any of these because we provide daily automatic backups for all hosting packages, free SSL, free cPanel, and optimized for WordPress and unlimited traffic, subdomains & FTP accounts, and more.
How to Handle Website Hosting for Clients
In this section, we’ll go through a step-by-step process to host websites for clients. Let’s get started:
Assess Client Hosting Requirements
The first step is to identify the type of website the client wants. A personal blog or small business site usually doesn’t need much storage or processing power. However, an ecommerce store, membership site, or high-traffic blog will require a more powerful hosting plan.
Another key factor is website traffic. A shared hosting plan may be enough if the website is new and has few visitors. But if the website expects thousands of visitors per day, it’s better to choose VPS, cloud hosting, or a dedicated server to handle the load.
Once you understand the client’s website type and traffic requirements, you can recommend the best hosting plan. This helps ensure the site runs fast, stays secure, and performs well under different conditions.
Configure Your Hosting Account
After determining the client’s hosting needs, the next step is to set up their hosting account. This means creating a space where their website files will be stored and ensuring everything is properly configured for smooth performance.
If you have shared hosting, you should purchase a separate hosting plan for each client and connect it to their domain. For VPS or dedicated hosting, allocate separate server resources to each client, ensuring better speed and security.
Once the account is set up, you need to optimize the hosting environment based on the type of website your client is running. If they are using WordPress with us, you can install it using a one-click feature by navigating to Manage Services → WordPress Hosting → Quick Manage → Install WordPress:
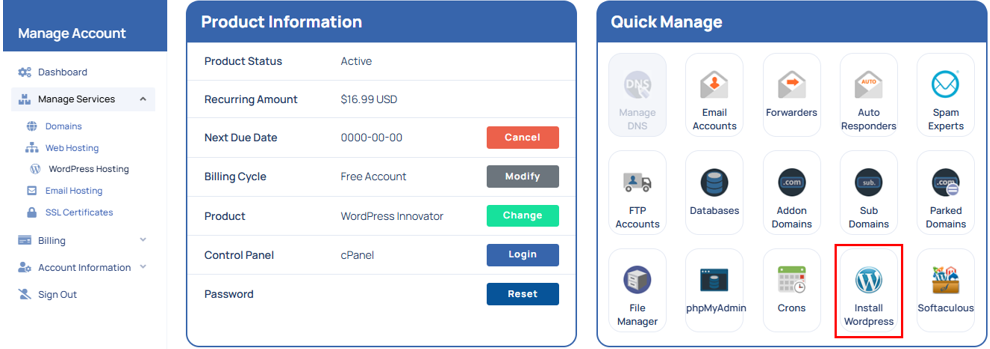
Or, you can use Softaculous. For detailed instructions, refer to the following guide:
– How To Install WordPress From Softaculous
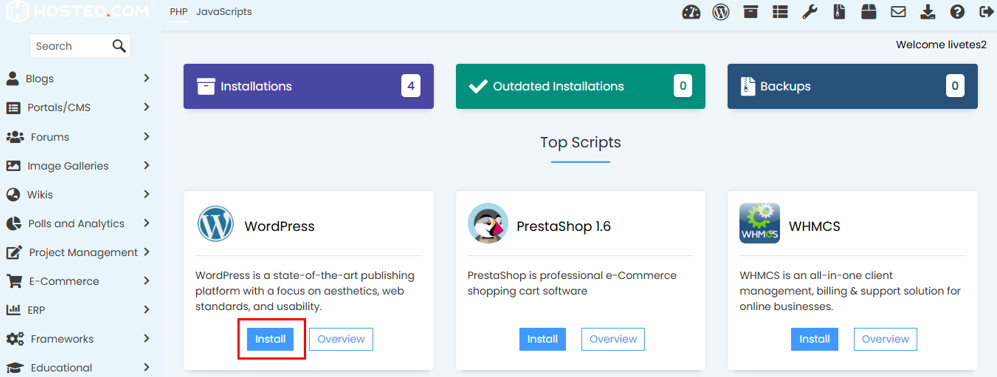
Then, to improve speed, enabling LiteSpeed Cache or another caching plugin can help. If you’re using Hosted® to host websites for clients, you can enable LiteSpeed Cache quickly by going through the following steps:
To activate LiteSpeed Cache using the LiteSpeed Web Cache Manager in cPanel, follow these steps:
Login to the Hosted® cPanel and go to Advanced. Click LiteSpeed Web Cache Manager to open the settings.

Under LiteSpeed Cache Management, select WordPress Cache.
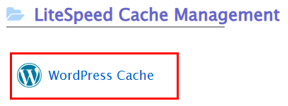
Click Scan to detect your WordPress installations. Select the website where you want to enable caching and click Enable to activate LiteSpeed Cache for that site.

This process ensures your WordPress site benefits from faster load times and optimized performance. Also, set up automatic backups and enable SSL certificates to protect the website from cyber threats.
For ecommerce websites or high-traffic platforms, you need more resources. Ensure the hosting plan offers sufficient RAM and CPU power to handle multiple visitors immediately. Using a Content Delivery Network (CDN) can also help improve speed for users worldwide.
Remember, a properly configured hosting account ensures the client’s website runs smoothly, securely, and efficiently. With the hosting environment ready, the next step is to develop and launch the website.
Develop Client’s Website
Once the hosting account is set up, the next step is to build the client’s website. Instead of working directly on the live domain, use a temporary domain name or staging environment.
This helps prevent visitors from seeing an unfinished website and allows you to test before launch. If you’re using Hosted® to host websites for clients, you can set up a staging site from WordPress Manager:

A staging environment is a separate space where you can build and edit the website without affecting the live site. Many web hosting providers offer staging tools, especially for WordPress hosting. Here’s how you can create a staging website using Hosted®:
– How To Set up A WordPress Staging Site
If your hosting provider doesn’t provide a staging feature, you can use a temporary subdomain or install the website in a different folder on the hosting server.
After setting up the staging site, test all features carefully. Check if pages load correctly, forms are submitted properly, and images display as expected. If the site has ecommerce functionality, test the checkout process, payment gateways, and security settings.
Also, ensure the website is mobile-friendly and works well on different devices and browsers. Once everything is working perfectly, the final step is to move the site to the live domain and launch it for the client.
Update Domain Name System (DNS) Settings
Once the website is fully developed and tested, the next step is to connect the domain to the hosting server. Do this by updating the Domain Name System (DNS) settings. DNS acts like an address book, directing visitors to the right server where the website is hosted.
For the website to go live, the client’s domain must be linked to the correct hosting server. This process is called domain pointing and is done by updating the nameservers or A records in the domain registrar’s control panel.
Nameservers Method
Find the hosting provider’s nameservers (e.g., ns1.example.com, ns2.example.com). Next, log in to the domain registrar. Go to the DNS settings and replace the old nameservers with the new ones. Then, save the changes. Hosted® users can refer to the following link to update nameservers:
Point an External Domain to Your Hosting Server
(add a link to this section of the “Tut OS-104 – How to Host Multiple Websites on One Server” tutorial)
The A Record Method
Locate the hosting account’s IP address. In the DNS settings of the domain registrar, update the A record with this IP address. Then, save and wait for the changes to take effect.
Remember, after updating the DNS, the changes do not happen instantly. The process of spreading new information across the internet is called DNS propagation, which can take anywhere from a few minutes to 48 hours.
In this time frame some users will see the new website, while others will still see the old one. To speed up the process, you can:
- Clear your browser cache.
- Use a tool like WhatsMyDNS.net to check the propagation status.
- Inform the client that the website may take some time to update for all visitors.
Once DNS propagation is complete, the website will be fully live and accessible from its domain. The next step is to set up security and backups to ensure long-term stability.
TIP: Buying a domain name is simple. However, transferring it can be complicated. Avoid issues by having your client purchase the domain and give you the login details. This way, you can manage the DNS settings without the hassle of transferring ownership.
Set up Backups & Security Measures
Once the website is live, keeping it safe and secure is a top priority. A website can face problems like hacking, data loss, or software errors, so setting up regular backups and strong security measures is essential.
This helps restore your website’s files and database if anything goes wrong. Without backups, recovering a hacked or broken website can be difficult. To ensure safety, follow these steps:
- Use Automated Backups: Most web hosting providers offer daily or weekly backups. Enable this feature so backups are created automatically.
- Store Backups in Multiple Locations: Save copies on the server, cloud storage (Google Drive, Dropbox), or an external hard drive to prevent data loss.
- Test Backups Regularly: Occasionally restore a backup to ensure it works and contains all the necessary files.
Furthermore, provide security protocols to protect against cyber threats such as hacking, malware, and brute-force attacks. To prevent these risks, install an SSL certificate, use security plugins, enable firewall and DDoS protection, set strong passwords, and limit login attempts.
Best Practices for Managing Client Web Hosting
Managing client hosting goes beyond just setting up a website. Ensure websites stay secure, fast, and reliable by following best practices for maintenance, communication, and continuous learning. Proper management improves website performance and strengthens client trust in your services.
Regular Maintenance
Keeping the hosting environment updated and optimized is important for smooth website operation. Outdated software can lead to security vulnerabilities, slow performance, and compatibility problems.
Here, regular updates play a significant role in preventing security threats. Ensure that server software, WordPress core, plugins, and themes are always updated. To do this, refer to the following detailed tutorials:
– How to Update WordPress: 5 Easy Ways
– How to Update WordPress Plugins: A Step-by-Step Guide
– How to Update WordPress Theme: 5 Effective Methods
Monitor website performance using tools like Google PageSpeed Insights or GTmetrix to help identify and fix slow-loading pages.
Also, addressing issues such as downtime, broken links, or security threats immediately prevents further complications. Remember, a well-maintained website enhances user experience and protects a client’s online business reputation.
Effective Communication
Clients depend on you to keep their websites running smoothly, so maintaining clear communication is key to building trust. Regular updates help clients understand the work being done to keep their websites secure and functional.
Additionally, providing timely notifications about security checks, updates, and website improvements reassures clients that their sites are well-managed. In case of technical issues or downtime, be transparent, explain the situation, and provide the steps you are taking to fix it.
Since many clients don’t have technical knowledge, simplifying explanations helps them better understand website issues and solutions. Keep clients well-informed to enhance their confidence in your hosting services and reduce unnecessary confusion and concerns.
Continuous Learning
The web hosting industry is constantly evolving, and staying updated with new technologies helps improve the quality of service you provide for clients. Keeping up with industry trends allows you to offer better hosting solutions and enhanced security measures.
Stay updated by following well-known hosting and technology blogs such as the Hosted® blog and WordPress.org. Engaging in online communities also provides valuable insights from other professionals in the industry. Additionally, attending webinars and training sessions offered by hosting providers can help expand your knowledge on server management, security, and performance optimization.
By continuously learning and adapting to industry changes, you can stay ahead of the competition and provide clients with top-quality hosting services that meet modern web standards.
![Choose Hosted® for all your Web Hosting needs Strip Banner Text - Choose Hosted® for all your Web Hosting needs. [Get started]](https://www.hosted.com/articles/wp-content/uploads/2025/02/host-websites-for-clients-2-1024x229.webp)
FAQS
How can I offer email hosting to clients?
Many clients want a professional email address with their domain. You can offer this by setting up email hosting through cPanel. Most web hosts provide built-in email services, where you can create custom email accounts like info@clientdomain.com. Ensure you set up spam filters, storage limits, and backups for smooth email performance.
What happens if a prospect wants to cancel hosting?
You must have clear refund and cancellation policies to avoid disputes and keep your hosting business professional.u003cbru003eIf a client decides to cancel hosting, follow these steps:u003cbru003e- Confirm cancellation terms based on your contract. Some hosting plans require a 30-day notice before termination.u003cbru003e- Provide a website backup in case they wish to move to another host.u003cbru003e- Assist with domain transfers if their domain is registered under your service.u003cbru003e- Close the hosting account and remove their files securely after the cancellation period.
Should I include website maintenance in my hosting services?
Yes. Offering website maintenance helps keep client websites updated, secure, and running smoothly. This can include plugin and theme updates, security checks, backups, and performance monitoring. Many web professionals charge a monthly maintenance fee along with hosting, ensuring clients get full support while you generate recurring income.
Can I move a client’s website to another hosting provider later?
Yes. If a client outgrows their current hosting plan or wants better performance, you can migrate their website to a different hosting provider. The process involves backing up files, exporting databases, and updating DNS settings. Some hosting companies offer free migration services, making the transfer easier. Always test the website after migration to ensure everything works perfectly.
Can I use a free hosting service to host websites for clients?
Free hosting is not recommended for client websites. Free plans often include limited storage, slow performance, ads, and security risks. To provide professional hosting services, use a reliable paid hosting provider to ensure speed, security, and support.
Other Tutorials of Interest
– How to Host Multiple Websites on One Server
– How To Setup & Configure WordPress RSS Feeds
– How To Setup A WordPress Dropdown Menu: 3 Easy Methods
– How To Change The Logo In WordPress: 3 Effective Methods
– WordPress Permalinks Not Working: 3 Easy Ways to Fix Them


