Imagine you’ve spent hours, days, or even years building your WordPress website. It’s full of your hard work, creativity, and important information. Now, think about what would happen if something went wrong—like a server crash or a hacker attack—and you lost all that content. Scary, right? This is why it’s so important to export a WordPress site.
Exporting your site means creating a copy of all your website’s content, like posts, pages, and images. You do this to keep your work safe and easily restore it if something unexpected happens. There are several reasons why you would export a WordPress site.
Maybe you’re moving to a new hosting provider, creating a staging website for development, or you are keen to keep a backup for safety. Whatever the reason, having a recent export can save you a lot of time and stress.
In this tutorial, you will learn different ways to export WordPress sites. We’ll cover everything from using the built-in WordPress export tool to more advanced methods, like plugins and manual backups.
KEY TAKEAWAYS
- It is essential to export WordPress site to keep your content safe and migrate to a new host or domain.
- The built-in tool to export WordPress site lets you choose between exporting all content or specific types like posts, pages, and media.
- Plugins like Duplicator offer a simple way to create complete site backups, including files and databases.
- SFTP allows manual export of site files, giving you more control over what you save.
- phpMyAdmin is great for exporting your WordPress database, letting you keep a secure copy of your site’s data.
TABLE OF CONTENTS
Significance of Exporting WordPress Site
Imagine you want to move your site to a new domain name or switch to a different hosting provider. Exporting your site makes this process smooth and easy. It’s like packing up everything when you move to a new house; you want it to come with you, right? By exporting your site, you ensure all your posts, pages, and settings are saved and can be easily set up again in the new place.
Exporting WordPress sites is also important for backups. Think of backups as a safety net. If something goes wrong, you’ll have a recent copy of your website that you can use to restore everything. This can save you from losing all the hard work you’ve put into your website.
Following the above, before making major changes to your live website, it’s a good idea to create a staging or development environment. Exporting your live site to a local server or a subdomain allows you to test updates, new plugins, or design changes without affecting the live version.
Therefore, understanding these reasons is important to see why exporting is not just a technical step but an important part of managing your WordPress website. It’s about keeping your work safe and having the freedom to make changes whenever you need.
Before explaining further, it’s important to discuss what file type will be exported. For all the WordPress export methods we’ll discuss, you’ll get a .zip file. In this .zip file, you’ll have an XML file containing your content backup. However, when you export WordPress site media content, the .zip file would have the media files rather than an XML file.
Now that you have your site’s export file, you can import it into a new WordPress site on a different hosting service, or you can save it as a backup. If you’re migrating to a new host, you’ll usually go to the new site’s dashboard, find the Import option, and upload your XML file.
You can import content by navigating to WordPress Dashboard → Tools → Import. Follow the on-screen instructions and upload your XML file. This will transfer all your content to the new site. If you create a backup, store the file somewhere secure, like an external hard drive or cloud storage.
Export WordPress Site Using Built-in Tools
For self-hosted WordPress sites (which means you choose a hosting provider and install WordPress there to have full control of your site), you can export WordPress site content directly from the admin dashboard.
This method is ideal if you want to move your written posts, pages, and media files but don’t need to include the WordPress core files or database. It’s also a great way to create an additional backup of your site’s essential content.
With this method, you can choose specific types of content to export, such as Posts, Pages, Media files, or other custom content.
Other types of content might include data generated by ecommerce plugins, like Products, Orders, Product variations, Coupons, and Testimonials. Additionally, it may contain content created by other plugins you have installed, including Contact forms, Pop-ups, and other similar elements.
Here are the steps to effectively export this WordPress content using the built-in export tools:
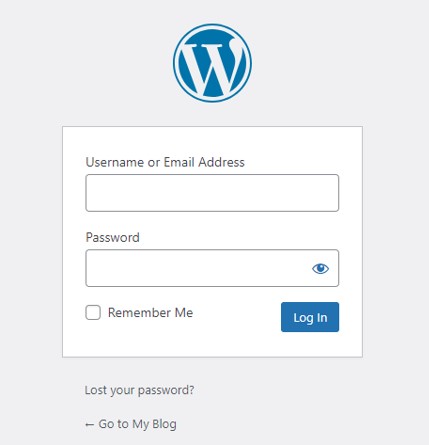
Step 1: Log in to the WordPress Dashboard
You can do this by going to yourwebsite.com/wp-admin and providing your username and password.
Step 2: Navigate to Export Tool
Once you have logged in, look at the menu on the left side of the dashboard. Click on Tools to expand the options. Then, click on Export. You will now reach the export page.

Step 3: Choose What to Export
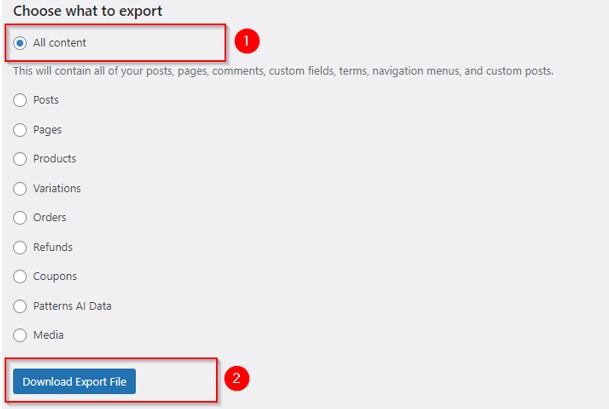
On the Export page, you’ll see several options for the type of content you want to export:
- All Content – Select this to export everything, including posts, pages, comments, custom fields, terms, navigation menus, and custom-created posts.
- Posts – Choose this option to export only your posts. You can refine this further by choosing specific categories, authors, date range, and post status (published, draft, etc.).
- Pages – Select this if you only want to export pages.
- Media – This option lets you export the WordPress site’s media files, such as images and videos.
- Other Content – This could include content created by plugins, such as products from an e-commerce plugin or other custom post types.
You need to select the option that best fits your needs. If you’re unsure, choosing All Content is a safe bet to ensure you have a complete backup.
After selecting the content type, click on the Download Export File button. WordPress generates an XML file that contains your site’s data. This might take a few moments, especially if you have a lot of content on your site.
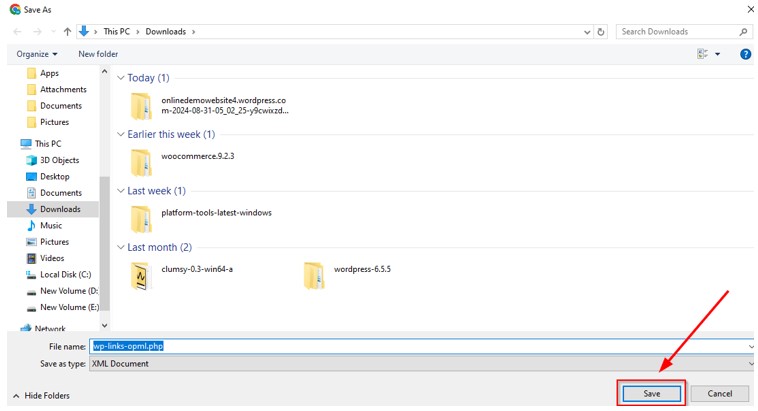
Once the XML file is ready, you’ll see a message that says your export is complete and it can be downloaded to your computer. Save it in a secure location where you can easily find it later. This file will be useful if you need to restore your site or move the site to another server.
You can now name the file as you wish; in this example, we keep the default filename. Then click the Save button.
Step 4: Importing Your Content (Optional)
If you need to use this exported file to move your content to another WordPress site, then:
- Log in to the WordPress dashboard of the new site.
- Go to Tools → Import. You may need to install the WordPress Importer plugin, which is prompted automatically.
- Once installed, you can use the importer tool to upload the recently exported XML.
Follow the prompts to import your content, and WordPress will bring in all the posts, pages, and media you exported.
Hosted®’s all-in-one WordPress Hosting solution simplifies your site management.
Benefit from an integrated package designed for efficiency.
Export From a Private WordPress Site
If your WordPress site is private, the steps we’ve explored above won’t work. In this case, you’ll need to make it public temporarily to export your content. This allows the export tool to access all the necessary data. So, to do this, you should take the following steps:
Step 1: Change Your Site Visibility
Head for your WordPress dashboard and click on Settings → General. Page down a little to the Privacy section. Now select Public to make your site public. Then click Save settings to apply changes.
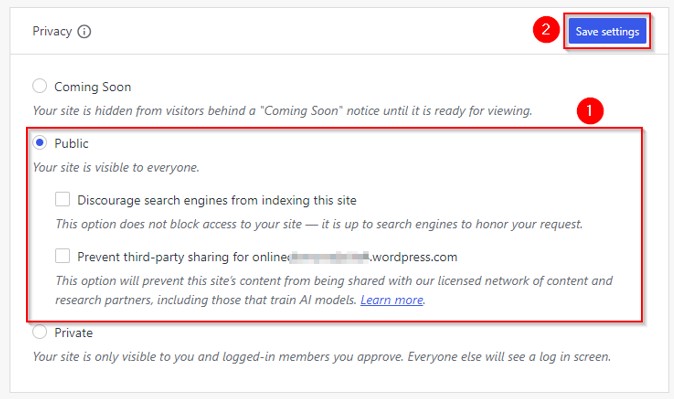
Step 2: Export WordPress Site
Once you’ve made your site public, you can proceed with the export process we covered in Steps 2 – 3 under the Export WordPress Site Using Built-in Tools section.
Step 3: Revert to Private
After the export is complete, it’s important to revert your site to private to keep your content secure. This way, only you and those you choose can see your site.
Important: When changing your site’s visibility, remember to do it quickly and check that the private setting is re-enabled immediately after exporting. This minimizes the time your site is visible to the public, helping to keep your site’s content safe and secure. Always keep a copy of your export file in a safe place for easy access whenever you need it.
Export WordPress Site with Duplicator Plugin
Duplicator is a popular WordPress plugin for migrating, copying, or cloning a WordPress site from one location to another. It lets you easily create a backup of your entire WordPress site, including the database, plugins, themes, and all site files.
This tool is useful for website owners and developers who want to move their site to a new server, make a copy of a site for testing, or create a backup before making significant changes. Here’s how to use Duplicator to export WordPress site:
Step 1: Install & Activate Duplicator Plugin
To do this, log in to your WordPress dashboard and go to Plugins → Add New Plugin. In the search bar, type “Duplicator”. Locate the Duplicator plugin and click on Install Now.
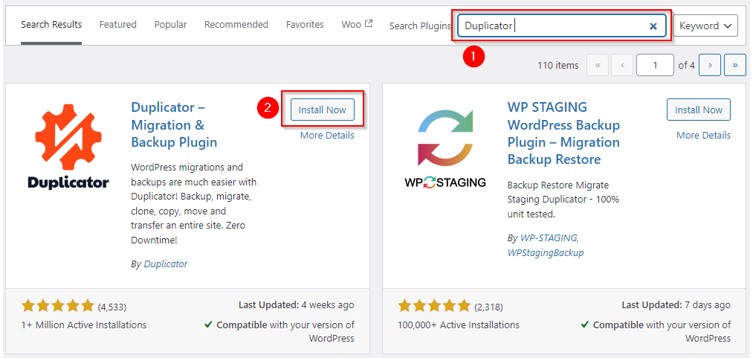
Once successfully installed, click Activate to activate the plugin on your site.
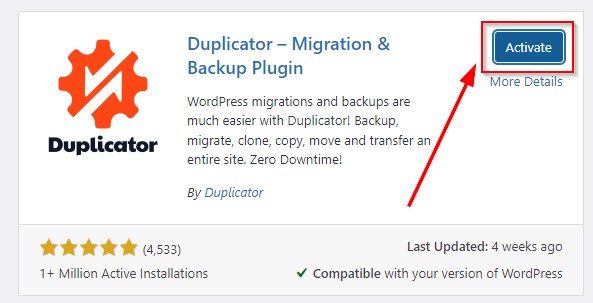
Step 2: Create a New Package
After activation, you will see a new option called Duplicator in the left-hand menu of your dashboard. Click on it. Then, click Create New to create a new package for your site. A package in Duplicator is a backup that includes all your site’s files and the database.
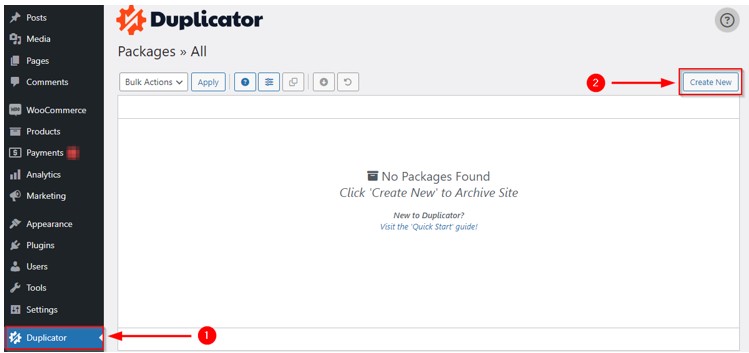
You will be prompted to name your package. You can use the default name or create a custom one. Then, click Next.
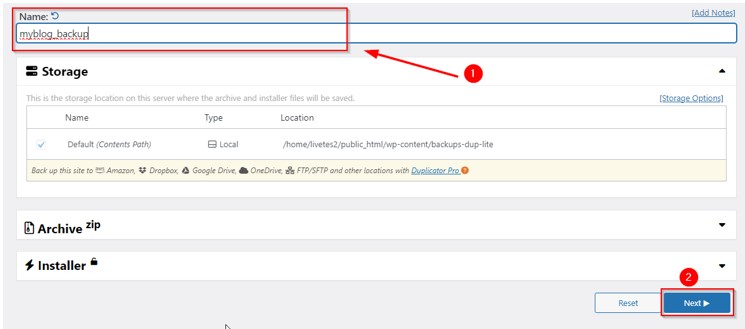
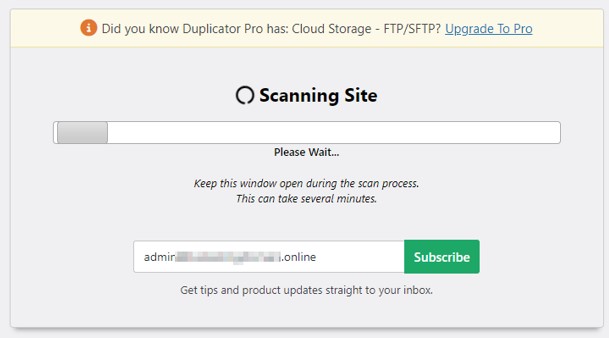
Step 3: Scan Your Site
Duplicator will now perform a quick scan of your site to check for potential issues that could affect the backup. This includes checking the size of the site, server compatibility, and other factors.
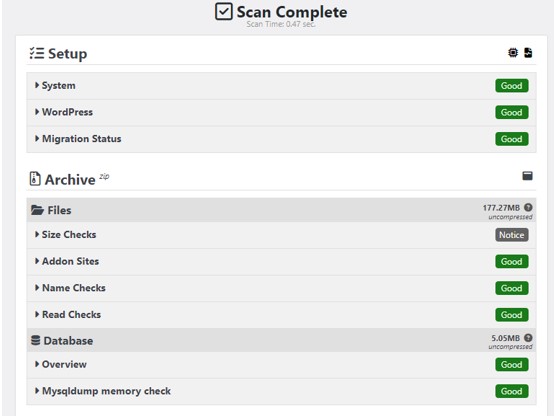
Once the scan is complete, Duplicator will display the results. Look over these results to ensure there are no major issues. If there are warnings, you may need to address them before proceeding.
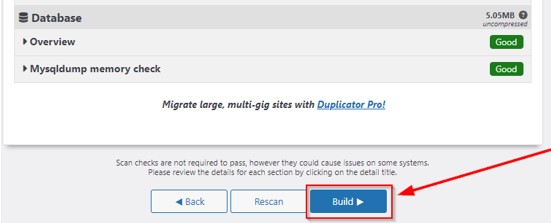
However, if everything looks good, click Build to start creating the backup package.
Step 4: Download the Package
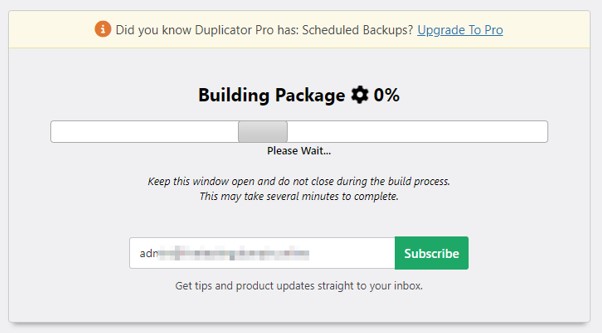
Now, wait for the build to be completed. The time it takes to build the package will depend on the complexity and size of your website.
Once complete, you will see two options for downloading – Installer and Archive. Click the Download Both Files button to download the Installer file (a PHP script) and the Archive file (a .zip file containing your site’s files and database). Save these files to your computer.
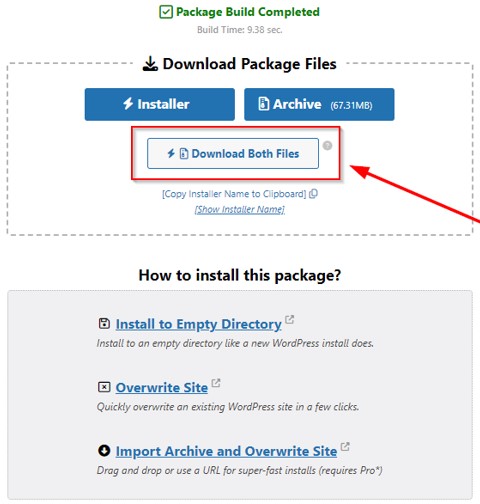
The downloaded files can now export or migrate your site to a new server or location. However, you must have Duplicator Pro on the destination website to import.
Use Hosted® to Export WordPress Site
Previously, we’ve explained how to export WordPress sites using built-in tools and how to use the Duplicator plugin to export. In this section, we’ll explain how to use the Hosted® Client Portal and cPanel to export your site’s content and database:
Step 1: Login to Hosted® Account
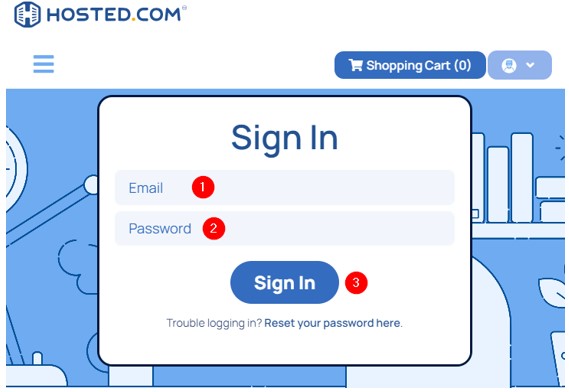
Go to your Hosted® account and provide login credentials, then click Sign In to log in.
Step 2: Access Control Panel
Once you’re in, go to Manage Services → WordPress Hosting. Then, click Manage next to your desired website’s domain (URL).

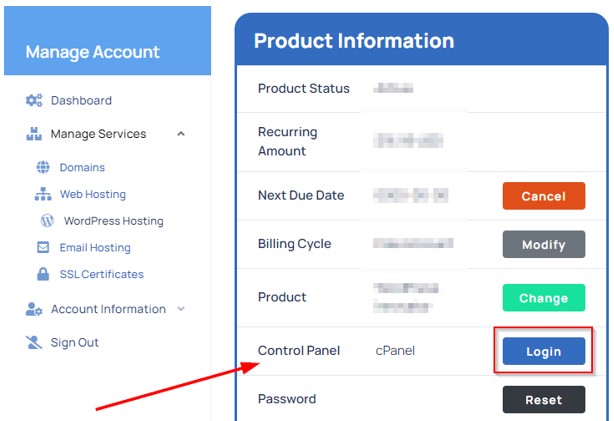
Look for the Product Information block, then click Login next to cPanel.
Step 3: Export Website
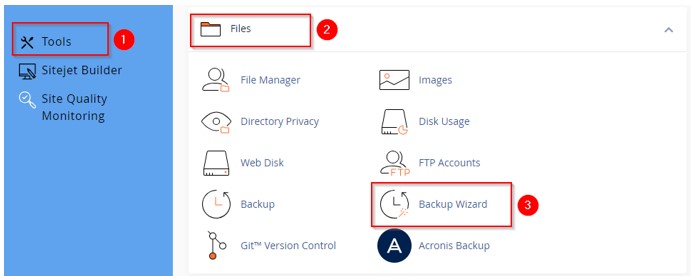
Once you access cPanel, navigate to Tools → Files → Backup Wizard.
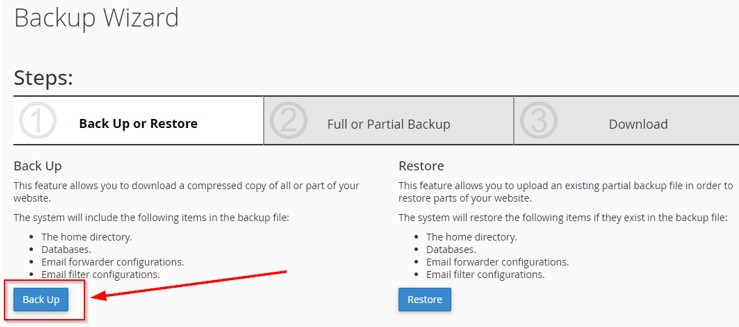
Click on Backup to download a compressed copy of all the content.
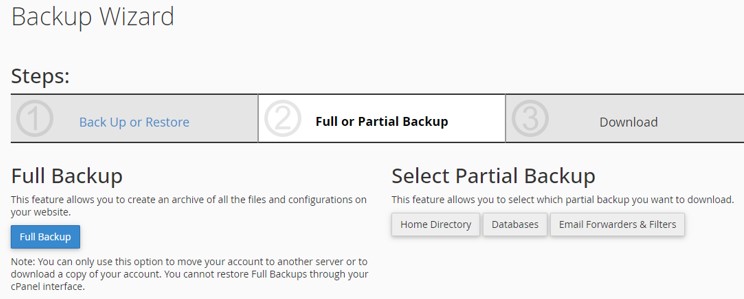
You will be asked if you want to create a full or partial backup of your website. For a complete backup, click Full Backup. But if you want a partial backup, whether a home directory, databases, or email forwarders and filters, hit the corresponding button under Select Partial Backup. For this tutorial example, we’re using a full backup.
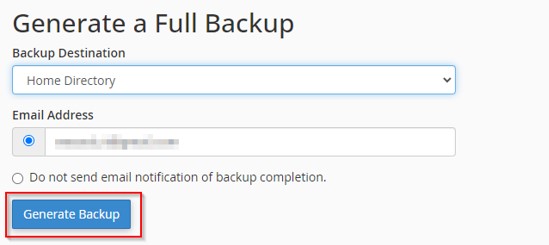
Choose where you want to save the backup (on your computer or an external drive) and click Generate Backup. You can also choose the option for an email notification when the backup is complete.
Now, the backup is in progress. As soon as it is complete, you’ll get an email at your specified email address.

Step 4: Download Backup
Once the backup is complete, click on your latest backup file to store it on your computer.
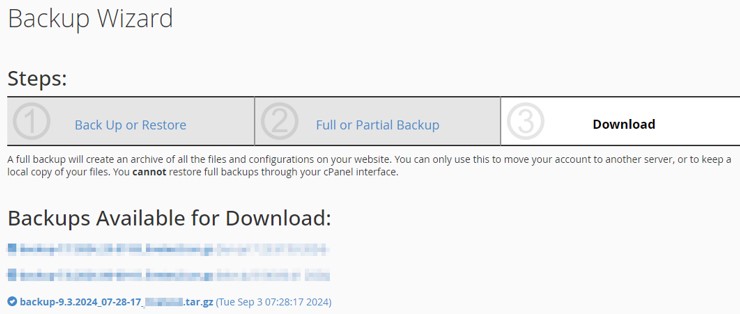
Now, you can use this backup to import your website wherever you want.
Export WordPress Site Manually Using SFTP + phpMyAdmin
Manually exporting your WordPress site using SFTP (SSH File Transfer Protocol) and phpMyAdmin is ideal for a tech-savvy person who needs full control over the backup process, or when automated tools like plugins are not available or don’t meet your needs.
This method backs up the site files and the database. It is useful in situations where:
- You want a hands-on approach and to ensure everything is backed up correctly.
- The site is too large for standard plugins to handle efficiently.
- There is a need to troubleshoot specific parts of the site, such as individual files or database tables.
- Your hosting provider does not support one-click migration tools.
So, if you’re in any of these situations, continue with the following approach.
Step 1: Set up SFTP Access
First, you need your WordPress site’s SFTP (secure FTP) credentials. Your hosting provider usually provides these and includes the server address, username, password, and port number.
If using Hosted to host your site, navigate to cPanel → Files → FTP Accounts to find your SFTP credentials.
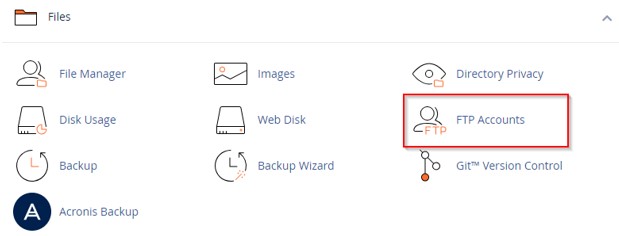
Then, locate your desired FTP account and click Configure FTP Client to see SFTP login details.
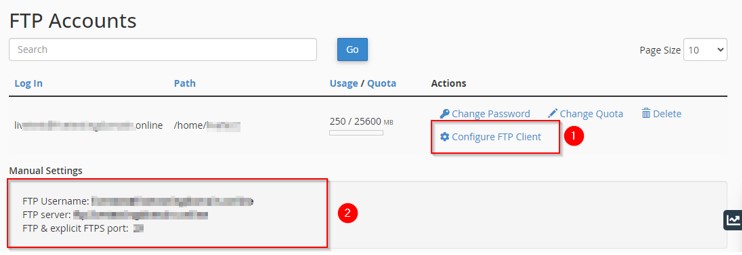
Then, install an SFTP client. You may download and install an SFTP client like FileZilla or WinSCP on your computer. These tools let you connect to your web hosting server and manage files. So, to connect to your server, open your SFTP client (for this tutorial, we used FileZilla) and enter the SFTP credentials.
Select the host (its server address), username, password, and port number provided by your host. Then, click the Quickconnect button.

Important: Remember, the FTP password is the same one we created when configuring a site in FileZilla. However, if you’ve lost your FTP password, you may reset it by going to cPanel → Files → FTP Accounts.
Once you successfully connect to your server, it’s time to download the website files. Here’s how to do it:
Step 2: Download Website Files Using SFTP
Once connected, browse to the directory where your WordPress files are stored. This is usually in a folder named public_html. Select all the files and folders inside the WordPress directory.
This includes important folders like wp-content, wp-admin, and wp-includes, as well as all individual files like .htaccess and wp-config.php. Next, drag all the selected items and drop them in your desired directory on your local machine.
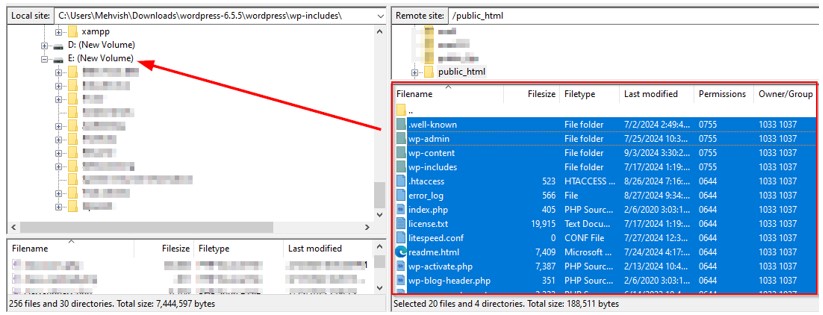
Important: This process (steps 1 and 2 in this section) will only download your site’s files, such as themes, plugins, and media uploads. It will not export the content stored in your WordPress database, such as comments, contact form entries, posts, and pages. To export database content, you need to continue with Step 3 below.
Step 3: Export Database Using phpMyAdmin
To do this, log in to your web hosting control panel (like cPanel). Find and open phpMyAdmin, a tool used to manage MySQL databases. If you’re a Hosted user, you can locate phpMyAdmin at cPanel → Databases → phpMyAdmin.

Once inside phpMyAdmin, you’ll see a list of databases on the left side. Click on the database that corresponds to the WordPress site. If you’re unsure which one this is, check your wp-config.php file in your WordPress root directory for the database name. Then, click the Export tab at the top of the phpMyAdmin interface.
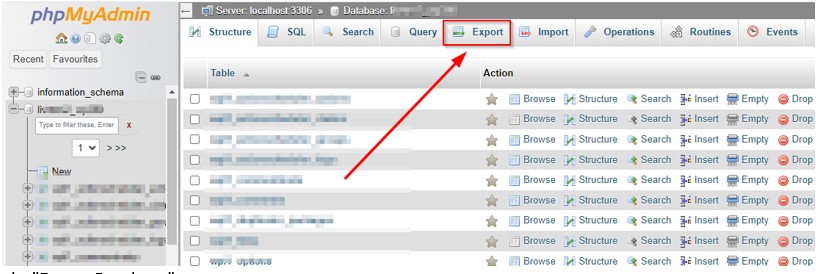
Now, choose the Quick – display only minimal options export method, which will export the entire database. Make sure the format is set to SQL, and then click Export.
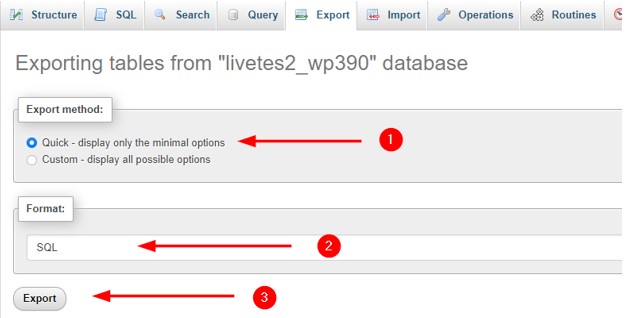
The database will now be exported as an SQL file and downloaded to your computer. Save this file in the same location as your WordPress files for easy access. Now use this backup data to restore or migrate your site.
Furthermore, we recommend duplicating these backup files and storing them in another location, such as an external hard drive or a cloud storage service. This ensures you have multiple copies in case one gets corrupted or lost.
Important: If you’re exporting your website from a different website builder to WordPress, you can’t use these methods as they are only for WordPress-to-WordPress migration. In this case, you may need to consult experts.
![Choose Hosted® For A Fully Integrated WordPress Hosting Solution Strip Banner Text - Choose Hosted® for a fully integrated WordPress hosting solution. [Get Started]](https://www.hosted.com/articles/wp-content/uploads/2024/09/export-a-wordpress-site-1-1024x229.png)
FAQs
Why should I export WordPress site?
Export your site for backups, migrations to new hosts, or moving from a development environment to a live website. It keeps your data safe and easy to restore.
What is the easiest way to export WordPress site?
The built-in WordPress export tool is the simplest way to export your site’s content.
Can I export only my images and videos?
Yes, you can export these media files by going to Tools → Export to export the media library.
What is Duplicator, and how does it help with exporting?
Duplicator is a plugin that creates a complete copy (package) of your site, including files and database, which you can easily move or back up.
How do I export WordPress site using SFTP?
Connect to your site using an FTP client like FileZilla, navigate to your WordPress root directory, and download the files to your computer.
What is phpMyAdmin? Why is it used to export WordPress site?
phpMyAdmin is a tool that can help you manage your database. It lets you export your WordPress database, which stores all your content and settings.
What should I do if my site is private?
Temporarily make your site public for the export process and switch it back to private immediately afterward to keep your content secure.
Where do I save the exported files?
Save the exported files on your computer in a safe location, like a backup folder, and consider storing them on an external drive or cloud storage for extra security.
Other Related Tutorials & Blogs:
– How To Fix ERR_SSL_BAD_RECORD_MAC_ALERT Error
– How To Fix PR_END_OF_FILE_ERROR Connection Error
– How To Fix ERR_OSSL_EVP_UNSUPPORTED Error
– How To Fix ERR_UNKNOWN_URL_SCHEME Error
– How to Fix ERR_CONNECTION_TIMED_OUT Error


